DIY New Year's masks for children - templates. DIY New Year's masks
The main attribute of the carnival is, of course, the carnival mask. If you want to spend New Year's Eve unforgettably, then with the help of this accessory everyone will turn into mysterious heroes: princesses, princes and handsome men. The store selection of carnival masks does not please us, so I will tell you how to make a mask for the New Year with your own hands.
And if you have already made your New Year’s mask, I recommend checking out other New Year’s themes:
How and what to make a mask from
First you need to decide on the shape and design of the mask. Whether you will be a stranger, a Venetian beauty, Cinderella or a Chanterelle on New Year's Eve is up to you to decide.
So, we decide and decide what and how we will make the mask. And will it be a half mask or will it completely hide the entire face. In half masks, the face is recognizable, and if you want to completely hide your face, I recommend reading the previous post about papier-mâché masks, which were written about
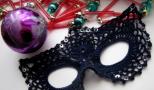
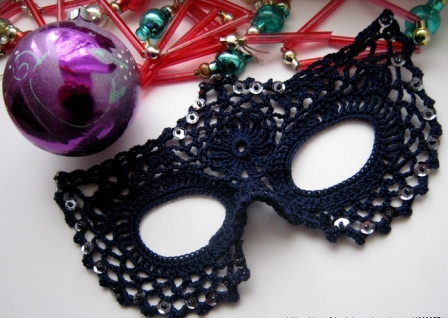
Here is one of the options for a New Year's lace mask - a crocheted mask. I give the diagram below. It is enough to knit such a mask and starch it well so that it keeps its shape. Refined and tasteful.
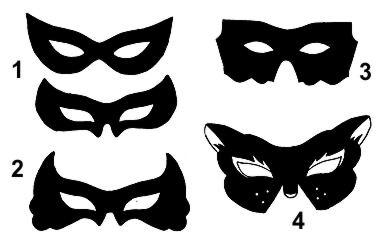
Here is a version of fabric masks. For them you need to draw a stencil. These can be masks with corners going up, covering the nose, or strict male versions. The imagination here is limitless.
Or you can print this stencil after enlarging it to the desired size.
Once you have cut out the template from paper, try it on. If somewhere is inconvenient or in the way, we trim off the excess. When everything is in order and the eyes are exactly where they need to be, apply the mask template and cut out the same one from non-woven fabric.
Almost any fabric is suitable for a New Year's mask. Cotton, velvet, silk - these are the best fabrics for elegance. Take the fabric and smooth it out. Place interlining on the wrong side with the adhesive side and iron it with an iron.
We make holes for elastic bands along the edges of the mask. We cut out the mask from the fabric along the contour and proceed to the most interesting part - decorating the mask. This can be done with any materials: buttons, rhinestones, sparkles, feathers, beads. You can decorate the slots of the mask or embroider it with beads. You can also sew a veil to the mask and decorate it with rhinestones.
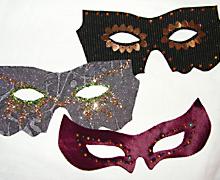
Ideas for carnival masks in the photo


At a New Year's party or masquerade ball, the most impressive detail is the mask. It adds some zest and intrigue to the holiday look, making it even more vibrant and memorable.
Nowadays you can find a great variety of different masks on store shelves, but wouldn’t it be better to make it yourself, taking into account all the features and important touches. can be done in just one evening, without using expensive materials.
First, you need to understand for whom you need to make this accessory, because it can be for both children and adults. Masks for a matinee in kindergarten or school must be combined.
For example, if your child dresses up as a bear, then you should try to make the face of this animal from available materials.
You may also need a New Year's mask if you are organizing a festive masquerade for your employees at work. Take note of a few ideas presented in this article, and perhaps soon you will be able to surprise all your friends or colleagues with originality and impeccable taste.
Colorful mask for children
- artificial flowers;
- felt;
- bright ribbon;
- glue (glue gun);
- sequins.
Step 1. To begin, draw a mask. It is advisable to choose the standard option, so you can be sure that the product will suit everyone. Now place the template on the felt and mark it. It is better to make holes for the eyes by placing felt on the child’s face and marking their approximate location with a pencil.
Step 2. For artificial flowers, you need to separate the petals and glue them onto felt in the order you like. It is better to do this using hot glue or super glue. This way you can be sure that the decoration will not come off.
Step 3. Now you need to decorate the holes around the eyes with sequins. The photo shows how this can be done.
Step 4. Take the tape and stick it to the back of the mask. Make the ends slightly larger than the circumference of the child's head so that the remains are not too large. Your bright mask is ready!
Original paper mask

To make a paper mask you will need:
- thick cardboard;
- stationery scissors;
- stationery knife;
- elastic thread or elastic band;
- markers, felt-tip pens or pencils;
- hole punch (you can do without it).
Step 1. Fold thick cardboard in half.
Step 2. Mark with a simple pencil where the eyes will be located on your mask and cut holes using a stationery knife.
Step 3. Make small holes for the elastic.
Step 4. On the cardboard itself you can draw the face of any animal, even a cat, even a dog, even a pig. It all depends on your imagination and perseverance.
Bright carnival mask

To make such a mask you will need:
- mask (buy a ready-made mask at a specialty store or make one from cardboard);
- decorative feathers (multi-colored);
- sparkles, sequins, rhinestones;
- super glue or hot glue;
- toothpicks.
Step 1. First of all, decide how you will decorate your mask. It should blend harmoniously with your suit, so try to choose colors based on its coloring.
Step 2. Now carefully glue the rhinestones to the mask. To do this, you can use a small brush or toothpick - dip them in glue and apply to the surface around the eyes.
Step 3. You can decorate the mask at your discretion: apply rhinestones on the top, and sprinkle sparkles and sequins on the bottom.
Step 5. All that remains is to attach a bright ribbon and adjust its length.
Step 6. Leave the accessory to dry out of the reach of children.
Stylish New Year's mask

To make a New Year's mask you will need:
- mask pattern (classic);
- colored thick fabric (any color);
- thin fleece (for lining);
- needle and thread;
- scissors;
- pins;
- various decorations;
- ribbon (in our case, velvet).
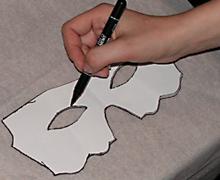
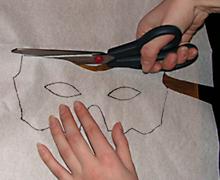
Step 1. Attach the pattern of the mask from the fabric and outline its outline. To keep it securely, attach it with pins. Then cut out the mask.
Step 2. You can use lace as decoration, after cutting off the seam on one side.
Step 3. Attach the lace to the back of the mask with pins, gathering them a little, as shown in the example.
Step 4. Carefully sew the lace to the main part and cut off the rest.
Step 5. Attach a velvet ribbon under the lace.
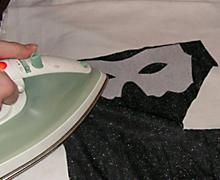
Step 6. Now you need to sew on the lining fabric to make the mask look more voluminous. To do this, transfer its outline to the fleece, make slits for the eyes and stitch.
Step 7 You can decorate the mask itself, made with your own hands, on the front side as you wish. In the example, a small spider and a snowflake are used. If you don't have such details, come up with something of your own. In any case, the craft will look bright and elegant.
Classic New Year's mask

To make a mask you will need:
- thread and needle;
- scissors;
- thick cardboard;
- soft tape or elastic band (not thick);
- nail polish;
- awl;
- various decorations (rhinestones, beads, sequins);
- lace;
- satin fabric.
Step 1. On paper, transfer a mock-up of the mask, which you can find on the Internet or draw yourself from memory.
Step 2. Attach the sheet with the design to the cardboard and trace it.
Step 3. Carefully cut holes for the eyes.
If you are going to celebrate a holiday in an unusual way, be it New Year, a party or a birthday, then you can prepare a mask for yourself and maybe for the other participants for this occasion.
Making a mask is not difficult, you just need to know a few simple rules and have the necessary materials with you.
You can find several not-so-complicated master classes on making masks here, including New Year's and carnival masks, as well as masks for children and adults.
DIY carnival masks
You will need:
Scissors
Black fabric paint
Cling film
Template for a mask.
Glue (moment, superglue, fabric glue)

1. Prepare a mask template using paper and a marker or printer and place it on the table. Cover the template with cling film.

2. Prepare the tulle and cut a rectangle from it with dimensions of approximately 25 x 13 cm.

3. Start outlining the black part of the mask using fabric paint.

4. Let the paint dry and then carefully remove the tulle from the film.

5. Cut out the mask, including the holes for the eyes.

6. Prepare the ribbon and cut 2 pieces from it, each approximately 50 cm long.

7. Using glue, attach the ribbons to the mask. Let the glue dry.

You can make the ribbons shorter. The main thing is that you can tie them loosely.
How to make a cat mask

You will need:
Scissors
Lace trim
Satin ribbon
Small decorative feathers, if desired
1. Cut the lace trim so that you get two equal parts.
2. Connect the binding halves as shown in the image. This should be the main part of the mask. Secure in the middle with glue.
3. Cut off unnecessary parts to obtain the desired shape.
4. Glue the feathers so that they resemble cat ears.
5. Prepare a satin ribbon, cut it into two equal halves and glue each part to the left and right ends of the mask.
How to make a Halloween mask

You will need:
Nylon mesh
Lace
Scissors
Super glue
Sticky aerosol

1. Prepare a mask template first.

2. Place 2 rectangles of nylon mesh and lace on the mask design (lace first, and mesh on top). Each rectangle measures approximately 25 x 13 cm.
3. Connect the fabrics together using adhesive spray. Place the workpiece under something heavy and wait a little.
4. Using scissors, cut out the mask, including the eye holes.

5. Prepare the tape, cut it in half and glue each half to the mask so that you can put it on.
DIY New Year's masks

You will need:
Artificial flowers
Sequins.

1. Cut out a mask from felt, after drawing it with a simple pencil. To make it easier to figure out where to cut the holes for the eyes, place the mask on your face and trace the approximate location with a pencil.

2. Separate the petals from the artificial flowers and glue them to the mask the way you like.


4. Glue or sew the tape to the back of the mask so it can be worn.


DIY paper mask

You will need:
Scissors
Stationery knife
Thread (preferably elastic) or a not very wide elastic band
Pencils/markers, etc.
Hole puncher, if desired

1. Prepare a sheet of thick paper or cardboard and fold it in half.
2. Using a utility knife, cut out holes for the eyes.

3. Using a hole punch or knife, make holes for attaching thread or elastic.
4. Decorate the mask to your taste. If it's an animal, you can draw a nose, whiskers, ears, etc.

How to make a carnival mask

You will need:
A sample mask (can be found in specialty stores) or cut a mask out of cardboard.
Multicolored feathers
Sequins
Super glue
Toothpick

1. Prepare a sample mask and think about how you want to decorate it.
2. To carefully glue the rhinestones, use glue and a toothpick - dip it in the glue and apply it to the mask. Glue rhinestones around the eye holes.

3. You can glue rhinestones on the top side of the eye hole and apply glitter on the bottom. To do this, apply glue to the bottom and carefully sprinkle glitter on it.

4. Also use glue to add colorful feathers. You choose how many feathers and where they will be placed yourself.

5. All that remains is to add an elastic band or tape to put the mask on and leave the glue to dry.

DIY cardboard mask

You will need:
Scissors
Leaves of different colors and sizes
Sticks, twigs, seeds, feathers, etc.

1. Cut out a mask from cardboard
2. Glue the leaves as shown in the image (or choose your own option) to make the mask look like an Indian attribute.
3. Start decorating the mask with various details to suit your taste, the main thing is not to overdo it and do everything symmetrically.
How to make a mask out of paper. Decorate with paper roses.

You will need:
A simple papier-mâché or plastic mask (without drawings or patterns), purchased in a store or you can cut it out of cardboard yourself
Corrugated paper
Scissors
Feathers, optional

1. You will need to cut approximately 25 strips of crepe paper. Their length can vary from 25 to 40 cm. Fold each strip in half.

2. To make a rose out of a paper strip, start rolling it as shown in the picture. As you curl the paper, turn the strip 180 degrees. To keep the flower in place, you can secure some places with glue.

If you want to know what other flowers can be made from paper, check out our articles:
3. Start gluing the roses to the mask. Add glue to the bottom of each flower.

4. If desired, you can add decorative feathers.


You can try using different colors and types of paper.
DIY masks for children. Animal noses.

You will need:
Cardboard packaging for eggs
Tassels
Rubber
Thread and needle
Thick paper
Scissors

1. Take the egg packaging and cut out the parts with indentations - they will play the role of noses, which then need to be decorated.
2. To be able to breathe through your nose, make several small holes in the workpiece - use a needle or nail.

3. Start decorating the cardboard nose in the colors of your favorite animal. Draw in some details such as nostrils, teeth, etc. Look in books or on the Internet to see what animals look like to better create a mask.
4. Prepare thick paper and cut out antennae from it. Glue them to the workpiece.
5. All that remains is to sew on the elastic so that the nose can be put on.
New Year's masks for children

You will need:
Mask pattern
Fabric (in this example the color is purple)
Lining fabric (thin fleece);
Lace (in this example the color is black)
Thread and needle
Scissors
Pins
Velvet ribbon
Decorations.

1. Prepare the main and lining fabrics and use a pattern to cut out the details of the mask.

2. If your lace has a seam on both sides, you need to trim the seam on one side.

3. Using pins, attach the lace to the sides of the mask (you need to do this from the wrong side), while making small folds.

4. Now you need to sew the lace to the main part and cut off the excess.


5. Insert the velvet ribbon under the lace and secure it with pins.

6. Using a sewing machine, sew the lining fabric to the main part, as well as the eye holes.
7. Decorate the mask to your taste, for example, you can add a small spider or snowflake.

DIY masks (photo)


DIY Venetian masks


New Year's holidays are a time of carnivals, miracles, etc. Only at this time can an ordinary person turn into a fairy-tale character and, leaving all everyday worries, have a lot of fun. Children also look forward to New Year's parties. To look decent at the holiday, take care of your carnival outfit! A bright mask will add a touch of mystery to your image.
Nothing will complement your New Year's look better than a carnival mask!
If you didn't have time to prepare your costume, it doesn't matter. It is enough to make an original mask in an hour, and it will be able to turn your ordinary evening clothes into a fabulous outfit. This idea can also be used when preparing a child for a matinee. A cardboard or felt mask of some animal will complement children's clothing well. Without extra expenses, your baby can become a cute little bunny, a cunning fox or a fierce tiger. At the end of the article you will find a whole selection of masks that you just need to print and cut out!
 Show your imagination - and your New Year's Eve will be simply unforgettable
 Well, for lovers of photo shoots, we have selected a set of masks, glasses, mustaches and lips that will enliven any New Year's party. Just print them out on a color printer, stick them on thick cardboard and cut them out! The blanks need to be attached to wooden kebabs, and then armed with them for a festive photo shoot. But first things first...
Paper mask for children
 Very simple and funny masks for children's creativity
 Delight your kids with fun paper masks. You can make them together with your child. Prepare the following materials:
- cardboard
- scissors
- stationery knife
- elastic thread or narrow rubber band
- hole puncher
- pencils, markers, paints
 Making masks will require a minimum of tools and materials from you.
 Fold a sheet of cardboard in half. Use a utility knife to make cutouts for the eyes. Use a hole punch to punch a hole for the thread or elastic. You can decorate the mask however you like. For example, draw an animal on it. Draw a mustache, nose, ears. Attach an elastic band to keep the mask in place.
Openwork carnival mask
 The complexity of an openwork mask depends only on your imagination
 To make a lace mask you will need:
- scissors
- ribbon
- cling film
- sample
- fabric glue
- black fabric paint

 Preparing the polyethylene base and pattern
  Step-by-step instructions for making an openwork mask for the New Year
 Print or draw a mask template on paper. Cover it with film. Cut a rectangle measuring 25 by 15 cm from tulle. Outline the mask ornament with fabric paint. When the paint has dried, you can remove the tulle from the film. Carefully cut out the mask and make slits for the eyes. Divide the prepared tape into two parts of 50 cm each. Apply glue to the ends of the tape and attach it to the mask. After the glue has dried, the product will be ready.
Bright felt mask
 Bright "rooster" mask made of artificial flowers
 A very colorful and elegant mask will not leave anyone indifferent, especially during a meeting. To make it, prepare:
- artificial flowers
- sequins
- tape
 Step-by-step instructions for creating a felt mask
 Draw the outlines of the mask on a piece of felt and cut it out. To make holes for the eyes, try on the mask and mark with chalk the places where you need to cut out the fabric. Remove several petals from the prepared artificial flowers and attach them to the mask with glue. Cover the eye holes with sequins. To ensure that the mask can be worn, sew a ribbon to the inside of the product.
 This mask will come in handy not only for the New Year, but also for Halloween!
 A mysterious and spectacular accessory for a mysterious stranger. It can be made from fabric and lace. To work you will need:
- mask template
- beautiful fabric
- lining fabric
- lace
- thread and needle
- scissors
- pins
- ribbon
- decorations
 Preparing materials and creating a cardboard base
  Step-by-step instructions for making a fabric mask
 Make a mask template from cardboard. Draw the outline of the pattern onto the main and lining fabric. Cut out the workpiece. On the inside of the product, use pins to secure the lace on the sides, making small folds. Sew the lace to the mask with threads and cut off the excess parts. Attach the ribbon for the ties to the back of the workpiece. Using a sewing machine, sew the main fabric to the lining fabric along the contour. Don't forget the eye holes. They also need to be trimmed. Decorate the mask to your taste.
Animal masks

These masks are the easiest to make and require almost no financial costs. Materials:
- A4 sheet of paper
- crayons, paints, pencils
- scissors
- hole puncher
- scotch
- rubber
Print the template you like on an A4 sheet. To prevent the mask from being too soft, stick the printout onto cardboard. If the drawing is printed on a black and white printer, color it with your children. Use sharp scissors to cut out the mask. There are small circles on the sides - these are the places where you need to punch holes for the elastic using a hole punch. Paper masks often tear at these points - glue the holes with tape. Tie on the elastic and adjust the length so that the mask fits snugly, but not tightly, on your face.
Paper mask templates for children


Templates for a New Year's photo shoot
 Simple cardboard cutouts will liven up any holiday party!
The tradition of dressing up as various characters on New Year's Eve is firmly rooted in our society, but it is especially popular among children. Not a single children's party is complete without funny little characters who reflect the leading trends of our time. For example, at the beginning of the 20th century, every boy dreamed of dressing up as a funny mouse, Mickey Mouse, and girls imagined themselves as his girlfriend. Today, carnival costumes of princesses, fairies, Spider-Man, and other colorful cartoon characters are in particular demand among the younger generation. And of course, the carnival masks that complement the image have not lost their relevance, which we will talk about now.
DIY New Year's carnival masks for children
On the eve of the holiday, the most varied masks imaginable appear on sale. These are products that cover the entire face, or only half of it, on a stick, or those that are attached with an elastic band, flat and convex, and there is no point in talking about design at all. But when it comes to New Year's masks for children, handmade products have been and remain a priority. Firstly, they fully correspond to the concept and style of the chosen image. Secondly, during the manufacturing process the size and features of the child’s face are taken into account. Thirdly, before making New Year's masks for their children, parents themselves choose the material, decorative elements and method of attachment, which relieves them of unnecessary worries about the health of their children. After all, not all manufacturers can be called conscientious, and there are often cases when products for children are made from low-quality and sometimes unsafe materials.
Now that we have discussed the main advantages of homemade New Year's masks for children, let's talk about how to make them.
How to make a New Year's mask for a child?
In most cases, when choosing an addition to a carnival costume, adults give preference to simple products made of paper and cardboard.
Making these New Year's masks for children with your own hands is very simple - you need to find a ready-made template, print it on a color printer, cut it out and attach fasteners. Fortunately, there are plenty of different options on the Internet. There you will find: New Year's monkey masks, which children will surely like, masks of other animals, masks of the most popular cartoon characters, retro-style masks, for example, a nutcracker mask, in a word, everything your heart desires. Making a mask will take no more than half an hour, and this is the obvious advantage of this method.
If such a simple option is not acceptable to you, instead of a ready-made template, you can use a stencil, which will allow you to design the product at your own discretion. Stencils of New Year's masks for children can also be found on the World Wide Web, or you can make them yourself by choosing a shape and taking measurements. In addition, future owners can be involved in the manufacturing process. So young ladies can easily glue rhinestones or sparkles, and little knights can master a brush and paints.
If ordinary flat products seem boring to you, experiment with voluminous elements. For example, New Year's animal masks for children can be supplemented with protruding ears, mustaches, and feathers. And an elegant half mask of a fairy or a mysterious princess can be decorated with beads, covered with lace, embroidered with sequins or glued with a beautiful braid.
Below we invite you to view a gallery of ready-made templates for New Year's masks for children (boys and girls), which you can turn into a finished product with your own hands in 15 minutes.
 |
 |
 |
 |
 |
 |
 |
 |
|