How to make a crystal out of paper with your own hands. Paper crystals for a holiday garland
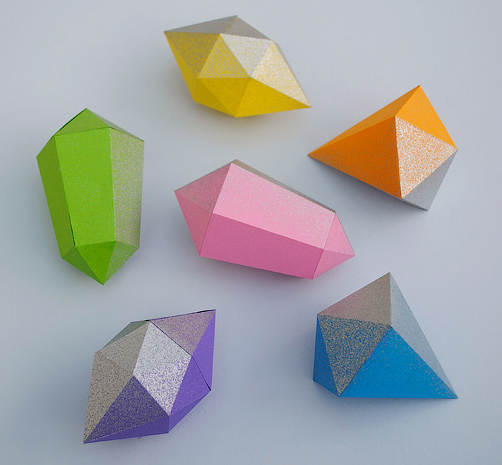
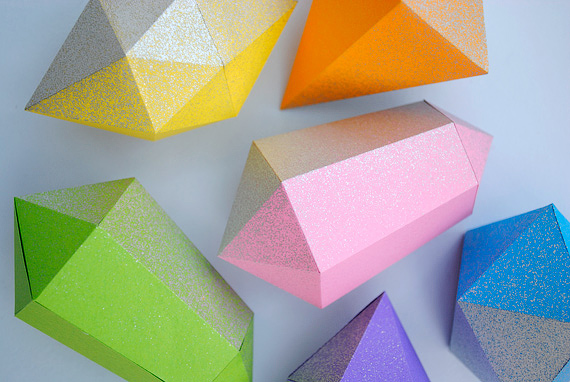
We will cut out these original paper figures in the form of crystals and glue them together according to the diagram. I think everyone will find their own use for voluminous paper crafts. They can be strung on a thread and made into a garland, decorating a holiday, party, birthday, or simply decorating the interior.

There are only three types of figure patterns that can be made in different colors to obtain the desired variety. It looks impressive if you spray a can of silver paint on one side of the crystal.
Just place the figures on a sheet of paper and lightly spray the paint, then let it dry. The main thing is to achieve a light effect, do not overdo it. Then the glitter effect will appear.
How to make paper figures
For three-dimensional paper crafts, we will need diagrams. Chip circuits can be or.
Colored paper for printers. Packages are already sold in several colors. Also additional tools are a ruler, scissors, a needle or a knitting needle. First, take and print the downloaded diagrams; you can enlarge or reduce them as desired. In the diagram, the details are labeled in accordance with the figures in the photo.
Some crystals consist of three others of two parts in the diagram. After printing, cut out the parts along the contour. We apply a ruler to the dotted lines and draw them with a knitting needle. This way we make a hollow in order to make it easier to bend the part along the fold line. Now all that remains is to glue the parts together, combining all the components and the crystals are ready.
The best decoration for your home is a homemade decoration. After all, you put your soul and strength into it, and the result is always so different. Therefore, it is worth learning how to make a diamond out of paper. Finding a use for such a cute little thing is quite easy.
Volumetric diamond
The main thing in the question of how to make a diamond out of paper in volume is the template. You need to print it on paper. It’s better to go straight to the one from which you want to make a craft. Cut out the template and draw a needle along all the lines (this is necessary to make bending easier). Do this along the line. Now, based on the photo of the finished result, bend the cut out shape. The protruding triangles are the part that glues the diamond together. As you can see, everything is quite simple.

This was not the only way to create a 3D diamond. There is another one, its template is even a little simpler. Do the same as in the first method and glue the trapezoid pieces to the base of the diamond (hexagon).

Another option for using volumetric diamonds is a garland. To create it, make holes on both sides in each part and pull the thread through them. Make knots where the thread enters and exits the diamond. This will prevent the diamonds from bunching together.

Octahedron
How to make a diamond out of paper easier? Print out the octahedron net. Draw a needle along the fold lines and glue in the right places. From a distance, the figure quite resembles the one you need.

This is great if you need to create something like a fancy diamond curtain. Translating the patterns proposed above, drawing a needle along each line and assembling a diamond is much more difficult than an octahedron. And with a large number of octahedra, just the right impression is created!

Box
How to make a “Diamond” box out of paper? Print the provided template. The sides of the diamond itself are marked in pink and orange, and the places with the help of which the craft is glued together are marked in white. The hexagon is the lid of the box.

To create a large diamond-shaped box you need:
- Whatman sheets.
- Gold duct tape.
- Clear adhesive tape.
- Scissors.
- Ruler
- Pencil.

Progress:

Origami

How to make a diamond out of paper using the origami technique:

Quite a complex assembly diagram. It may not work out the first time, but don’t despair and keep trying!
Now you know how to make a diamond out of paper. You are unlikely to find a use for one copy, but if you make a lot of multi-colored diamonds, then there is a lot of scope for imagination. For example, take a clear vase and fill it with these jewels, or place them in a flower pot. Looks very cute and stylish. Don't throw away the template; you'll probably need it again. After all, such decoration will brighten up any boring interior!
Today in our master class you will learn how to make an origami crystal out of paper with your own hands. It’s not difficult to create such a paper crystal using the modular origami technique, especially since we have prepared for you step-by-step instructions with photos and a diagram illustrating the step-by-step folding process.
Tools and materials Time: 30 minutes Difficulty: 4/10
- 6 sheets of metalized origami paper, twice as long as wide. We took pieces 5 x 10 cm.
Simple crafts are the best because most of us can do them! This origami crystal is created using the modular origami technique, and all you need to make it is a few sheets of gold-colored metallic paper.
Step-by-step instructions with photos
This origami crystal is created from 6 identical folded figures that are inserted into each other. The steps and folds on this model are quite simple and the result is a faceted ball with a lot of dimensions.
This is a quick and easy project that looks very complex when your work is finished. A little effort and time - and a gorgeous precious origami crystal made of paper is in your hands!

What you will need:

Step 1: Fold the Corners
Take one of the gold metallic origami paper pieces. Place it face down in front of you.
Fold the top right corner down toward the bottom center point of the rectangle. After this, fold the lower left corner up to the top center point of the rectangle.

Step 2: make a square
Fold the lower right flap up along the center line. In the same way, fold the top right flap down along the middle line.

Step 3: Fold the Corners
- Fold the bottom free corner upward to the middle line.
- Fold the top free corner down to the middle line.
- Gently straighten out the folds.
One of the modules is ready! Repeat steps 1-3 with the remaining 5 sheets of gold metallic paper.

Step 4: Assembling the modules
When all 6 modules are ready, it's time to assemble the crystal. Insert one triangular flap into the middle of the second flap.
Connect these two modules with another one by pressing the triangular flaps and inserting the third module into them on both sides.

Insert two more modules into one of the three parts in the same way. Finally, attach a free module to the last two inserted parts and assemble the structure into a ball.

A sparkling modular origami crystal made of paper is ready! We hope that the folding scheme we described in the master class did not cause you any difficulties during the work process.


