Modular origami – Cactus. Cactus with yellow flowers How to make a cactus in a paper pot
Exploring the world is fun. Doing something with your own hands is interesting. Working with paper is easy. With its help you can do almost anything, even what seems impossible, for example, paper cactus. How? Let's find out further.
To work you will need:
- small glass/lid;
- container from the Kinder toy;
- plasticine;
- green corrugated paper;
- acrylic paint/gouache;
- sponge/brush;
- cocktail straw;
- scissors.

Step 1. Making a cactus pot
Any small glass or syrup cap will serve as a base. The main thing is that the base for the cactus (plastic egg) does not fall completely into the container. You can decorate the pot in different ways: with fabric, rope, etc., or simply paint it with bright acrylic paint, as in our master class.

Step 2. Making the base for the paper cactus
We completely cover the plastic container from the Kinder egg with plasticine 1-2 mm thick.


Next, place the egg covered with plasticine in the pot and press it a little so that a mark remains from the edges of the cup - these will be the boundaries for placing the soft spines of the cactus. 
Step 3. “Growing” the cactus
When the base for the cactus is ready, we begin to prepare its non-thorny spines. To do this, we cut corrugated paper into strips 1 cm thick, and then into pieces of 1-2 cm.

Now let’s get straight to creating the “spines”: attach a cocktail tube to the center of the pieces of corrugated paper. We twist the paper around the tube.

We press the rolled paper against the base with plasticine so that the “spines” are fixed to it.

This way we fill the entire surface of the cactus. This can be done by holding the base in your hands or placing it in a pot.

How to easily and quickly make cacti from paper in pots, which can be used as props for children’s games, interior decor, props for creative photo shoots, and even as decorative boxes for storing useful little things - you will learn about this in detail from this master class .
I would like to note right away that it is quite possible to make such cacti together with children. It’s not difficult at all, especially since ready-made templates simplify the work as much as possible. Although, having mastered the principle, you can come up with and implement your own cactus designs.
Required materials and tools:
office paper (for printing templates);
thick colored paper or colored cardboard;
corrugated cardboard (3 mm thick) and micro-corrugated cardboard (1.5 mm thick);
standard (or stationery) knife or scissors;
scoring tool (for example, a compass, a non-writing ballpoint pen, etc.);
glue stick;
hot glue gun.
Download templates for making paper cacti (4 options) and flower pots below.
- Hand cut templates:
- Templates for plotter (DXF, SVG, Studio3):
Paper flower pot
Making a flower pot is very simple. You need to cut out only 4 parts from thick colored paper.
I very successfully found terracotta-colored pastel paper, and the pots will look like ceramics.
If, like me, you cut out parts on a cutting plotter, then across the arc parts (at one edge) you will see dashed slots, as for fold lines. But this is not for bending, but simply a border along which you need to align the second edge of the part when gluing.
If you are cutting by hand, simply use the tip of your knife to make a couple of marks along the blue dashed line.
We bend the teeth along the bottom edge of the large part of the pot inward and glue the side edges of the part. To do this, lubricate with a glue stick the edge where the gluing boundary is marked, along the front side. And connect the edges.


Lubricate the second part of the bottom completely with glue and glue it to the outside of the pot.

Before gluing the strips, use a ruler to make a few pencil marks along the center line of one of the strips.
Then apply glue to just the bottom half of the strip and cover the pot with it, aligning the top edge of the pot with the pencil marks on the strip.
At the same time, connect the first end of the strip to the seam on the wall of the pot.

Lubricate the other end of the strip with glue along the entire width. 
Lubricate the second strip with glue along the entire inner surface. Align the end with the seam on the first strip and tape around.
Such a two-layer bezel will look more prominent.

Our flower pot is ready. It turned out about 8 cm in height and in upper diameter.
Now let's prepare the cacti for planting in pots.
Paper cacti
There are many options for making a cactus out of paper. Our template kit will help you make 4 varieties of cute cacti.
Let's take a closer look at the manufacturing principle using one of the options as an example.
Cut out all the details of the cactus from thick colored paper (or colored cardboard).
When cutting by hand, first punch the pieces along the fold lines.
When using a plotter, the fold lines will already be cut.

We bend all the spines outward, and also bend the parts along the fold lines.
Glue the cactus parts together in pairs (use a glue stick), as shown in the photo. We do not glue the lower valves and spines together.

And then we glue all the blanks, aligning the edges. We insert the cactus shoot part into the corresponding slot.

By the way, if you use only parts without a shoot, you will get an additional version of a paper cactus.
From thick black, gray or brown paper, cut out 2 circles of the base of the cactus.

We insert the cactus valves into the holes of the circle.

We bend and glue the valves.

Glue the second circle of the base.

Place the cactus in the pot. The base will lie on the edge of the wall of the pot and lock into place.
As you can see, the “earth” base and the cactus itself form a kind of lid, and it’s removable. And the rather spacious space of the pot can be used to store all sorts of necessary little things: toys and “secrets” or some materials for creativity, for example.
The versatility of our paper cacti is obvious!

The next version of a paper cactus. The principle of its manufacture is similar, only here it uses not 6, but 4 parts.

But here there is a fundamentally different manufacturing method and a completely different design of the cactus. We will need not only paper, but also corrugated cardboard.
We cut out 2 sets of parts using templates from colored paper. If the surface of the paper is different on different sides, do not forget to mirror the second set.

In addition, using the same templates, we cut out parts from micro-corrugated cardboard 1.5 mm thick.

For the base of the cactus, you need to cut out 3 parts: from corrugated cardboard 3 mm thick, from micro-corrugated cardboard 1.5 mm thick and from paper.

We cover the cardboard parts of the cactus with paper on both sides.
We glue the base in this order: on top - a paper part, then - a cardboard part 1.5 mm thick and a part 3 mm thick.

We collect the cactus and insert it into the base. There is no need to glue at this stage.


As usual, we place the cactus in a pot.

Since a cactus made of paper and cardboard is quite heavy, it is recommended to store something inside the pot for the stability of the entire structure. And if you have nothing to store, just put/glue/pour something inside as ballast.
Flowers for cacti made of paper
Since our cacti are still blooming, we’ll make a few simple paper flowers.
Using templates, cut out 3 parts from colored paper. Using scissors, round off the petals. And then with our fingers we collect the petals of each part “in a pile”, closer to the center.

We glue the parts with hot glue, assembling the flower according to the matryoshka principle.

Then, using a heat gun, we attach the flower to the top of the cactus.

Fringed flowers using the quilling technique on cacti will look no less interesting. Other design options are also possible - use your imagination!
That's all! Our paper cacti in pots are ready and pleasing to the eye.
As we found out, they can perform not only various decorative and gaming functions, but also quite utilitarian ones. How exactly to use them is up to you!
And if you love not only paper flowers, but also real potted flowers, take a look at the Megaflowers online store and give yourself or a loved one a nice gift.


I wish you exciting creativity and the implementation of new ideas!
See you again in KARTONKINO!
In spring, everyone has a lot to do - it’s warm outside, you want to take a walk with the children, go out of town for a picnic or go fishing with friends. During this active time, the house flowers that have delighted us all winter and reminded us of summer may not receive the usual attention.
Some even forget to water them on time. Of course, they cannot be trusted even with unpretentious cacti! For such busy people, decorative flowers or, for example, cardboard cacti are suitable. Beautiful, green and no watering required! Even a novice florist can handle it.

We will need colored double-sided cardboard in green shades or thick green paper, which will have to be glued in 2 layers for sufficient density.
You will also need felt-tip pens, paints and a brush, scissors, PVA glue or gun glue, a flower pot or an unnecessary jar, pebbles (pebbles or decorative glass).

Let's choose a template and draw the outlines of a cactus on cardboard. Apply relief lines with paint, and after drying, cut out the flower.

Our cactus will be three-dimensional, and we will make it up of two elements located perpendicularly. This rule for creating three-dimensional figures is suitable for large and small flowers of any shape and size.
We cut the main part from above and insert the second part into this cut, fixing it with glue. The width of the cut should be equal to the thickness of the cardboard, otherwise the cactus will turn out wrinkled or the second part will not stay in place.

We will make 3-D blanks of different shapes and sizes. Individual parts of a cactus made from paper of a different color, pattern or texture will look interesting. Let some cacti bloom - make flowers from red or pink paper napkins.
We insert the blanks into the pots, secure them with large stones (you can fix the elements with a glue gun), and fill the empty holes with smaller stones.

You can choose the form you like using the template provided or find it yourself on the Internet.

Here are a few more ideas - more complex cacti from several identical elements, with spines and flowers, from paper strips rolled into a tube and a cone, cacti from cardboard cylinders and complex origami cacti.

You can make as many of these cacti as you like, decorate not only your home, but also your office, give them as gifts and collect a whole collection of paper and then real flowers.

On Women's Day, someone gives their mother a bouquet of flowers, while others present fresh flowers in a pot. Or you can make a gift for March 8th with your own hands. This doesn't require much. For example, you can do DIY paper gifts. There are a lot of such crafts.
There is such a wonderful technique called “cutting”. Let's try to create a charming cactus made of crepe paper using the cutting technique. You'll see - it's very simple! Craft paper cactus can be performed by children from 7 to 8 years old and adults.
A master class with detailed photos will show how to make DIY cactus.
You will need the following materials:
- crepe paper (corrugated paper or regular napkins),
- newspaper,
- small pot,
- any threads,
- skewer,
- PVA glue,
- scissors,
- flower (can be made from colored paper).
Cut the skewer with scissors and break it in half.
We leave the second part - it will serve as a crosscut for us. If you don’t have skewers, then an ordinary pencil can easily cope with this role.

Place the first half of the skewer, which has a sharp end, in the middle of the pot and stuff it tightly with newspaper.


From another newspaper we crumple a tight lump, which we wrap with thread so that it holds its shape.

Cover the newspaper in the pot with crepe paper and secure it with a little glue.

We prick the prepared newspaper base for our cactus onto a skewer.

Cut 3/3 cm squares from green crepe paper.
I haven’t counted exactly how many crosscuts are needed, but you will need a lot of them. My cactus took a little less than half a roll of crepe paper.

The main cutting tool is a long thin stick with a blunt end.
Using the straight, blunt end of the second part of the skewer, we make trimmings.
Place the blunt end of the stick in the middle of the square, then carefully twist the paper around the stick.

Without removing the paper from the stick, dip the lower part into PVA glue and glue the part to the base.
We start gluing from the bottom, moving gradually upward. We glue the parts as close to each other as possible so that there are no gaps left.


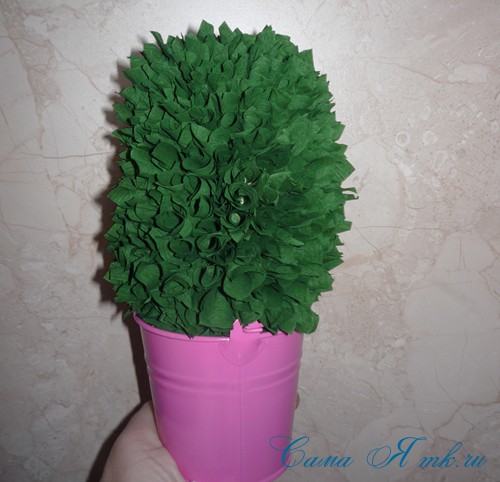
Let's decorate! Our cactus has bloomed!


You can make eyes and a mouth out of cardboard for a cactus and then it will “come to life.” If you don’t have a ready-made decorative flower, you can also cut it out of colored or crepe paper.
Such an original, cute, homemade gift will surely delight and surprise your mother or grandmother.
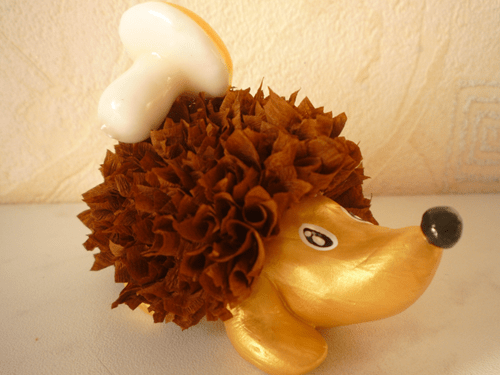
Using this technique you can create a wide variety of interesting crafts, for example, hedgehog made using the trimming technique. Since the craft is much smaller, in this case I used smaller end pieces (2/2 cm). The body is made from baby modeling mass and painted with acrylic paints.

Have fun creating!
I was glad to help!
How many beautiful photographs of blooming cacti were sent to the Country of Masters. Looking at these wonders of nature, I have long wanted to grow my own cactus, only a modular one. And now it has bloomed for me too... Try growing this variety too. The number of flowers on one plant and their colors can be very diverse.
The entire work is made from modules folded from 4x6 cm rectangles according to the Triangular Origami Module scheme.
Flowers

Cactus

Potty

Such a cactus will be able to delight you with its flowering for a long time!
Happy creativity to you!
From the flora of this section, we have at our disposal not only ordinary flowers, such as daisies, made from modules, but also a more exotic option - Cactus.
Of course it’s a joke, but: if you don’t really like watering flowers, then you will especially like this craft, because on the contrary, they don’t really like water.

Let's start assembling with a pot. We connect the modules as shown in the figure and form a ring from them, two rows of 28 modules each. The long side faces outwards. From above we pass another (third) row entirely of yellow modules.
In the fourth row we add 2 modules - we get 30. We immediately begin to form a pattern on the pot. We install the white module through 2 yellow ones. The fifth row of 30 modules is white through 2 yellow. The sixth row is completely white.
Next, we fill in the modules, drawing the pattern symmetrically in reverse, as shown in the figure. To complete the pot, we lay out a row of yellow modules, turning them with the short side outward - we get a beautiful edging.
The pot for the modular origami Cactus is ready, and now we can start making the plant itself.
We again assemble a ring of 8 green modules in a row, connecting them as shown in the figure.
In each row we add 2 modules, we go through 11-12 rows. At the same time, we bend the corners towards the middle, rounding the edge of the base of the stem. The main part is ready.
Video: Modular origami Cactus Modular origami Cactus
As you probably know, many cacti have several shoots extending from the main stem. Let's do them too. They are performed in a similar way. At the base there will be a ring of 2 rows of 3 modules each.


For shoots, 5-6 rows with expansion are enough, but this is a matter of taste. You don't have to do them at all.
Almost the final stage: putting it together. First, install and glue the main stem to the pot. After this we glue the shoots. For beauty, the cactus can be decorated with flowers and toothpick needles.
This is how you can quite easily add a modular origami Cactus to your greenhouse.


Origami technique - the art of addition


Welcome, masters of modular origami and those who are just learning this wonderful art! Today you will learn how to make a cactus from modules. The main thing for this is to have a lot of multi-colored triangular modules on hand and, of course, patience.
Try to collect other crafts from modules
Modular origami cactus with yellow flowers
As you know, cacti bloom extremely rarely, not particularly pampering us with their beautiful flowers. But by making a flowering cactus from triangular modules, you will enjoy its beauty all year round. Flowers and pots can be made in any color, it all depends on your taste and imagination.

Potty
To make a pot you will need orange and white triangular modules. Rows 1-3 - connect and close 18 modules in each row into a ring. Turn the workpiece inside out.


Row 4 - alternate 1 white and 2 orange modules. Row 5 - alternate 2 white and 1 orange module. Row 6 - 1 orange and 2 white modules. Row 7 - 2 orange and 1 white module.


Row 8 - place a module on two corners between two orange modules, and the rest - one module on one corner (30 orange modules in total, short side out).
Cactus (two parts)
The lower part of the cactus - 150 modules: Row 1-2 - connect and close 16 modules into a ring (8 modules in one row).

3-10 row - add another 8 modules between the two modules of 2 rows (inside the first, without securing). Each row should have 16 modules.

You should get an oval figure; on top of it (between the modules of the initial row) insert another 8 modules, as in the figure.


Upper part - 109 modules: Row 1-2 - connect 12 modules into a ring (6 modules per row).

3-7 row - connect 12 modules.

We make a symmetrical hole: 8th row - 10 modules. Row 9 - 9 modules. 10 row - 8 modules. 11 row - 7 modules. Row 12 - 3 modules.


Flowers
1. Connect and close 5 orange modules into a ring.

2. Put 4 yellow modules (on one corner, as in the picture), you get two “half-arches” and connect them with one yellow module.

The assembled composition will decorate any home!
MK prepared by Olesya Budanova
Modular origami - cactus

We will need:
- green, yellow, pink and blue paper;
- glue.
- Let's begin the step-by-step process of making a cactus using the modular origami technique by creating a large flower module. To do this, take a square piece of pink paper (10x10 cm), bend it diagonally in half, then in half again, clearly marking the fold lines. Then fold the square in half, in half again and bend one corner.
- Bend the upper corners of the resulting diamond towards the center. Repeat this for each side of the diamond. In the end, you should end up with a square with clear fold lines emanating from the center. After this, start modeling the flower, bending the corners alternately towards the center and then inwards. Using a similar pattern, make 35 more green paper modules for our modular origami cactus.
- When all modules are ready, begin assembly. To do this, lubricate the modules on the sides with glue one by one and connect them to each other. If the paper is thick, secure them with paper clips until the glue “sets.” To make cactus branches, stack three modules of different colors, inserting them into each other. Then glue the resulting flower into the composition.
- It's time to make spines for our cactus. To do this, use a small square piece of paper and a toothpick. After wrapping the paper around a toothpick, coat the tip with glue and wait until it dries. Then remove the toothpick and insert the resulting needle between the cactus modules. You will need 10-12 such needles.
- This photo tutorial on how to make a cactus out of modules could be completed, but a pot made using the origami technique will ideally complement the composition. To do this, you need to make 202 classic triangle modules. Then they are put on top of each other, forming something like an accordion. A module cactus in such a pot will look great!
You can also make other crafts from the modules, for example, beautiful vases.