How to use a plate with patterns for nails. Stamping with gel polish: description, execution technology and reviews
The art of modern nail art does not stand still. Thanks to constant innovations, you can easily create a beautiful and high-quality manicure without resorting to the services of a specialist. One of these innovations is a technology called "stamping", which has gained a huge share of popularity among lovers of original and fashionable manicure. It should be noted that the usual manicure is radically transformed through the use of stamping. This method is quite easy to use, since it does not require any special skills, which is why its popularity is increasing every day.


What it is
The concept of "stamping" in translation from English means "stamping". This is the printing of drawings by copying patterns from a special plate. In general, beautiful and original drawings are created thanks to a stamping design kit in the form of a plate, scraper, stamp, varnishes and a fixer. The printing of drawings is carried out as follows: the stamp transfers the pattern from the plate, after which the picture is reproduced on the nail. Stamping design technology using stamping allows you to easily transfer different images with the smallest details.


To learn how to make clear drawings, you need to practice, so most girls prefer to make their first creations in stamping on gel polish, which makes it possible to remove damaged drawings in the future without fear for the main coating.


Patterns transferred from the plate can be tried to be transferred as many times as necessary to achieve the desired result, because the gel cannot be erased with simple acetone. But thanks to him, you can remove the image, which is performed using ordinary nail polish. Thus, thanks to the gel coating used as a background, you can gain experience for quickly printing images. With a good mastery of this technology, you can start doing a manicure using absolutely any varnishes, both for drawings and for the background.
The set for stamping with gel polish includes:
- Stamp;
- Scraper (scraper);
- Plate with engraved images;
- Drawing fixer;
- Thick varnish or acrylic paints;
- Gel polish applied for background image.

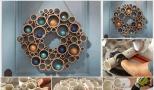
Design examples
A variety of drawings with stamping can please even the most fastidious persons. After all, the patterns that are engraved on the plates can be easily selected for each image. Changing drawings on gel polish is not difficult, since the background coating of the nail in the form of a gel cannot be erased with acetone, but requires special methods to remove the gel coating. Therefore, the printing of patterns can be changed at least every day, while the background of the nail will remain unchanged for about two weeks.

Ornaments on the disks are in the form of patterns, lines, geometric shapes, inscriptions, flowers and various animals.


You can find designs on the New Year theme. Disks with emoticons are very popular.
Most often, dark shades of varnishes are used for printing drawings, for example, burgundy, black and blue. But in this case, it all depends on personal preferences, since a manicure, first of all, should be pleasant for its owner, which means that even the most daring decisions can be created, because all innovations are born in this way.


How to do a manicure
With the help of stamping, you can create a variety of patterns in a matter of seconds, even without special drawing skills. The technology of stamping with gel polish is practically the same as applying drawings using conventional ones. The main thing is to take into account the specifics of the gels in the work, and then a stunning result in the form of a beautiful manicure will not be long in coming. Before you start applying stamping, you need to follow a simple instruction.
- First you need apply a colorless gel polish to the prepared nails and dry it thoroughly under the rays of an ultraviolet lamp.
- Further it is necessary paint your nails in two layers of the color you want to use for the background and dry after each application.
- Then cover your nails fixer or top and use the drying lamp again.
- Next, remove the sticky layer from the top coat using a regular cotton pad pre-moistened in the solution.
- To move on to the drawing process, it is important to prepare a set for stamping and wipe each item with nail polish remover. This will help the pattern print more clearly.
- The next step involves applying a decorative varnish. on a plate with a pattern. The tool is evenly distributed over the surface of the pattern, and the excess is removed with a quick and sharp movement of the hand with a scraper.
- Finally, copy the pattern from the plate to the stamp with a light and rolling motion. and try to quickly transfer it to the nail. All minor flaws can be easily removed with nail polish remover without damaging the base coat of the nail at all, because, as mentioned earlier, acetone does not affect gel polish.
- In the event that the ornament turned out as it was intended, then you can safely apply an additional layer of fixative. This method will help the drawing to remain intact for as long as possible and delight with its beauty and grace.


Such a design with stamping on gel polish can last up to two weeks, which will allow you not to worry about the appearance of the manicure and enjoy its original patterns.
An important point in working with stamping: the steps must be quick, and after creating a pattern on each nail, you must use nail polish remover and thoroughly wipe all items to create stamping.
Most people naively believe that gel polish can be used in stamping when printing drawings. This opinion is deeply erroneous, because for stamping technology, you can use the gel as a background for the nail, and not for printing patterns. The thing is that gel polish is not designed to perform such tasks. Its consistency does not allow the tool to be imprinted on the stamp, which means that it is beyond its power to transfer the pattern from the plate to the nail.

The most suitable option for creating beautiful and truly high-quality drawings using stamping are traditional viscous varnishes and special acrylic varnishes. With their help, you can create real masterpieces. A little practice and a bit of imagination will help every girl to easily translate her ideas into reality. With acrylic paints, all the small outlines of the pattern are quite well preserved. All its thin lines and details pass from the plate to the nail. A dense shade of varnish will help create a colorful pattern that will look gorgeous on the nails of its owner.

By the way, a manicure looks quite impressive when the stamping is applied only to the ring fingers, and a monochromatic gel polish remains on the rest of the nails.

Master classes
Stamping fashion trends do not stand still, because this unique method has become one of the most sought-after nail designs among most girls. Women of fashion, who perfectly mastered this technique, did not stop at the achieved results and rapidly improved in these matters. Such experiments were not in vain, because today a new type of stamping has appeared, which is called "reverse". Until relatively recently, this technology was familiar to few, but today it is the main trend in nail art.


Reverse stamping is a color manicure design, which is initially created not on the surface of the nail, but on stamping.
The painted pattern should harden well, and only after that should the resulting film with the ornament be removed and carefully glued to the nail. This method is translated from English as "reverse". This name turned out for a reason, but because the film with the pattern lies on the wrong side of the nail. For a more detailed consideration of this issue, a step-by-step study is needed.


The technique for transferring drawings to nails is quite specific and differs markedly from the usual printing of images with stamps. Application technology requires accuracy and perseverance at all stages of creating this unique manicure. How to use reverse stamping, you can learn from the following instructions.
- To start you need to apply on the nails that shade of varnish that will go well with the pattern.
- Next, you need to apply acrylic varnish on a plate with patterns. Having chosen the drawing you like, you should fill it with paint.
- Then with a scraper you need to remove excess varnish, evenly distributing the paint over the pattern.
- Now you need to transfer the drawing to the stamp. With a smooth movement, you need to touch the disk with an ornament and lightly press it with a stamp.
- Further actions will be performed only on the stamp itself. Having opened colored varnishes for coloring patterns, apply two drops of each such paint on any flat surface.
- Using a brush, you need to paint over the entire drawing, smoothly filling in all the details of the picture.
- After drawing the pattern, it is necessary to apply a transparent varnish thick enough layer.
- To understand that everything is done really right, you need to wait until the varnish dries well. Carefully lifting the formed film with a pattern with tweezers, you can judge the state of the image.
- In the event that the varnish is dry, carefully separate it from the stamp. This is done as carefully as possible so as not to damage the film with the pattern. It should be borne in mind that it is quite fragile and can break with sudden movements. The transfer should be smooth and accurate.
- The finished slider is transferred to the nail. The varnish on the nails themselves must be fresh so that the film can adhere well. In case of drying of the varnish on the nails, you need to paint it again with a colorless agent. The film will not be able to stick to a dry base. The resulting sticker must be carefully smoothed so that it fits well on the nail.
- While the film is firmly on the nail, you can use scissors to cut off the excess edges. Often, many girls use a brush dipped in nail polish remover instead of scissors. This method will also allow you to get rid of excess varnish along the edges of the nail. In this case, everyone stops their choice on the option that is the most suitable.
- At the end of the reverse stamping, apply a fixer to the resulting pattern.

Reverse stamping is quite difficult to perform, so you must follow all the rules for its implementation.
Lessons for beginners will be a great help at the beginning of learning this difficult technology for creating a manicure. Such a manicure is perfect for creative people who love to create this kind of masterpiece. The technique of applying a reverse stamping design will give unforgettable emotions from an interesting creative process, and a manicure will not go unnoticed by others.
You will learn more about the technology of applying stamping on gel polish from the following video.
The modern beauty industry offers representatives of the beautiful half of humanity a variety of ways to design nails.
One of the most sought after is stamping, which is easy to use.
 Stamp in translation from English means "seal" or "stamp". The name speaks for itself, since stamping is based on drawing a picture using a special form (template).
This way of decorating nails was borrowed by Russian stylists from American colleagues and quickly gained popularity among the fair sex.
This is explained the following reasons:
- the possibility of using at home;
- speed and convenience;
- democratic cost of sets;
- the complexity of other nail art techniques.
As a rule, this process requires the purchase of a kit from a professional store, which includes tools such as a disc with miniature thematic drawings, a rubber stamp and a device for removing excess varnish (scraper).
Stamping varnishes
 To create an original and durable pattern on the nails, you need to know varnish requirements.
There is a misconception that stamping can be done with regular nail polishes. However, they do not have the properties required for professional design. Therefore, special attention should be paid to the choice of a suitable tool.
One of the recognized manufacturers is the Korean company Konad, which produces a whole series of acrylic-based stamping products.
Note that a high-quality varnish should have such characteristics as a thick consistency, rich and deep color, as well as a high degree of pigmentation.
If use varnish with such characteristics, then you will be provided with a stable and clear pattern that will remain on the nails for up to 2 weeks.
Stamping discs
 The disk included in any set for drawing is a metal circle on which several engraved ornaments are located. At the same time, fragments of the disk are combined according to the thematic principle, which allows you to quickly select the best design option.
Miniature flowers, animals, labels of famous brands, geometric shapes, butterflies, cartoon characters, oriental-style paintings - all this can be seen on stamping discs.
Also on sale are widely represented rectangular discs with three-dimensional images. However, they cost significantly more. Discs can be reused, not forgetting to thoroughly disinfect and clean them after nail art.
It would be useful to purchase such a convenient device as a disc holder. With it, you can fix the disk in one position.
How to use?
The process of creating a unique manicure using stamping involves the following actions from you:
- Remove old varnish with an oil-free liquid.
- Apply the desired color to the entire surface of the nail plate. It is better to give preference to pastel colors. However, light ornaments will look spectacular on a dark background.
- Degrease all tools (disc, die, scraper). This is necessary so that the varnish can easily penetrate even the smallest parts of the engraving and lay down evenly on the nail.
- Quickly cover the surface of the drawing with varnish. It is enough to make 2-3 wide strokes. Otherwise product will start to dry. and will not be completely printed on the stamp. It is recommended to shake the bottle thoroughly beforehand.
- Remove excess varnish from the disc with a scraper. If you neglect this stage, you can ruin the entire manicure, since only a clear image should remain on the stamp.
- Take the seal and press firmly against the pattern on the disk. The contact time of the varnish and the stamp varies from 3 to 5 seconds.
- Gently apply the stamp to the nail plate and make sure that the image is evenly printed and dense in texture. Followed by remove excess polish from the skin of the hands.
- Cover the surface of the nails with a colorless strengthening base.
- Wait for the varnish to dry completely.
- Wipe down all instruments with a disinfectant solution and put away until next use.


Stamping with gel polish
 In salons, the technology of applying a pattern is actively used not only on a regular base, but also on gel polish, as well as shellac. Do this stamping better from a specialist who knows all the intricacies of the procedure.
The advantage of using gel polish as a base coat is that a damaged or smudged image can be easy to remove with regular acetone, and then make a new one without damaging the main tone.
The process of stamping on gel polish practically does not differ from the standard one.
The only difference- the final coating of the nail with a top and subsequent polymerization under the lamp.
Nail design
 The stamping kit will allow you to create unique images and unusual combinations. It all depends entirely on the flight of your imagination.
Modern nail art trends offer fashion options such as zodiac signs, abstractions, a variety of symbols, floral, animal and romantic prints, hieroglyphs, snowflakes, and images of people.
A rich imagination, knowledge of the basics of stamping, appropriate materials and the ability to correctly combine a variety of colors - recipe for success original design on your nails.


Every year in the field of nail art, the number of ways to create drawings in the manicure process is growing. Stamping has firmly won the position of the most versatile technique, as it does not require significant financial costs, it is practical and makes it possible to experiment.

The third popular variety is. Their pad also transfers the design perfectly, just like conventional silicone stamps. Their difference is in the extraordinary softness of the pillow itself, in which the nail literally drowns (which is especially convenient for fragile, thinned or injured nails). Despite the stickiness, these stamps do not need to be treated with a buff. The only way to clean it is with tape. But in the methodology of working with them there are subtleties:
It is necessary to transfer the drawing strictly by pressing, and not by rolling (so that the flexible cushion of the stamp does not distort or stretch the drawing).
It is necessary to perform stamping with such a stamp as quickly as possible so that the varnish does not have time to dry.
In order for the stickiness of the stamp not to impair the transfer of the pattern, its surface must be regularly thoroughly cleaned of dust and small contaminants.
Soft pads of sticky silicone stamps tend to fall out of the case frequently, so you should try to control the degree of pressure, and before starting work, sink the pad more firmly into the case.

An interesting and very useful subspecies of silicone stamps, which have appeared relatively recently, are the hole on the opposite side of the case. Such dies are especially convenient because they allow you to perfectly center the pattern or part of it on the nail, aiming accurately. This feature of this type of stamps has made them indispensable for French stamping.
Silicone pads of transparent stamps do not stretch or distort the design during transfer, having optimal elasticity and rigidity. They are good at picking up paint from engraving plates. The case sits ergonomically in the hand, allowing you to fully enjoy the process.
Once you've found your perfect stamp, ink, and board, it's time to get creative!

How to use nail stamping? Stamping design technology.
In order for you to succeed the first time, and the result itself to stay longer on the nail in its original form, follow these steps in sequence:
After preparing the nail and applying the base, cover the nails with the chosen color of the base polish. The varnish must be allowed to dry completely so that it does not deform during stamping. It is not worth applying, as this may interfere with the qualitative transfer of the pattern from the board.
After drying the base and covering it with a layer of top varnish, paint over the selected pattern on the board with varnish or stamping paint. Apply a thick layer of paint so that the smallest details are painted over.
Holding the scraper (scraper) at an angle of 45 degrees, remove excess polish from the disc with a light stroke. You don't need to press the scraper too hard or too tightly, as otherwise you will remove too much paint / varnish from the engraving, and the pattern may not be completely transferred to the nails.
Depending on the type of stamp, transfer the design by rolling or pressing, rather than purely stamping (like a normal document stamp).
After each nail, carefully wipe the stamp, scraper and disk (plate) ZhDSL. Use tape for the silicone stamp.
Beginners will find it convenient to use the disc holder. It securely fixes round boards, helping to keep the workplace clean.
When stamping, remember: special varnishes and paints dry without a lamp and very quickly. Therefore, try not to let the varnish dry in the engraving of the plate, do the stamping on the nails as quickly as possible.
Having covered all the nails with a pattern, be sure to fix the pattern with a special top for stamping. It will protect the manicure from damage and tarnishing, give the design a chic gloss. Special tops do not smudge the stamping design if applied carefully in 2-3 strokes. At the same time, try to smear the very drop of the finish on the nail, but do not touch the drawing itself with the bristles of the brush.
Let the top dry and your exclusive stamping design is ready to please you for as long as you want.

Every girl who has tried stamping sooner or later asks the question: what is better - to buy products separately or to purchase a ready-made, as complete set as possible? We are ready to answer this popular question.
Stamping kits: everything you need is always at hand.
It is much more profitable to purchase ready-made selections of the necessary products for stamping, regardless of whether you decide on a small set or a stylish gift set. All components of such a set are only branded products from well-known, popular and reputable brands. Each set is designed in such a way that the products in it ideally complement each other in terms of quality (both in terms of the quality of materials and the safety of the formulations of liquid products and preparations). Another plus of ready-made kits is the presence of recommendations from the manufacturer. If you have forgotten something or are in doubt, a hint is always at hand, and you do not need to waste time searching for information.
Another important point is that before you seal the drawing, even if it seems to be completely dry, it is better to let the design dry for another five minutes before applying the top coat. In the finish itself, pre-test the brush. The brushes that can mechanically damage the pattern least of all are soft and wide, with light pressure on the nail and maximum coverage of its surface.
6. The varnish is not transferred from the board to the die, but from it to the nail. How to be?
The reason may be: a stamp that is too hard (choose a softer option), a shallow engraving of the plate (it is worth changing the board to a better engraved one), or a stamp that is too smooth (a light gash or will help). Also, the frequent causes of this problem include too thick varnish (therefore, for design it is worth picking up and keeping a couple of varnishes or paints of different consistency on hand). In addition, when removing excess varnish from the plate, do not be zealous with pressure, but only easily sweep away the excess.

We hope that now the world of stamping has become much easier, clearer and more attractive for you! We wish you successful creativity and only perfect manicures :)
ATTENTION! Each action should take no more than 2 seconds. They applied paint - 1-2sec - removed the remnants with a scraper - 1-2sec - applied the pattern to the stamp - 1-2sec - applied the pattern to the nail. varnish removal. It is advisable not to leave the plates and stamp dirty, as this may affect their further operation.
Result


Our manicure with stamping design is ready!
A simple coating of nails with varnish has long been dissatisfied with beauties, because you really want to decorate your nails with an elegant pattern or a sophisticated pattern. This can be done without much effort using special stamps. At first glance, stamping technology may seem rather complicated and incomprehensible, and besides, not everyone manages to master it the first time. However, with a little practice, you can create original nail designs in minutes that will amaze others.
How to choose the right stamp?
Initially, the phenomenon of stamping originated in Korea, and only one factory in the whole world produced special sets for decorating nails. These sets were of excellent quality and durability, but the price was correspondingly high. As stamping became popular, the demand for such kits grew, and more companies began to manufacture them. Now the range of stamps is quite wide, and the price range is quite diverse. Of course, the original stamps are of high quality, but they also cost an order of magnitude more expensive than their Chinese counterparts.
There are several main points that you need to pay attention to in order to choose a truly high-quality stamping kit:
- - First of all, pay attention to the price. Chinese-made kits are usually cheaper, but their quality is much lower than that of the original;
- - you need to carefully consider the disk on which the drawings are applied. Their contour should be clear, and the embossing should be deep enough. In addition, the disk should not have any damage or scratches;
- - cheap stamping kits often have a disk made of low-quality material. Such a disc is usually thin and has jagged edges, which is why it is likely to get hurt;
- — the surface of the stamp must be sufficiently dense. If it is easily pressed through when pressed with a finger, then its service life will be short-lived, and the drawing will turn out to be sloppy and fuzzy;
- - the scraper must be of high quality, without any bumps and notches. If it is made of poor quality, then there is a high probability of damaging the disk with patterns.
It is worth noting that stamps are bought for long-term use, so you should not save on them. In addition, if you buy an original stamping kit from the Korean company Konad, then you will also find nail files, multi-colored varnishes and a special container into which you can pour nail polish remover. Another nice addition to the set will be an elegant cosmetic bag in which it will be convenient to store stamps. Of course, if you have not previously had experience with stamps, then for training you can buy a set and cheaper. However, it is worth considering the fact that the quality of the drawings on the nails will be much lower.

Instructions for using stamps
Before you start working with a stamping kit, make sure that you have all the necessary items for the job. So, you will need: a primer, paint, two colored varnishes in contrasting shades, a scraper (you can use an old plastic card instead), cotton swabs, acetone or any other nail polish remover, stamps. It is very important that the colors of the varnish chosen for the background and for the pattern are contrasting so that the pattern is clearly visible.
Creating patterns on nails using stamps includes several successive steps:
- - start by coating your nails with a special base polish. After the first layer is completely dry, cover the nail again and wait for it to dry again;
- - take the varnish that you have chosen as a base and cover your nails with it. If the coating is transparent, apply another layer of colored varnish;
- - next you will need a contrast varnish in order to create a pattern. Select the pattern you like on the disk and paint over it with varnish. The layer of varnish should be dense enough so that the pattern on the nails looks bright and clear;
- - take a scraper, press it firmly against the disc and remove excess varnish from the surface. As a result, the pattern engraved on the plate will be colored;
- - take a special stamp, lean it against the disk and press it against the drawing with one confident movement. Thus, the pattern will be imprinted on the stamp;
- - now you can move on to transferring the pattern to the nail. The side of the stamp must be leaned against the very edge of the nail plate, and then roll the stamp to the opposite side. As a result, a pattern will remain on the nail. Before you print a pattern, follow the location of the pattern on the stamp;
- - the same action must be repeated on other nails. If the pattern becomes poorly imprinted on the nail, repeat the whole procedure from the beginning, starting from the moment when you applied varnish to the disc, covering the pattern you like;
- - when the manicure is finished, be sure to apply a fixative or gloss coating on the nails so that the pattern lasts as long as possible;
- - do not forget that at the end of the work you need to carefully wipe all the elements of the stamping kit with nail polish remover.

Benefits of stamping
Buying a stamping kit is quite justified, because. Such a manicure includes a number of undeniable advantages:
- - you can create intricate patterns without resorting to the help of a master;
- - the result of the work looks like you did a manicure in an expensive salon;
- - you can apply even the most complex pattern on the nail without any drawing skills;
- - It will take quite a bit of time to create a manicure. Half an hour is enough for stylish, original drawings to appear on the nails.
Stamps for nail design are a real find for fashionistas. Now you do not need to make an appointment with the master to get an original, elegant manicure. In addition, with the help of stamps, you can refresh a boring monochromatic coating or a strict French manicure.
And in conclusion, we offer you a video on stamping design:
A beautiful and neat manicure can transform any woman, make her hands attractive and well-groomed. You can draw attention to your nails thanks to an unusual design, using drawings or patterns on the nails. To create a bright and chic manicure, women have to turn to professional nail design masters, since not everyone has drawing skills. For those who are ready to experiment and want to do their own actual manicure at home, we offer you to get acquainted with a fashionable novelty in nail art - stamping, with which you will quickly learn how to create a fashionable nail design, apply a variety of patterns, pictures, without even knowing how to draw. .
Stamping on nails how to do?
To learn how to make newfangled nail art correctly, you need to figure out what stamping is, what tools are included in a special kit for creativity and how to work with it at home. To easily master the lessons of decorating marigolds, a step-by-step guide and a master class of the process with detailed photos and videos for beginners will help you. We are sure that our colorful photos and video tutorial will be useful and interesting for you.
What is stamping for nails - the secrets of the masters
Stamping is the creation of drawings and patterns on nails using a stamp. The stamp allows you to transfer the image to the nail plate, covered with gel polish or shellac, as well as a base coat: colored or colorless. In a short time, knowing a simple technique, you can get a complex, extraordinary pattern and an original manicure with your own hands, which turns out no worse than a salon one. You can order a special stamping kit at any online store that specializes in selling products for nail art. As a rule, this set is inexpensive, its price depends on the manufacturer, the quality of the tools and the configuration. The main advice from the masters is to purchase a set of good quality, the best option is the Konad set, with which it is easy to create an unusual design. Reviews about these sets are only positive. You need to understand that using the set for the first time may not lead to the desired result and an interesting manicure may not work right away, so it is advisable to practice more and use our tips and recommendations.
Popular articles:
What is needed for this?
Stamping on nails at home is performed using the following tools and tools:
- a metal plate (disk) with engraving of drawings or prints;
Having prepared everything you need, you can start creating a fashionable manicure.
How to do a manicure at home - design step by step
The step-by-step guide below with detailed photos will help you quickly and easily make an unusually beautiful manicure at home.
1. Before doing a fashionable manicure, you need to wash your hands well, degrease your nails with acetone and apply a base base or colored varnish.
2. Apply varnish to the engraved metal disc. Lacquer paint is applied to the entire surface of the stencil.
3. Excess varnish must be quickly removed with a scraper - a scraper, at this stage, speed and speed are important. It is important to properly hold the scraper at a 45 degree angle.
4. We take a stamp and transfer the pattern from the disk with rolling movements. In order for the drawing to be clear and perfect, you should make good pressure and apply effort.
5. With the same rolling movements, the picture from the stamp is transferred to the nail. Let the drawing dry.
Stamping for nails - how to use with gel polish
For stepming, gel polish is used as a coating on which stamps are applied. The main advantage of stamping on gel polish is the multiple application of drawings, without the need to paint the nails, applying a new layer of regular varnish if the image is smeared and needs to be reapplied. The base coat of gel polish or shellac remains. But, when applying a stamp to the surface of nails covered with gel polish, there are some secrets:
- do not use gel polish for drawings, it will not be able to print on the surface;
- it is necessary to remove unsuccessful pictures from the surface with an acetone-free liquid;
- using shellac as a base, it is necessary to remove the upper sticky layer from it before applying the pictures.
Fresh ideas and novelties of the year
Thanks to stamping, you yourself, without the help of professional masters, can make an impeccable and luxurious nail design at home. A little practice and - stamping on the nails will be an exciting experience for you. We present to your attention a photo of the freshest manicure ideas and stamping novelties that are relevant this year.