Family crafts made from any material are original. DIY crafts from scrap materials
This unusual craft is designed to surprise everyone. The shape of the craft, the material used, or the purpose of the craft may be unexpected.
- It happens that you yourself cannot come up with an unusual craft. Then the Internet can come to the rescue. But after seeing the idea, you then understand on your own how and from what you can make the craft.
- People with a rich imagination can take a closer look at natural materials and discover a lot of amazing things from which they can make unusual crafts.
- Interesting ideas are often born in children's heads. The main thing is to support the child at the beginning of the journey into the interesting world of fantasy and handicrafts.

You can use any material to create an unusual masterpiece. An activity that does not require a special tool is especially exciting. It will be enough to have scissors, a needle, knitting needles, a crochet hook, and paint brushes. All you need is imagination and patience when doing the work, no special skills.

Awaken your imagination
You can create many amazing and unusual things with your own hands:
Celebrating the New Year with a Christmas tree
An unusual Christmas tree can be made from wine corks.

- The barrels are glued together, forming the shape of a Christmas tree: 2 pyramids, which are first connected between soda with toothpicks, and then glued together.
- A small stick in the shape of a stump will be the base for this tree. The end sides of the barrels are covered with green paint and some are painted in different colors to give the feeling of New Year's balls on the tree.
A gift for the Christmas tree can be packed in a box made in the shape of a heart.

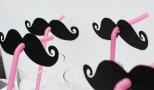
Sweet craft
A bouquet of sweets can be an interesting craft.

- Strips of 150x40 mm are cut from multi-colored paper.
- They need to be twisted in the center and bent in half. This is how the petals are formed.
- The candy is strung on an elongated toothpick. This will be the stem of the flower; it needs to be wrapped in green corrugated paper.
- The petals are glued to the candy itself.
- The bouquet will be decorated with organza. Figures with sides 13-16 cm are cut from it.
- The resulting squares are placed on the stem in the center and rise close to the made flower bud. The organza adheres to the candy, creating a slight waviness.
Now you can form a bouquet and decorate it with a satin ribbon.

Crafts made from natural materials
An unusual craft would be a cake maker made from a cut tree.
- The saw cut must be coated with wood varnish, which will highlight its design even more clearly.
- One board will serve as a cake stand.
- And wooden cuts connected into 2 or 3 tiers will resemble a dessert stand.

Keyboard for creating jewelry
Many interesting and unusual crafts can be made from a keyboard. A little fashionista can make a personalized bracelet out of a keyboard.

- A word is assembled from the letters of a broken keyboard.
- Each letter button has 2 holes on each side. The letter will have 2 holes in a row at the top and 2 holes in a row at the bottom.
- 2 elastic bands will be threaded through them, which will be parallel to each other.
- You can make knots on the back of the letters so that the buttons do not move on your hand. The elastic thread can match the color of the letters, or you can specially choose a different color. Then the bracelet will be original and bright.

Another keyboard accessory for fashionistas: select the Scroll Lock or Print Screen SysRq buttons.
- On each button, one hole is punched in the corner for small metal rings.
- Already in the rings the earrings are put on.
All the necessary parts: rings, bows, clasps for the bracelet are available for sale in the handicraft department.

Learning the quilling technique
A postcard made using the quilling technique can be an unusual craft. This technology is based on creating different pictures and shapes using rolled paper. The activity is interesting for both adults and children. Together you can create a whole picture or an interesting postcard. Flower bouquets made in this way can be on cardboard or in a basket.

All parts and the basket, including those, are made according to the same principle. To create a large flower, you need to glue several strips together. The center of the flower is formed by tightly twisting spirals of strips of paper.

The fluffy daisy is made by cutting the top of the strip, which forms its core. The cuts should not be too deep. The quilling technique allows you to create basic shapes that are used in crafts.

Shapes are created by twisting paper:
- The technique is based on a spiral or roll. It is twisted tightly or loosely and the number of turns is always different. Tight coils are created around the rod. A relaxed twist creates a loose roll.
- The shape of the leaf is created by a loose roll, the two ends of which are slightly flattened.
- Deformation of the free spiral on 4 sides creates a square or rectangle.
- If you move the center of the free roll slightly down and flatten the top part, you get a drop.
- A drop with a flat base forms a triangle.
- If the base of a triangle is bent inward, then in this way an “arrow” figure is obtained.
Knowing how to make basic figures, you can start by making a small postcard.

Panel of lids
A multi-colored panel can be made from plastic caps. The variety of their colors is simply amazing. Now it’s important to come up with a plot for the picture.

Using a sock for a craft
An unusual craft can be made from a seemingly ordinary thing, for example, a sock. Everyone has socks in their house that they no longer wear, but it’s a shame to throw them away. This is exactly the sock you need. An unusual craft could be a snowman, who will first celebrate the New Year with you, and then become a place to store needles.

- To work, you need to prepare a sock. Just above the bulge for the heel, the upper part of the toe is cut off. All you need is the lower part.
- It is necessary to stuff it with cotton wool and tighten the hole at the top and sew it up. It turned out something like a pear.
- The figurine is slightly tightened with thread, which creates the appearance of two balls connected to each other. The lower one will be larger (torso) than the upper one (head).
- Then your imagination comes into play. The head is decorated with beads: eyes, mouth; buttons are made at the bottom.
- The tip of the other sock can be used as a snowman hat. You need to lightly grab the cap with threads so that it does not fall. And tie a scarf around your neck.

Shown imagination will make any craft unusual. You can borrow some idea, but improvisation is yours.
Transforming home walls into a cozy nest is definitely an exciting activity. Sometimes it is not necessary to explore all the stores in the area; it is enough to use your own imagination and find interesting ideas for your home with your own hands. The magazine site offers various original ideas that are not so difficult to implement on your own.
Read in the article
The most interesting thing about DIY home crafts: choosing the material to create something new in decor
You can make numerous little things for home decor with your own hands. The same should be said about more. It all depends on the availability of material at hand and the ability to use it. Depending on the skills and preferences of the creator, we suggest considering handmade wooden crafts, knitted or sewn items, amazing lampshades, and also choose a glass product to decorate your home.
DIY crafts for the home: warm and elegant wood in the apartment
What beautiful thing would you like to decorate your home? The answer will most likely be “everything.” Let's look at different options for DIY home ideas.
Noble wood is subject to sensitive hands and certain skills in working with. To create something wooden for an apartment, they first develop a concept for the future product, prepare tools and materials, then get to work. They mostly make do with sandpaper, varnish and wood glue.


Beautiful DIY crafts at home: practical benefits and decorativeness of homemade lampshades


Decoupage technique for furniture restoration
You can almost always update it yourself. Very interesting and useful for the home. Furniture that has been restored using decoupage takes on a real second life and looks even better than after purchase.


Creative ideas for decorating the interior of your home with your own hands
Designers and hobbyists always have different home interior ideas in stock that are worth trying to implement with your own hands. Each room in the house has its own solution and some zest.
Hallway and corridor
We entered an apartment or house - and... So what? And we were amazed at how much it conveyed the homely mood. To come to your home with joy, you should take care of the appearance of the hallway.
We remove clutter mercilessly from the space, but we select the decor in such a way that it does not interfere with movement along the corridor.


Living room and bedroom
In DIY home design, the specifics of the room play a role. there is a central place in the house - for receiving guests and gathering all household members. This place should express the general mood of the house, so the choice of decor should be careful and appealing to all family members.


Each family member has a separate chronicle of the history of this house. Every member of the household has the right to write their own story in design.


Children's room
Fantasy should not be limited by anything. We take into account the character traits of the small owner of the room and begin to decorate the room. whatever you like, we make hanging structures, select creative furniture: let your childhood be bright!


Kitchen and bathroom
You can decorate the refrigerator in any way. 

A bathroom can be very original; you should not limit yourself to the desire to make it surprising and unusual.
Ideas for the yard and garden of your home: using cinder blocks and other available materials
Those who own their own should also try using scrap materials or cinder blocks left over from construction.
What you can do with your own hands for the yard of a house from cinder blocks of a flowering wall.


To build a fire pit you don’t need a special master class. This is the same element of construction as the construction of a wall, with the difference that it is not necessary to use cement mortar.

What they do for the garden from scrap materials
What is applicable as improvised material: tires, plastic bottles, branches, firewood, old furniture. Each material has its own series of solutions and ideas.


What else can be made from cement for the garden and in what way, the video will tell you.
To keep you in a great mood in any weather, make new things from available materials. Quick crafts that take less than an hour to make.
The content of the article:
Sometimes you want to pamper your child with a new toy, but you don’t have the financial resources or time to make one. Therefore, we decided to select for you the fastest simple crafts that you will spend no more than an hour on. The family budget will not suffer, since they are made mostly from waste material and all sorts of leftovers.
How to make a doll from threads and a dandelion with your own hands?

You will create it while relaxing in a cozy chair. The main thing is to place everything you need nearby so that you don’t have to get up again. This:
- threads;
- half a sheet of cardboard;
- scissors;
- strip of flesh-colored fabric;
- markers.
- Wrap the threads around the card in an impressive layer.
- Tie the finished winding with thread. Determine where the doll's head will be. Mark it by also rewinding it with thread.
- Do the same for your right and left hands. To make a doll's hands from threads, wrap your hands at wrist level and cut the yarn in the area of the toy's fingers.
- Also use threads to separate the torso from the legs, and perform them using the same technique as the arms, just make them longer.
- Measure a strip of flesh-colored fabric according to the volume of the head, glue its sides.
- Wind hair threads around your hand and cut through the resulting roll on one side. Glue to the head, trim the bangs if desired.
- Use markers of different colors to draw facial features.
- Sew a sweater for a toy or tie it with a piece of fabric to make an apron. You can tie a handkerchief to make it a cloak. Children are happy to make such clothes, and they will certainly appreciate a new doll made from threads.
If you are making a girl doll, then you do not need to mark her legs. Let the threads cut evenly at the bottom become a skirt.
Such simple crafts will surely delight the kids. You can also create a fluffy dandelion from leftover threads.

For this charm you will need:
- yellow and green yarn;
- wire;
- PVA glue;
- knitting fork or metal staple;
- scissors;
- gypsy and thin needle.
- Wind the yellow yarn around a crochet fork. Thread a thread of the same color into the gypsy needle. Sew it down the middle.
- Lubricate the resulting line well with glue. Remove the created fabric of yarn from the fork and roll it with a roller.
- A thread is wound in the middle to give the workpiece a dumbbell shape. Coat the middle of this part with glue on top and wait until it dries.
- Such simple crafts are interesting for both adults and children. They are made quickly, but part of the time is spent waiting for the glue to dry. Therefore, it is better to make crafts in the evening, and continue the entertaining needlework the next day. What are we going to do now?
- Cut the resulting dumbbell in the middle. On the first and second flowers, you need to cut the loops with scissors and carefully comb them to get fluffy caps of two dandelions.
- The green yarn from which we will make sepals must be cut into pieces 4 cm long. We thread the same thread into a gypsy needle, sew the pieces across, but not in the middle, but 2/3 away from the edge.
- Trim the top with scissors, trim it, make another line parallel to the first.
- Apply glue to the back side of the flower and attach the sepals here. Wrap it with the same thread you used to stitch it. Glue both ends and leave the workpiece to dry.
- Meanwhile, you will wind the green thread onto the glue-coated wire. You will get a stem.
- Insert a thick needle into the sepal from below and twist to make a hole for the stem. Install it there, having previously lubricated this part with glue.
- The leaves can be crocheted, but since we are making simple crafts, cut them out of green paper or cardboard and glue them to the stem.
How to quickly make crafts from animal tissue?
If you want to spend less than 30 minutes making a new toy, then make these funny mice. They don't even need to be sewn. By making the slits in a certain way, you will make these rodents.

See if you have:
- pieces of felt;
- juice straws;
- beads or small buttons.
- For each mouse you need to cut two parts from one fabric. The first will become a body, pointed on the muzzle, rounded on the other side. Cut out the ears in the shape of a figure eight.
- From a fabric of a different color you need to cut out a small circle for the nose and two larger ones for the ears, and glue them in place.
- Using scissors or a utility knife, make 4 cuts on the body of the mouse. Two will be vertical, at the back of the head, and the other two you will make in the rump area to place the straw here. Place the ears on the head, threading them through the slits.
- All you have to do is glue beads or buttons instead of eyes and marvel at how quickly crafts are made from simple materials.

If your child is bored, you can make a fabric applique with him. Such funny bunnies are also sewn onto the worn knees of children's trousers to update this item.

Transfer the applique onto the fabric and cut it out. The bunny is decorated by sewing a bow to his ears and a carrot on his body. Attach eyes and other facial features. If this is an applique, then you need to glue the hare onto the cardboard.
And here are some simple crafts - in the form of birds. You can cut them out from leftover felt, glue on a nose, eyes, wings and perform a home performance.

DIY crafts from pine cones for children

They are also made simply and quickly.
To make gnomes, take:
- Pine cones;
- light plasticine;
- pieces of felt or fleece;
- glue;
- brush.
- Let the child roll a ball out of plasticine and use the back of the brush to make indentations for the eyes, mouth, and nose. They will be filled with pieces of plasticine of the corresponding color. So, the eyes can be brown or blue, the mouth red.
- Attach the head to the top of the pine cone. Cut a triangle out of felt and glue its sides together to form a cone. Place this cap on your character's head.
- Cut out mittens from the remaining fabric and attach them to the pine cone with plasticine.

For a craft made from pine cones like an owl, we will also need:
- 2 acorn caps;
- yellow paint with a brush;
- plasticine;
- accessories in the form of feathers, ribbons.
- First, you need to paint the cone and the acorn cap, and continue subsequent work when they are dry.
- Let the child roll small balls from black plasticine and stick them to upside-down acorn caps - these are the pupils.
- Make a nose out of orange plasticine, attach it in place.
- This owl craft made from pine cones is decorated with feathers or ribbon.
- pine cone;
- pieces of thick fabric;
- two toothpicks;
- cotton wool;
- 2 ice cream sticks;
- white paint.
- Let the child paint the pine cone and remove it until it dries completely.
- Mom will cut out a scarf from plaid fabric and tie it around the snowman’s neck. Make headphones from felt and glue them to the character’s head.
- The child will make a snowman’s nose and mouth out of plasticine and attach it to his face.
- Make your hands from wire wrapped in a strip of fabric or ribbon. You need to wrap the wire around the bump.
- Place toothpicks in the snowman's hands, with pieces of cotton wool glued to the bottom of these sticks.
- Paint the popsicle sticks and when dry, place the snowman on these skis.
Quick and easy to make and these are the piglets. Glue the scales from the cones to the fir cones in the form of ears. Attach the snouts that will become the acorn caps. You can use plasticine rather than glue for this.

Paint the piglets pink, you can use spray paint for this. Once it's dry, only then will you attach the little black beads that will become the eyes.
For this craft you need an unopened pine cone. But over time, the scales open up. To avoid this, dip the cones in wood glue diluted with water for half an hour.
Remove them from the solution and shake them off. After 3 days, the cone will dry completely, securing the scales, which will now not open. After this, you can cover this natural material with paint and make new objects.
The next simple craft is a forest corner. For her, take:
- CD disk;
- plasticine;
- spruce and pine cone;
- acorn cap;
- glue;
- paints;
- eyes for toys.
- Paint the disk green and draw flowers on its surface.
- Let the child roll the caps and stems of the mushrooms and connect them.
- The base for the hedgehog can be sculpted from plasticine or polymer clay. Then cover it with brown paint.
- When it dries, stick scales from a fir cone into the back of the hedgehog. Place a cap on his head.
- Glue the eyes, nose, mouth, put a cane stick in your hand. In the other there will be a basket with mushrooms, which are molded from plasticine.
- Attach the hedgehog to the stand, after which another wonderful craft is ready.
Tie floral wire to the pine cones and place picturesque flowers in a jar previously wrapped with twine.

You can also make another craft from pine cones for the garden, such as a wonderful decorative basket.

If you need to quickly make a hedgehog to bring to kindergarten, mold its body and head from beige plasticine, and roll out its eyes and nose from black plasticine. Stick in the seeds, which will become spines.

Simple crafts for a great mood
Now the sun rarely comes out, and the weather is increasingly cloudy. To avoid succumbing to despondency at this time of year, create mischievous tricks that will certainly improve your mood.

Place these cheerful flowers in a vase at home, which can be made from almost nothing. All you need to do is:
- colored paper;
- cardboard from a white box;
- marker;
- stationery knife;
- tape;
- scissors.

Color the eyes with a black marker and bend the petals forward.

Cut a stem from cardboard. At the top, on one side, glue the finished part, on the other, a pre-cut flower with petals.

Fold a green sheet of paper in half, draw an oval line on it, and cut along it. If available, use zigzag scissors. Keep the notches simple.

Tie the paper flowers with a ribbon, and if you have taffeta, then use this fabric for decoration. You have got a bouquet that will never fade and will make you happy.

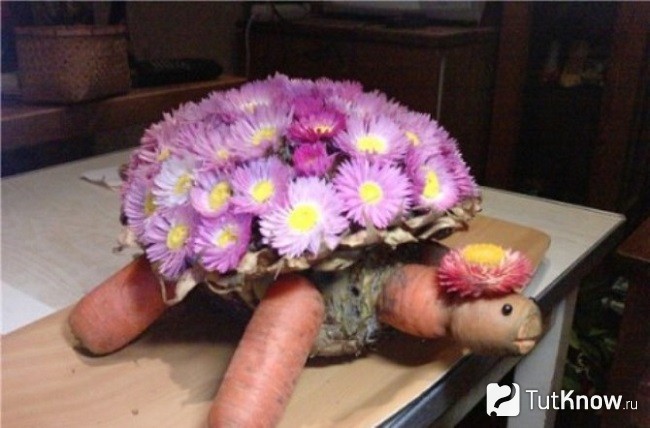
You can attach flowers with a toothpick to washed beets or pineapple. You will get a beautiful shell for a turtle. You will make her arms, legs and head and neck from carrots. Attach these parts to the body using toothpicks as well.
If you want the New Year to come quickly, decorate white objects in your apartment by turning them into snowmen.

Attach black magnets to the refrigerator, and now a holiday character has taken up residence in your kitchen. If you draw on a white vase or glue round eyes and an orange nose in the shape of a carrot, then another snowman will amuse everyone gathered at the table.
See what other quick and easy crafts you can make.
Children love to watch cartoons. Of course, educational animated films benefit the baby. But it’s still better to do what you can do with your own hands. This process develops fine motor skills, logical thinking and imagination. As Vasily Sukhomlinsky wrote: the child’s mind is on his fingers.
Therefore, develop your baby in a playful way. Find an interesting craft and invite your child to make it themselves. Some processes will require your help, but your son or daughter will be happy with the result, because they are confident that they did it themselves.
To create a variety of figures, you don’t need to go to the store; you can make them from what you usually throw in the trash. We will show you several master classes on creating original products.
DIY crafts from scrap materials for children, photos accompany each description
Children will really like theatrical dolls. They are made from paper plates.

Step 1. Take a disposable paper plate and fold it on both sides - this will be a raincoat.
Step 2: Paint the piece a bright color.
Step 3. Cut a cone from the plate. Apply the same paint to it as for the cloak - this will be the cap.
Step 4. Arms, legs and face can be cut out from the same plate or cardboard. Whatever suits you.
Step 5. Place all the parts in place and secure them. Draw the gnome's face.
Step 6. Use wool instead of hair. Glue them on the head and the cap on top.
It is best to fasten the elements of the product with a stapler. Theatrical puppet making is not difficult. A 5-6 year old child can do it without difficulty. The main thing is to show what the result should be.
Another craft a child can make from disposable plates is a flying bird.

It is performed as follows.
Step 1: Take a disposable plate and cut it in half.
Step 2. Cut the other half in half again.
Step 3. Fasten the parts together using a stapler, as shown in the figure.
Step 4. Take a disposable spoon and attach it to half of the plate with the convex side facing you, glue the eyes and beak there, cut out of colored paper.
Step 5: Decorate the bird with feathers.
Work is done. You can make a cute yellow chicken using the same method.


Everything in the house
It turns out that you can make a variety of crafts with your own hands from scrap materials, the photos show with your own eyes how to do them.
Just look at these gnomes.

To make them, prepare the following materials:
- paint brushes;
- paint;
- beads;
- wool or cotton wool.
Step 1. Place the brush in front of you.
Step 2. Paint the handle with red paint and varnish.
The beard is the bristles of the brush, and the handle is the hat.
Step 3: Glue cotton wool between the bristles and the handle. It will act as the trim of the hat. If you have wool, use it.
Step 4. Glue beads instead of eyes, and half a ball or cap instead of a nose. Basically, you can use whatever comes to your mind.
And such cute monkeys are made from disposable cups. This is a great option for holiday crafts. For the New Year, put candy in cups and place it under the Christmas tree.

Step 1. Cut a circle out of white paper and divide it in half - this will be the muzzle.
Step 2. Cut out a similar circle from beige paper.
Step 3. Cut out eyes from black paper.
Step 4. Glue all the elements as shown in the picture.
See what other crafts you can make from improvised materials, the video will clearly show the variety of works.
Napkins to the rescue
It would seem that you can make something from an ordinary napkin. Although many have observed how beautifully they are folded in the restaurant. Savvy people came up with the idea of creating crafts from this scrap material. For example, elementary school students can make a beautiful autumn tree.

To do this, prepare napkins and colored paper.
Step 1. Prepare the base - a sheet of blue cardboard.
Step 2. Cut out a trunk from brown paper.
Step 3. Cut a strip of green paper into grass, it should look like a fringe.
Step 4: To make the foliage, cut the tissue paper into small pieces. Select the material to match the color of autumn foliage.
Step 5: Use a shape punch to make falling leaves.
Original crafts are made from clothespins.

Just paint them with acrylic paints and stick on fabric caps and pom-poms. By completing various details, clothespins will turn into funny cartoon characters.
Every home owner wants to feel as comfortable as possible in their home. This becomes the reason why there is a desire to decorate the interior not only beautifully, but also in an original way.
However, often the funds for this are not enough, because the services of professional designers, like beautiful things, are not cheap. Therefore, recently, an increasing number of homeowners prefer to decorate the interior of their home on their own using crafts from improvised materials that are inexpensive.
It is worth noting that the main advantage of such crafts is not the cheapness of the materials. The most attractive thing is that every item you create is unique. But it is the uniqueness of the design that attracts attention.

Products that were created with one’s own hands emanate a special energy. And thanks to this, an atmosphere of comfort and warmth appears in the house.

An important circumstance is that such structures can act not only as ordinary decorative elements. With their help, you can organize your space much more conveniently. After all, they can be used to store a variety of small items that are necessary for the household.
Do you think this is impossible because you need to have any special skills? No, even a child can handle this job of creating crafts.

Pay attention to the photo of crafts from improvised means, which is presented below. It shows an example of creating a key holder, which is not only a beautiful addition to the interior, but also serves as a small hanger for keys.

And the process of its creation is not difficult. Let's look at it in more detail.
Key hanger
Surely, many people are familiar with the situation when they have to raise the whole family to look for keys. After all, people often do not burden themselves with buying special small shelves for storing keys and other small things.

And since the key is a fairly small item, it is easy to lose it among larger things. To avoid having to constantly look for keys, many people keep them in their purses.

However, we can offer you a more interesting and original storage method. And for this we will build a key holder.

Its main feature is that in appearance it will resemble a product decorated with brickwork.

We will tell you step by step how to make a craft in the form of a key holder from available materials. But first, let’s look at exactly what tools and materials will be needed to create it: a thick sheet of cardboard or plywood, thick napkins, hooks, glue, varnish, paints.

Stages of performing a key holder
At the first stage, you need to cut out the back wall of the future key holder. As a material, you can use either thick cardboard or a not too thick piece of plywood.

In the second stage, you should cut out small rectangles from cardboard that will imitate brick. Please note that they must be the same size.

In the third step, you must glue the cut out “bricks” to the base using glue. Remember that there should be a small gap between them. You should also not cover the entire surface of the product with them. After all, in the central part there should be a small sign with an inscription, and in the upper part a picture.

Note!

At the fourth stage, you should start lubricating the bricks with glue. Do not skimp on the glue at this stage, because it is necessary so that you can place the crumpled napkin on top of it. It can also be covered with a small layer of glue on top for better impregnation.

Using a stick or the back of a brush, press the tissue into the gaps to create corners. Leave the product to dry.

Please note that any crafts made from improvised materials at home must be durable. Therefore, we strongly recommend not to skimp on binding materials.

At the fifth stage, the process of creating a visual resemblance to natural brickwork begins. Once the panel is dry, coat it with paint. The seams must be painted with bronze paint.

At the sixth stage, you should coat the bricks with paint a second time. However, this time you need to use a dry brush. To do this, dip it in bronze masonry, wipe it on paper so that it becomes dry and then dip it again in the color with which you painted the bricks.

Note!

Remember that to achieve maximum similarity, you should only move the brush in one direction.

At the seventh stage, which is the final one, you should coat the finished product with clear varnish and attach the hooks on which the keys will hang.

Crafts for the garden
If you are the owner of a country house, then for you the decorating process is not limited only to the area of the home. Therefore, to improve the area around the house, you should use garden crafts from improvised means that will decorate any garden or vegetable garden.

To make them, you can use plastic bottles, hemp, tires and old soft toys. In this case, it all depends on what set of tools and materials you have.

Crafts made from tires are extremely popular because they are quite simple to create, but at the same time they look original and interesting.
Note!


For example, you can create a real cup from tires, which will become a wonderful flower bed. To create it you will need one tire, a round board (the diameter of the board should be larger than the tire), paint, and a small piece of rubber.

The tire and board must be painted the color you like. If you have artistic skills, you can use them to decorate the product with beautiful images.
If you do not have such drawing skills, you can paint the design one color or polka dots. The handle of the cup should be secured with a large stapler. And now your product is ready.

We draw your attention to the fact that even children’s crafts made from improvised materials can become a worthy decoration for your garden. Use crafts your kids made from plastic bottles and cups. Despite their simplicity, they look quite original.

If they are small in size, use them to decorate the porch or window sills. This way, you can focus on them, and they will not get lost in a large area of the garden.

Photos of crafts from improvised means