Origami crane step by step. Paper crafts: crane
Japanese cranes are an integral part of the legends and myths of the Land of the Rising Sun, believing that they can turn into people, or more precisely, into monks. The classic crane is white with a head covered in red feathers and black wings and tail.
If you have a desire, then you can also “settle” in your apartment figurines of these proud birds made of paper, which will become a wonderful decoration for your apartment. In addition, Japanese cranes created using the origami technique mean faith in longevity, for good reason in the Middle Ages they were considered an excellent gift for loved ones.
According to legend, the person who makes a wish must make 1000 origami cranes from paper. Even a fatal illness can recede if this condition is fully met. One girl from Japan, Sadako Sasaki, who became a victim of radiation after a nuclear bomb explosion, decided to test this sign. But before she had time, death overtook the young Japanese woman; only 357 paper cranes separated the patient from achieving her goal. Her friends continued making paper cranes, creating the required number of figurines for a flock of 1,000 origami cranes. In Japan, a monument was even created in memory of this girl. It represents a girl holding a paper crane in her hand.
Even if you have never tried your hand at making this craft, you can make an origami crane using the beginner's pattern.
In order to create this craft, we need only one sheet of paper, which corresponds to the main rule of origami: 1 sheet - one craft. If you want a paper crane to keep its shape perfectly, then you should use special Washi paper, which has sufficient density.

Fold a piece of paper in half horizontally, running your hand along the fold to define it more clearly.

Next, you should unfold the sheet and fold it in half again, only vertically, ironing the fold line. Having unfolded the sheet, you will see a square divided into 4 sectors, separated by 2 lines running at right angles.

After this, you need to repeat the same steps, but in the horizontal direction, connecting opposite corners to each other and ironing the resulting fold lines.

Now we should get a square reduced by 4 times. Take the lower right part of the half next to you with your hand and carefully fold it towards the middle, using the previously created lines for this. The photo shows what you should end up with.

The lower corners of our diamond should be folded, doing this strictly along the middle fold running through the center.


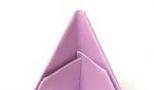
We bend the resulting corners until we get a figure that resembles an opening bud.

We unfold the upper part of the square upward, focusing on the fold lines obtained earlier. The 2 folds located at the top of the diamond should bend in the opposite direction.


Turn the resulting figure over to the other side. The corners located in the upper part must be folded towards the middle of our figure, doing this in such a way that they swing the lines in the center. Continue with these operations shown in the photo.

We fold the outer edges of our elongated diamond shape to the center line of our future crane.

The right fold folds towards the left, after which it is necessary to turn our figure over. The outer edges of the crane are folded towards the middle and on the second side, after which it is necessary to fold the right fold towards the left again.

For both sides of our figure, it is necessary to bend the lower corner of the upper part of the crane, folding it with the upper one.

In order to get the head and tail of the bird, you need to bend the right fold towards the left, like a page from a book. The same operation must be repeated for the left side of our figure.

Carefully bend the crane's wings down, doing this strictly perpendicular to the head, body and tail.

The bird's head should be made more prominent by folding its tip.
How to make an origami Crane out of paper using our blank?
We take our hands by the tail and head with our fingers and gently pull them in opposite directions, thus straightening the figure. The head and tail will be on the outer edges of the bird.

We spread the wings of our crane, giving the figure more volume.

If desired, the paper can be replaced with foil, thanks to which the crane figurines will look more original, and they will last you a longer time.
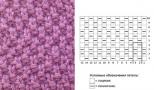
What about those people who want to make origami Cranes out of paper step by step, but they are uncomfortable using photos from the master class? For such people, we have a diagram for beginners, according to which you can make an origami Crane out of paper. The sequence of actions is numbered, a schematic description will allow you to quickly and correctly create the desired figure.

How to use Cranes made from paper with your own hands.
Bright and original figurines can be used for all kinds of holidays, themed parties, hanging them on strings on tree branches, under the ceiling. This can be done using a needle, passing it through the middle of our figure, where all the folds intersect.
You can simply put the Crane on a bookshelf and it will act as a talisman. For children, this is a great opportunity to develop their paper handling skills and improve fine motor skills. and of course, this will perfectly diversify the little man’s leisure time, especially if all family members sit down to make paper cranes.
In the land of the rising sun, it is very popular to exchange handmade figurines, thus wishing each other happiness, health and long life.

Be sure to make at least one paper crane using the origami technique, creating a beautiful interior decoration, or a gift for a loved one, or a toy for a small child who will play with such an unusual toy for a long time.
Origami is the ancient art of folding paper figures, which came to us from China. Origami requires patience and accuracy and cannot be rushed. You can make a crane out of paper, which, according to legend, fulfills any wish. Today we will show you how to make a paper crane with your own hands.
You need to take a square sheet of paper. Very beautiful cranes are made from colored paper, but you can also use white paper.
First, the paper square is folded in half. You need to connect the edges of the paper as accurately and accurately as possible.


Then the square is folded diagonally.

The same thing, but on the other side.

The result is 8 fold rays along which you need to fold the square so that you get a small square.

To do this, fold the square, holding the two opposite corners along the resulting folds inward.

It turned out to be a small square, more like a rhombus.


Then the second edge.

The upper triangle also needs to be bent and ironed.

All edges unfold, resulting in folds.


Now you need to unfold the figure and do all the steps on the other side. The result is a more elongated rhombus.

The next step is to fold the lower edges in the same way as in the previous case to the middle of the rhombus.

Do the same on the other side.

Now you need to expand the resulting figure so that the inner sides become outer, in other words, flip the sides.

The bottom of the diamond is bent upward.

Also on the other side.

The figure is again turned inside out, the inner sides become outer.

The figure almost looks like a crane. The wings are bent - first one, then you need to turn the figure over and bend the second wing.

Two narrow wedges sticking up are the head and tail of the crane. To make a head on one of them, the corner needs to be bent inward.

Now the wedges are bent to the sides, the one that forms the tail is further away, and the one that forms the head is not too far away.

All that remains is to straighten the hump of the crane. To do this, you need to carefully pull the crane by the wings and smooth out the back.

The final look of the craft. Photo 1.

The final look of the craft. Photo 2.
The crane is the most popular craft using the origami technique. It is recommended to start mastering this technique from here. In Japan, there is a belief: by folding 1000 paper birds, you can make your deepest wish, and it will definitely come true. Origami paper crane includes all the basic elements of addition. This craft has several options, but the main one is always a double square.
You can make many different crafts based on a double square. An origami paper crane is always made using this module.
The step-by-step addition scheme looks like this:
- Take a sheet of A4 paper and bend its corner to create a straight strip at the bottom. Cut it off.
- You have a square folded diagonally. Straighten it out and fold it in half vertically. Repeat the horizontal addition.
- Straighten the workpiece again and mark the second diagonal: fold it at a different angle.
- You should have 4 fold lines. Fold the square along one of the diagonals, place the corner down.
- You will see outlined lines forming a square inside a triangle.
- Along these lines, draw the free corners of the large triangle inside the figure. Collect a square.

These simple steps allowed you to get a blank for cranes. A child can handle making it. Knowing how to make this module is also necessary for adding other figures. If you are teaching origami techniques to children, then start with making double squares. When they learn how to make neat blanks, tell them how to make a crane out of origami paper.
Using the origami technique, paper cranes for beginners have beautiful wavy wings. It is recommended to start classes with children from 5 to 8 years old with this option.
Instructions for completing the craft (step by step):

Now you know how to make an origami crane out of paper. No complicated techniques are used when assembling it, so this craft is a good place to start teaching children. For beginners, it is important to do all the folds slowly and carefully. Follow the step-by-step work plan so as not to get confused.
Haste when making crafts is fraught with mistakes and violations of proportions.
graceful crane
The following popular pattern will help you make a bird with a thin neck and a long, sharp tail. This is another simple type of origami paper crane.
Scheme for beginners:
- Take the finished double square.
- Make folds on its sides, bending the corners of each layer towards the center. Bend the edge of the resulting diamond towards you.
- Expand the resulting triangle by lifting the corner of the top layer. Repeat the procedure with the second layer.
- From the bottom, fold the right corner of the top layer towards the center, repeat the procedure with the left side.
- Bend the bottom corners of the diamond so that they stick out to the sides. Then move them inside.
- The result was a blank resembling a lotus. Bend any of its narrow petals at an angle of 90 degrees to form the bird's head.
- The wide part will be the wings, stretch it in opposite directions.
- Leave the last thin triangle untouched - this is the tail.

This paper crane is easy to make. A junior high school student can handle it. The work will take no more than 10 minutes, taking into account the production of a double square.
Flying model
The most popular craft option is one that can move. It's simple, but kids really like it. It is often done in class during DPI classes.
Origami paper “Crane” assembly diagram:
- The main craft is not a double square, but a straight diamond, which is made according to the instructions for the previous model.
- Fold the right side of the diamond to the left, making a movement as if you were leafing through a book in the opposite direction.
- Iron the fold and repeat. You will get a rhombus, the upper part of which represents halves.
- Stretch these halves.
- Bend each layer of the lower petal upward and iron it.
- Turn one of the narrow parts into a head; to do this, you need to push the corner inward.
- Pull the upper corners slightly to the sides to create wings.
- To make the craft begin to move, pull it by the tail.

This toy has a rich history. It was made as a sign of solidarity for Sadako Sasaki, who fell ill with leukemia after the bombing of Hiroshima. She wanted to do 1000 crafts to get rid of the disease, but she didn’t have time. At the time of death, only 644 birds were ready; the rest were made by Sadako’s friends.
The story of this girl was filmed in the USSR in the film “Hello, Children.” Since 1955, the origami paper crane, whose design provides the illusion of flight, has become a symbol of non-acceptance of the use of nuclear weapons.
Festive crane
On some special occasions, craftsmen in Japan make special birds. Beginners should not try to fold this figure; they need to first get their hands on simple options. To decorate your interior or give gifts, you will need the following origami paper crane; it is made step by step like this:

- Mark the folds on the double square: fold the corners on one layer towards the center. Fold the top corner and straighten the square.
- Straighten the workpiece and fold it so that the triangles meet at the bottom.
- Press it with your finger and point it inward. Straighten the workpiece. It will look like a truncated rhombus.
- Fold back the top layer to create a boat shape.
- Expand the figure into a sheet, bend the obtuse corners in the opposite direction. Fold the petal along the intended fold line.
- Press the sheet on both sides so that the corner tucks inward on its own.
- You have an irregularly shaped figure. Its triangular part is the future tail. Bend the top part in half so that it becomes flattened.
- Fold one part of the resulting part in the same way as in the previous step. Repeat the addition with the second piece.
- Turn the figure over and continue folding the parts in the same way as in the previous description.
- You have a folded tail and a narrow part that will be the head and body of the bird.
- Bend the narrow part in half to form a head. Add volume to the crane.
Following this step-by-step plan, you will make a craft that will decorate your table or gift boxes. It symbolizes happiness and prosperity. A beautiful ribbon is often tied to this figurine to hang on the Christmas tree. Make a figurine from thick paper with a pattern, which is used in scrapbooking.
Origami is the art of folding paper figures, which is considered to be the birthplace of Japan. Initially it was used in religious rituals. For a long time, only rich people could practice origami, in whose circles it was considered good form to master the origami technique. In the second half of the twentieth century, origami crossed the borders of Japan and found itself on other continents, where it gained its popularity. Classic origami involves folding figures from one square sheet of paper without scissors or glue. Today you will learn how to make an origami crane out of paper with your own hands.

Special paper


Any paper is suitable for creating origami, however the final appearance of the model greatly depends on its quality.
If it is a figurine of a bird, then regular writing paper will do. More bulky models require heavy grades of paper.
There is a special paper for origami - “ kami", which can be bought in the form of squares. Its dimensions range from 2.5 cm to 25 cm. This paper has a different color on each side and is much lighter than printer paper, which makes it possible to create a variety of models.
You can use foil paper. It consists of two thin sheets of foil and plain paper glued together. This material holds its shape and successfully emphasizes small details.
Legend of the Crane
Japan is filled with legends related to wildlife. The Japanese personify birds and animals with the best qualities of a person. The Japanese crane is especially highlighted in legends. For the Japanese, this bird is a symbol of faith and hope. People began to fold cranes in ancient times, putting wishes for longevity and good luck into origami.
The origami crane has gained great popularity. Japanese paper cranes have a special history. The Japanese believe that if you fold a thousand origami, your cherished wish will come true, and the sick person can be healed.


In the Peace Memorial Park, located in the Japanese city of Hiroshima, a monument to Sadako Sasaki was erected. This Japanese girl, who survived a nuclear explosion in 1945, became ill with radiation sickness. A good friend told her that if you fold a thousand cranes out of paper, you can make a wish that will definitely come true. The girl carefully folded the birds, she managed to make only 644 cranes, then she died. Friends completed the missing figures. Sadako was buried with all the cranes.
The song about Sadako brought the Japanese crane worldwide fame. It tells about the difficult fate of a girl in trouble. And only the crane instilled faith and hope for healing in the poor girl. The meaning of the crane takes on a new meaning after the story about the girl. After all, it is believed that folding origami brings success and good luck to its creator. I would like to believe in the magical power of the figurine, which can become a magical talisman.


Let's start creating

It’s easy to make an origami paper crane with your own hands.
First, let's fold a simple crane. You will need a square-shaped piece of paper.
- Fold the square in half on one side and unbend it. We do the same with the second side;
- Four folds have formed on the workpiece. We place the figure with the angle up and tuck the side parts inward;
- Pull apart the side layers. We bend and fold back the right and left edges, then bend and straighten the top of the figure. Turn over and do the same with the other side;
- We lift the top layer of the square and bend it upward;
- Turn the workpiece over and do the other side in the same way;
- We push the layers apart on the sides and fold the side parts of the figure towards the middle;
- Let's turn the crane to the opposite side and do the same actions as in step 6;
- Now we will spread the side layers of the workpiece and turn the lower sharp ends up. We press on the sides, align the craft and turn the nose and tail of the bird to the sides;
- We form the nose of the bird, straighten the wings and that’s it, the work is finished.
The action plan for assembling the crane can be viewed here:

Origami crane with rose

Having learned how to fold a regular crane, you can improve your skills further. We suggest making a crane with a rose - an original, delicate figurine. Assembly is not very difficult, you will definitely succeed. A little patience and time.
You will need a small piece of paper. The color of the craft is light shades of paper.
First we fold the rose. Then we collect the crane.
For a diagram of how to make a crane with a rose, see here:
Video on the topic of the article
Crane video for beginners:
Video of a paper crane on small legs:
Video of a paper crane on high legs:
Video of a crane with wide wings:
Video of a crane flapping its wings:
In Japan, there is a belief that if you fold a thousand paper birds and make a wish, it will soon come true. Not every person knows how to make a paper crane. This figure is created by performing successive additions, which are considered basic in Japanese technique. This craft is done in several ways. In this case, in any case, a double square is taken as a basis.
The basis of the craft
The double square will become the basis for many different crafts. Using this module, a paper crane is made.
Executing the addition scheme step by step:
- First, take a sheet of album, A4 format. The corner of the sheet is folded in such a way as to create an even strip at the bottom. She is cut off;
- it turns out to be a square folded diagonally. It is straightened and folded in half vertically. The addition is also repeated horizontally;
- the workpiece straightens out again. In this case, the second diagonal is outlined at this stage: the workpiece is folded at the opposite angle;
- As a result, you get four fold lines. The square is folded along one of the resulting diagonals and placed with the corner down;
- at this stage, lines are formed that form a square inside the triangle;
- these lines will help to correctly bring all the other corners of the figure inward. The square is being assembled.
Using simple steps, create a crane base in minutes without difficulty. Even a child can make it. This module will allow you to add a lot of different shapes in the future.
If you plan to teach a child the origami technique, then you should start by creating a “double square” module. Only after successfully creating a smooth workpiece do they move on to making a paper crane.
The origami technique for beginners allows you to create a crane figurine with beautifully curved wings. It is with this format of work that children from five to eight to nine years old should begin learning origami.

Performing crafts step by step:
- the double square got its name because of its multi-layer nature. The upper part is considered the first layer, and the lower part is considered the next line. To make a beautiful bird, turn the corner towards yourself. The corners in the top line are folded to the line in the center. The workpiece is turned over, and the work is repeated again, using the second layer;
- the workpiece is unbent to return the square to its original position;
- At this stage, along the resulting fold lines, bend the corners of the figure on all layers inward. The result is a rhombus, as with the first addition. The only difference is the evenness of the workpiece;
- The corner of the diamond is lifted up to turn it inside out. This produces a figure with smooth edges;
- the right and left edges on each layer are folded;
- the part of the figure on top, located closer to the master, is also bent;
- at this stage, a triangle is obtained with several layers. On one plane, the upper parts of the formed figure are folded on both sides. Each resulting wing is folded like an accordion;
- The central part of the bird will be two triangles. The upper part of one of them is bent back so as to form a head with a beak. The second figure is left unchanged.
 Now every person is able to assemble an origami crane from paper if desired. This assembly does not involve complex manipulations; even a child can master and perform it.
At the beginning of learning, do not rush; it is advisable to perform the folds carefully and slowly. In order not to get confused in the process of making a bird, follow a clear plan for performing origami.
When in a hurry, they make irreparable mistakes that will affect the change in proportions and appearance of the craft.
graceful bird
This pattern is popular among origami masters; it allows you to create a bird figure that has a sharp tail and a thin neck.
Scheme for beginners:
- first take a double square in a ready-made form;
- folds are made on the sides of the figure, bending the corner on each line towards the central part. The edge of the diamond is folded towards itself;
- The resulting triangle is unfolded, lifting the corner of the surface layer. The same actions are performed with the second line;
- At the bottom, bend the corner on the right to the central part of the figure. Similar manipulations are performed on the left side;
- the lower corners of the rhombus are arched. They stick out on the sides, after which they are moved inside the craft;
- the resulting product looks like a lotus. One of the flower petals is bent at an angle of 90 degrees. This is how the head of the future bird is formed;
- the wide part of the figure plays the role of wings, it is stretched in opposite directions;
- the remaining thin triangle is left in its original form. This is the tail of a crane.
A paper bird like this is easy to make. Even a primary school student can do this process. The work is unlikely to take 10 minutes. In this case, the time required to create a double base for starting actions is also taken into account.
A popular craft among children is a bird that makes certain movements and flaps its wings. It is simple in execution, but the result cannot but please.
Step-by-step instructions for assembling the picture bird:
- In this case, the basis is not a square, but a rhombus with straight sides. The pattern for creating the model can be found in the previous bird model;
- The left and right sides of the diamond are folded together. There is also a movement that resembles turning the pages of a magazine in the opposite direction;
- The bend is smoothed out and the movement is repeated again. This creates a rhombus, with halves formed at the top;
- These halves need to be stretched;
- all layers of the petal from below are folded upward and ironed;
- one of the narrow parts of the figure will later become the head of a bird. To do this, the corner is tucked inward;
- the corners located on top are also bent to the sides. This is how crane wings are made;
- To make movements with the craft, you need to pull the educated bird by the tail.

This toy has a rich history of creation. It was made as a sign of solidarity with Sadako Sakashi, who suffered from leukemia after the war in Hiroshima. She believed that she could defeat the disease if she completed a thousand birds, but she did not have time. The girl performed a total of 644 figures. The rest of the birds were made by Sasaki's friends after her death.
Since then, the crane, which is made of paper and can move, has become a symbol of protest against the use of nuclear weapons by people around the world.
Many origami masters from Japan make special figures for festive events. There is no need to try to immediately make a bird from paper of a similar plan. It is worth training on figures that are easy to make.
 To decorate your apartment or make a memorable gift to family and friends, you can make the following bird figurine:
- folds are marked on a double square figure: on one plane, the corners of the figure are folded towards the central part;
- the workpiece is straightened and then folded so that the triangular elements meet at the bottom;
- Pressure is applied to the future bird, directing it inward. After which the resulting element is straightened again. The result should be a truncated diamond;
- the layer on top is folded back to obtain a boat;
- the figure is unfolded into a sheet, all obtuse corners are bent in the opposite direction. The petal is folded along the resulting fold line;
- the sheet is pressed from all sides. So the corner will tuck inward on its own;
- At this stage, an irregularly shaped figure is obtained. The triangle is the future tail of the bird. The part at the very top is bent in half so that it has a flattened shape;
- for the resulting part, all parts are folded in turn according to the previously completed pattern;
- the figure is turned over, and then they continue to perform actions with the bird as in the previous version;
- This creates the narrow part and folded tail of the crane. The narrow part will become not only the head, but also the body of the craft;
- the narrow base is bent in half to form the head. The crane is given volume by hand.

This plan, carried out step by step, allows you to create a craft that will become not only a table decoration, but also a decorative element for a box with a gift or souvenir.
The crane is a symbol of human well-being and happiness. A paper figure can be a wonderful decoration for a Christmas tree for the New Year.
To hang a cute crane you will need a beautiful ribbon. The figure can be made either on a simple A4 sheet or from thick colored cardboard. Scrapbooking materials will be useful for your work.
To decorate a child's room, paper birds of a similar design are used. To do this, the figures are placed on a thread and hung in opposite parts of the room. Experiments are not forgotten in this work. Often they choose a pattern for the bird, paint it with paints, or even make it out of packaging paper or cardboard.
In order to hang a bird on a thread, you need to pass the thread through the hole in the middle of the body and the bottom of the figure where the folds intersect.
You can simplify your work by choosing special materials for origami. The thinner the paper chosen, the easier it is to fold the crafts. Excessively thin material can create difficulties. But in this case, the work will pay off in full with the appearance of the bird in the end.
You can use recycled paper for your work. This way a person will help the environment and teach a child to take care of nature.
If you plan to transfer the paper figurine after it is made, then the final step is left for later, since after transportation the figurine will look neater. Packing a paper flat crane is easier than packing a three-dimensional figure. Moreover, in this case the risk of crushing the bird is significantly reduced.
With the help of origami it’s easy to surprise your friends or the girl you like. Bird figurines will look unusual if they are made from a simple candy wrapper.