How to make an origami swan the easiest way. How to make a swan out of paper using origami technique
Paper swans are very popular among novice craftsmen making handicrafts. The advantage of this material is that it is environmentally friendly and safe, which makes it possible to make interesting things for children of any age, even preschoolers.
Paper swans can be made using several variations of the origami technique. This may be a more or less complex scheme. Swans made from modules (made of paper) turn out to be very beautiful.
Given the huge selection of ways to create a swan, you can find a suitable option for any age. Working on the creation of this noble bird will be interesting for every child. In return, he will receive a toy made with his own hands, as well as a lot of necessary skills, including perseverance, attentiveness and accuracy. These are the main qualities that the ancient oriental art of paper folding can teach.
But it is worth noting that paper swans can be made not only using the origami technique. The master has the opportunity to create a three-dimensional craft. Corrugated paper is best suited for this. The main thing is to approach the issue creatively, which will allow you to create the most beautiful graceful swan with your own hands. If, in order to create a swan for cutting out of paper, you print out templates, then any child who knows how to work with scissors can handle the job.
Swan using modular origami technique
To make such a craft, you need to stock up on special paper blanks. They are made very simply from small squares. First you need to cut the paper and then fold it in half to make two triangles. After this, the workpiece is folded into a ball. Then the workpiece is turned over, the corners are folded again, and then everything is bent in half. This should result in one module. To create one swan, you will need several dozen blanks. As for the size of the squares from which the blanks will be made, they can be any, depending on the exact size of the craft you plan to make. You can also choose any color. But it's best to make a traditional white swan. Separately, you need to prepare one black module and a couple of red ones to make the beak.
Assembling an origami swan from paper is very simple. To do this, it is enough to nest one module within another. They will cling to the pockets and hold tightly to each other. It's best to start from the head. Here you need to use a couple of red modules, then one black one, and after that all the work will be done with white triangles. The neck and body of the swan should be laid out from them. If desired, you can make a bird with spread wings. Such crafts look especially good.
Advice! The toy will look best if the swan is placed in water. To do this, you need to take a sheet of blue cardboard and glue the finished work in the center. Additionally, you can make water lily leaves and even reeds from green paper.
Origami is most interesting for children at primary school age. For example, a first-grader will have enough care and accuracy to make modules and assemble them correctly. Moreover, at this age, a child can already fully work with scissors, so he can even be trusted to cut paper into squares.
Swan from a napkin
For this method, you can take either paper napkins or fabric ones, which are used for table setting. You can use the decoration when receiving guests, who will certainly be surprised by the imagination of the owners of the house.
To create a paper swan with your own hands, you will only need one type of material. The whole process consists of folding a napkin without using additional devices in the form of glue or scissors.
First you need to take a napkin and fold it in half. Next, it unfolds and connects along the fold. Here you need to iron everything thoroughly, and then turn the workpiece over to the other side. Then the corner is folded over, and the rest is folded in half. This will be the swan's neck, which needs to be slightly stretched and straightened.
The part that will be under the neck will act as the body. You need to straighten it and fluff your tail. To do this, carefully lift the layers of the product. This will complete the work of creating a simple swan from a napkin. It can be used to decorate a table or the entire room.
How to fold a swan from a sheet of paper?
The oriental technique of origami allows you to make very interesting crafts from ordinary paper. A swan can be made in at least two ways. The first involves the use of special modules. But this work requires a sufficient amount of time, perseverance and attentiveness. Therefore, modular swans are best made for school-age children. There are also suitable schemes for preschoolers. They are very simple and do not require the use of scissors and glue, which can be very important for children's creativity.
One of the simplest designs involves making a bird with regular wings. To do this, you need to take a sheet of paper and fold it in half, and then immediately fold it back. This is necessary in order to determine the center line of the workpiece. After this, the two corners are bent towards the center.
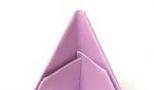
It should look like a bag. Its acute corner must be bent so that the involved part does not reach one centimeter to the middle. Afterwards, the same part needs to be bent again, but in the other direction. If you look at the workpiece at this stage, it will look like a bird, whose neck and beak can be clearly seen.
Next, the resulting element is turned over and bent diagonally. The head can be adjusted a little and placed at the height that will be most appropriate in this case. A triangle will stick out on the side opposite to the beak. It needs to be bent to form a tail.
At the end, all that remains is to bend the wings, and a simple swan using the origami technique will be ready. This craft is very convenient to do with children of different ages. Even the smallest children will happily practice origami, and parents will not have to worry about the child cutting himself with scissors, since they are not needed for this work.
Applications in the form of a swan
The swan is a noble bird, so it will look great on any postcard. If a child completes it in the form of an appliqué, the result will be real beauty that will not leave adults indifferent. There can be a lot of options for making such work. You can use a variety of materials for this, but plain paper is best.
First you need to create a base for the swan - paper appliqué. It is required to mark the pond and the greenery on it. Next, blanks of the bird’s head and neck are cut out of white paper. We must not forget that the swan will have black eyes and a red beak.
Next, you can begin one of the most interesting parts of making the applique. Here you can use various materials. If it was decided to do the work exclusively from paper, you need to cut thin and short strips from it. From these rings should be glued together, which are glued in large quantities and in a chaotic manner in the area where the swan’s body is supposed to be. This way the applique will be voluminous and very beautiful.
The second option would be to use corrugated paper or a white napkin. Thin strips are cut from them, which need to be crumpled up beautifully, and then glued onto the appliqué workpiece. This will give the swan an unusual fluffy body. Approximately the same effect will occur when using cotton wool. It makes very interesting swans. In this case, pieces of cotton wool can be draped not only on the bird’s body, but also on its neck.
Very interesting volumetric applications are obtained using the quilling technique. Here, strips of paper are used, which are twisted and glued to the base or to each other. From such paper strips you can make an original swan, including a three-dimensional version.
Attention! For preschool children, making appliques using the quilling technique will be a very useful activity, as it allows you to quickly develop fine motor skills.
You can use various materials to make the applique. Very beautiful works are obtained using felt, polymer clay and even ordinary plasticine. Recently, a material such as foamiran has become very popular. It is easy to use and allows you to create even large-scale crafts.
And yet, despite all the variety of materials that are offered to craftsmen, plain paper is the most popular. You can make any craft from it, including three-dimensional ones. Paper is an inexpensive and environmentally friendly material, which is very important when it comes to children's creativity.
An original thing, isn't it? Such a colorful swan will not only decorate your home, but can also be a wonderful gift. Making such a swan is not so much difficult as it takes a long time, because it consists of many elements (modules), and of course it is completely handmade. See below for a detailed diagram of a modular origami swan.
This technology was invented by the Chinese; they were the first to create three-dimensional figures from triangular origami modules. The composition consists of many identical elements (modules). Each module is made up of one sheet of paper, and then the modules are connected by nesting them inside each other.
You can assemble such an origami swan without glue, the friction force will not allow the structure to fall apart, but it will still be more reliable to glue the modules together, i.e. The figure can be used as a toy and not be afraid that it will fall apart.
To make a modular origami swan you need to fold many modules of different colors, their number is indicated below. It would be nice to make such a complex figure together with friends or assistants. You need to take high-quality paper; office colored paper or coated colored paper will do. It is better not to use thin paper.
As mentioned above, the basis of all origami is a module; let’s take a detailed look at the technology (scheme) for its manufacture.

The module is made up of a rectangle of colored or white paper. The aspect ratio of the rectangle should be approximately 1:1.5. You can get the desired rectangles by dividing the A4 format into equal parts. If the long and short sides of A4 format are divided into 4 equal parts and cut along the marked lines, you will get rectangles approximately 53x74 mm.

If the long side of A4 format is divided into 8 parts, and the short side into 4 parts, you will get rectangles 37 × 53 mm.

You can also fold modules from half a square using note blocks available in office supplies.
How to fold a triangular origami module
1. Place the rectangle with the back side facing you. Bend in half.

2. Bend and straighten to mark the middle line.

3. Fold the edges towards the middle. (At this stage, you can turn the part upside down towards you and fold the edges towards the middle on the other side. Everyone can find the most convenient way for themselves). 
4. Turn the workpiece over. 
5. Fold the corners. (Please note: it is better to leave a small gap between the folded corner and the upper triangle). 
6. Raise the edges up. 
7. Fold the triangle. 
The resulting module has two corners and two pockets. 

How to connect modules to each other?
Modules folded according to the above diagram can be inserted into each other in various ways and obtain three-dimensional products. Here is one possible connection example: 
Assembling a swan figure
1 red 
136 pink 
90 orange 
60 yellow 
78 green 
39 blue 
36 blue 
19 purple 
If you want to make a snow-white swan with a red beak, then take 458 white rectangles and 1 red one.
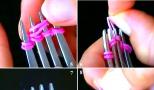
Take three pink modules and arrange them this way. 
Insert the corners of the first two modules into the two pockets of the third module. 
Take two more modules and attach them to the first group in the same way. This is how the first ring is completed. It consists of two rows: an inner row, the modules of which are on the short side, and an outer row, the modules of which are on the long side. 
Each row consists of 30 modules. Assemble the ring along the chain, holding it with your hands. Use the last module to close the ends of the chain.

Take 30 orange modules and complete the third row. Please note that the modules are put on in a checkerboard pattern. 
Complete the fourth and fifth rows in the same way, also consisting of thirty orange modules. 
Now, holding the edges of the workpiece with your fingers, perform a movement as if you want to turn the entire ring inside out. It should look like this. From above it resembles a stadium. 
From the reverse side, the “stadium” will look like this: 
Complete the sixth row, consisting of 30 yellow modules. Now you need to put them on from above. Check that the arrangement of the modules is the same as in the previous rows. 
From the seventh row, start making wings. Choose the side where the swan's head will be. Choose one pair of corners (from two adjacent modules). This will be the attachment point for the neck. To the left and right of this pair, make a row of 12 yellow modules. Those. the seventh row will be 24 modules and has two spaces. 
Continue making wings, decreasing each next row by one module. 8 row: 22 green modules (two times 11), 9 row: 20 green modules, 10 row: 18 green modules. 
11th row: 16 blue modules, 12th row: 14 blue modules. 
13 row: 12 blue modules, 14 row: 10 blue modules, 15 row: 8 blue modules. 
16 row: 6 purple modules, 17 row: 4 purple modules, 18 row: 2 purple modules. The wings are ready. Shape them so that they are convex at the bottom and slightly curved at the top. 
Make a ponytail consisting of five rows. In the same way, reduce the modules by one in each row. It will take 12 green and 3 blue modules. 
To make a neck, the pieces need to be connected in a different way. Insert two corners of one module into two pockets of another. 
Connect 7 purple ones to the red module. Try to immediately give your neck the desired bend. If you don’t want the swan’s beak to be forked, it’s better to glue the corners of the red module in advance. 
Next, connect 6 blue, 6 light blue, 6 green and 6 yellow modules. Give your neck the desired shape. 
Strengthen the neck on two corners between the wings. If desired, add details - eyes, bow. 
Make a stand in the form of two rings, consisting of 36 and 40 modules. Connect the modules in the same way as for the neck. 
If desired, the rings can be glued together and the swan can be glued to the stand. 
That's it now, the origami swan is ready. As you can see, a paper swan looks very elegant and will delight the eye for a long time. Having made such a swan for yourself, I think you will not regret the time spent.
Swans are the personification of nobility, devotion and purity of soul. This bird evokes touching feelings in people, so it would be nice to give your loved ones a gift in the form of such a souvenir. There are many ideas for creativity. A bird made of snow-white paper looks extraordinary. With step-by-step instructions on how to make an origami swan, this technique is easy to master even for beginners.
Assembling the figure, despite its apparent complexity, takes a little time. The main thing is to first watch special video tutorials and master classes, where beginners are taught how to make real works of art out of paper.
The swan is a gentle and graceful bird, and the pair is a symbol of devotion and love. Let's start the folding lesson with simple shapes.


Video: Volumetric swans in origami style
Master class: Swan in modular origami
 The entire figure will consist of small elements assembled according to a special pattern; in paper crafts they are called modules. You will need exactly 459 of these blanks.
For those who are trying their hand for the first time, we provide detailed instructions on how to create them:
- Take sheets measuring 4 by 6 cm and fold in half.
- You will get rectangles, bend them vertically, and then fold the corners directly along the vertical fold line.
- There will be free parts at the bottom, bend them up. Hide the corners of the paper template inward, along the main triangle.
Notice how it looks in the photo.

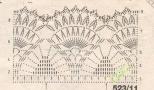
The work is done in stages, if you have completed the first one, then it is the turn of the main part. To make a swan from triangular modules look like the one in the picture, follow the following assembly diagram.
Step-by-step instruction:
- Take three blanks, then insert the corners of two of them into the pocket of the remaining one.
- Add 2 more modules, joining the first three on the side.
- It’s better to do everything step by step, continuing, you will get the entire row of 30 blanks.
- The first circle consists of two rows.


- Afterwards, the set of elements will occur in a checkerboard pattern. Add 30 pieces in a circle. You will have five rows.
- Take one module and press it in the middle, as if you want to turn it inside out. You will end up with a figurine that looks like a vase on one side and a stand on the other.

- Turn the workpiece over to the first side and continue.
- The swan in the sixth row also consists of 30 elements.
- In the seventh there will be a decrease, adding up 24 pieces.
- To avoid mistakes and place it correctly, decide on the side on which you want to secure the neck. Prudently leave 2 corners of two elements free. And continue to fill in the rest, 12 pieces on both sides.
- Starting from the eighth row, reduce each time by two modules, respectively, 22, 20, 18.


- According to this description, continue making until you have 1 piece on each side. These will be the wings.
- The neck is important in such a bird. To complete this, insert two corners of one element into the pockets of the other. It is necessary to gradually bend it, but carefully so as not to break it. When you are finished, attach it to the body where you left the space.


- To highlight the beak, use red or pink paper.

- If desired, add appropriate decorations: decorate the figurine with a ribbon, bow, flowers, or place it on an impromptu lake.
- With this, the process of creating crafts has come to an end.
Video: Master classes on making a swan from modules
Working with paper allows you to develop fine motor skills, which has a beneficial effect on the overall development of the child. You can develop fine motor skills by making various birds and animals. This also allows you to explore the diversity of the animal world with your child. One of the most beautiful and graceful birds is the swan. So, how to make a paper swan step by step?
Working with paper allows you to develop fine motor skills, which has a beneficial effect on the overall development of the child.
One of the most beautiful swans made of paper is considered to be the one made from modules. To create this craft, you will need to make a large number of triangular modules.
The first step is to make modules:
- A4 sheet is divided into 32 equal parts. To do this, its length is divided into 8 parts, its width into 4.
- Each resulting rectangle is folded in half along its long side.
- The elongated rectangle is then folded in half, connecting the two short pieces to each other.
- The previous step is turned back, and the halves of the upper side, consisting of two layers, are applied to the resulting middle line.
- The workpiece is turned over. The outer corners of the bottom rectangles are folded. And then the rectangular pieces with a beveled corner are bent to the main triangular element.
- The workpiece is bent in half.
Gallery: pictures of a paper swan (25 photos)


How to assemble a swan from modules?
Assembling a swan using modular origami technology is quite simple, but it requires concentration, since an error in counting can lead to the formation of a crooked figure.
To work you will need:
- 458 white modules;
- 1 red module.

Assembling a swan using modular origami technology is quite simple
Step by step steps:
- Each row of the swan's body consists of 30 elements. The first step is to assemble two rows at the same time: the left pocket of the upper element is put on the right acute corner of the lower triangle. In this way, all 60 elements of the first 2 rows are collected. With the help of the last module, the chain is closed into a ring.
- Next, rows 3-5 are cast one by one.
- The resulting workpiece is turned inside out. Next, another row is built in a similar way.
- In the 7th row the wings begin. For the head, 2 adjacent corners are left. On both sides of them 12 elements are attached. Thus, the 7th row forms a total of 24 elements.
- In each subsequent row of wings, it is necessary to reduce the number of elements used by 1 part. For example, in row 10, only 9 elements will form 1 wing. From the 11th row, 2 elements are decreased. Working according to this scheme, it is necessary to make the 18th row from 1 element for each wing.
- Gently bend the wings with your fingers, giving them a graceful concave shape.
- A tail is made between the wings at the back. The first tail row consists of 5 elements. Each row should be reduced by 1 piece until a sharp tip is formed.
- Then the neck is done. To do this, 1 module is attached to the remaining 2 corners, 2 elements are attached to it, then 1 again. This assembly pattern is repeated until all the white modules are gone. The neck should be crowned with a red module - the beak.
- The neck is given a curved shape. Eyes are attached to the head.
This swan can also be made colored. To do this, the white paper should be replaced with the one that most closely matches the shade to the desired purpose. One of the most spectacular design options for such a figurine is the assembly of a rainbow bird.
Large paper swan: step-by-step instructions
Using modular origami, a large swan can be made.
The assembly of this model has some features:
- Assembling the bird follows similar instructions, however, the rectangles prepared for forming the modules must be larger. So, an A4 sheet should be divided not into 32 parts, but into 8. As a result, the modules will be 4 times larger in size.
- You will also need to use PVA glue to assemble the large swan. This should be done to strengthen the structure.
- Each row of the bird's body should have double or triple the number of parts.

A large swan can be made using modular origami
If you want to make a large rainbow swan, you need to use paper of similar tones, since the contrast on large details will be very noticeable.
Swan: modular origami for beginners (video)
How to make a paper swan using origami?
To make a swan using the origami technique, you only need a square of white paper.
Making a bird step by step:
- The square is bent into a basic triangle shape and then returned to its original state.
- Adjacent corners should be folded toward the center along a diagonal fold.
- Next, you need to bend the sides of the formed triangle by 1/3.
- The resulting angle is bent by more than 50%. Then a small corner is bent to form a swan’s head.
- The workpiece is bent in half, the tail is bent, the wings are straightened.

To make a swan using the origami technique, you only need a square of white paper
Using such figures you can create voluminous appliqué works.
Volumetric paper swan
You can also make a swan out of paper by cutting it out.
To do this you will need:
- sheet A4;
- glue;
- clamp;
- scissors.

Such figures look very impressive as a New Year's decoration.

How to do:
- Sheet A4 is folded in half lengthwise. A template is drawn on the sheet.
- Next, the template is cut out using scissors. Through cuts are made on parallel inclined lines.
- The tail part is turned inside out and glued to the neck part.
- In order not to hold the figurine until the glue dries, you can fix it with a clamp.
- The beak is painted red, an eye is drawn on the head.
Such figures look very impressive as New Year's decorations for a kindergarten or school.
Big swan from children's hands
An excellent option for decorating a group in kindergarten is to create a large paper swan from children's handprints. All you need is paper and glue.
How to do:
- The first step is to cut out the base of the swan with a small oval body, spread wings, graceful neck and head.
- Next, each child traces their palms on a piece of paper and then cuts out the resulting shape.
- The swan's wings are decorated with carved palms, like feathers, pointing the fingers away from the bird's body. The prints should be placed overlapping, starting from the edge of the wings. One handle should be placed in the narrowest part of the wing, two in the second row, and three in the third. When the wing acquires a more uniform structure, the number of palms should be left unchanged, placing each rad in a checkerboard pattern in relation to the previous one.
- Then the resulting figure is decorated with a beak and eyes.
In this work, you should not use a large amount of glue, as it can deform the main figure and lead to its unnatural bends.
How to make a paper swan with your own hands: a simple origami lesson (video)
Paper crafts are objects into which every child puts his soul. By creating them, he develops creatively, and also develops such necessary qualities as perseverance and attention. In the first stages of teaching a child to work with paper, he should be asked to perform basic models of figures. Gradually, with a certain amount of experience working with this material, the child will improve them, finding his own ways of decorating and creating new forms.
(37 ratings, average: 5,00 out of 5)
The swan is a beautiful and noble bird. It symbolizes purity, wisdom and loyalty. It is not surprising that bird figurines are used to decorate weddings and birthdays. How to make a swan out of paper? In the article you will find interesting assembly methods with step-by-step instructions.
How to make a paper swan step by step
For children and beginners, a paper figurine assembled using the conventional origami method is suitable.
When creating crafts, fine motor skills and thinking develop.
You can decorate the interior of a children's room with a paper swan.
What materials will you need:
- sheet A4;
- scissors;
- colour pencils.
So, how to make origami out of paper:

- Cut part of the A4 sheet to make a square.
- Bend the square diagonally.
- Make cuts on both sides of the triangle. This is how you get feathers.
- Straighten the sheet.
- Draw the two bottom corners to the main line.
- Turn the paper over to the other side.
- Bring the bottom two pieces to the line again.
- Fold the piece in half. Make sure that the bottom corner is brought to the top corner.
- Form a swan's head by folding the corner down.
- Bend the workpiece in half, moving away from you.
- Bend your neck up, straighten your head.
- Finish the bird's head along the marked folds. Don't forget to bend the beak.
- Draw the eyes with a black pencil, and the beak with a red pencil.
The craft is ready. Joint creativity will delight children.
Paper swan: modular origami
The technology for creating modular figures came from China. It is not difficult to assemble the craft. A lot of time is spent on the manufacture of composite modules.

The design will be seamless due to the assembly features. The paper parts are inserted into each other so that the friction force prevents them from falling apart. If you want to give a craft, then it is better to glue the parts.
To assemble a paper swan, take the following materials:
- A4 sheets or blocks;
- 1 red and 458 white rectangles.
Find out how to fold the modules:

- Draw the A4 sheet into 4 equal parts on both sides. The result will be 16 parts (53x74 mm).
- Cut the rectangles and create modules.
- Turn the sheet with the long side facing you. Fold it in the middle.
- Fold it in half again and unfold it, marking a line.
- Fold the top edges to the line in the middle.
- Turn it over.
- Bend the bottom corners up.
- Bring the edges up. You will get a triangle.
- Bend the figure in half.
Do the same with the remaining rectangles.
We'll tell you how to assemble origami from modules:

- Insert the ends of two other modules into the two holes of one module. Collect the swan using this pattern.
- Attach two more pieces to the main group. The first row will be in the shape of a ring.
- Then carry out the assembly along the chain. At the end, close it with the last triangle. Each chain has 30 modules.
- Parts of the 3rd, 4th, 5th rows, fasten in a checkerboard pattern.
- Lift the base by the edges. Make a movement as if turning the workpiece inside out. The shape should resemble a bowl.
- Continue assembling the sixth row.
- In the seventh row, leave two gaps - for the head and tail. The rest is paper swan wings.
- Next, apply the wings. Make each layer smaller by one triangle. As a result, there are 18 rows. The latter consists of only two modules.
- Also collect the tail to reduce it. There will be 12 parts in total.
- Proceed to the neck. Insert the two corners of one triangle into the holes of the other. Place the red module first, then connect the rest with a snake.
- Give your neck a natural curve. Secure it in place with two needles.
- Draw or glue on the eyes.

The origami swan is ready. This is a great activity to do together with children.
This craft will be an original gift for friends and a decoration for your home. The main thing is to show desire and perseverance.