How to weave bracelets from rubber bands. We weave bracelets from rubber bands on a machine
Very simple. In general, there are a lot of techniques for making such bracelets. You can make them on forks, special machines, and even on your fingers. But for more complex designs and patterns, it is best to purchase a machine. The advantage of such weaving is that even a child can master it. In addition to the fact that a bracelet is an excellent gift, the activity itself can become an excellent hobby for a child. This way you will accustom him to needlework and help him develop motor skills and manual dexterity.
What you need to weave bracelets
In order to make bracelets from rubber bands yourself, you will need to purchase:
- rubber bands, in very large quantities;
- special fasteners;
- hook;
- for complex patterns - a machine;
- free time and patience.
You will need a lot of rubber bands, so buy in bulk right away. Now let's look at some weaving methods.
How to weave bracelets from fingers
Weaving bracelets on fingers in a figure eight pattern. So, take one rubber band, put it on your index and middle fingers, after twisting it into a figure eight shape. Now take another rubber band and, without twisting, put it on top of the first one. Now pull the first rubber band off your fingers without removing the second one; as a result, the first one should get tangled up in the second one. Now put the third elastic band on top, also without twisting. Remove the second rubber band from your fingers without removing the third. Repeat these manipulations until you get the bracelet of the desired length. During the learning process, take rubber bands of two colors so as not to get confused.
How to weave bracelets from rubber bands on a fork
In the same way, you can make bracelets from rubber bands on a fork, stretching the rubber bands over the teeth, and even on pencils, pens, and knitting needles. It is best to remove the loops with a crochet hook, but you can also use your fingers, just be careful so as not to pull off the wrong elastic bands. The ends of the bracelet must be secured with a special clasp, similar to the Latin letter “S”.


How to weave bracelets from fishtail elastic bands
If you have mastered figure eight weaving, you can move on to the next level - a tourniquet or, as it is also called, a “fishtail”. By the way, a bracelet made using this technique looks like a “spikelet” braid (otherwise known as a “fishtail”).
To make bracelets from fishtail rubber bands, prepare at least fifty rubber bands. Start weaving rubber bands in the same way as in the first way, but together with the second you need to put on the third rubber band, and pull the first through the second and third. Then pull on the fourth elastic band and remove the loops of the second, and so on: after pulling on the fifth, remove the third, after the sixth, remove the fourth. After you have braided to the desired length, hook the end with the clasp, carefully remove the beginning of the bracelet from your fingers and pull out the first elastic band, then hook it to the second end of the clasp.

As you can see, making bracelets from rubber bands is not difficult. You can choose either 2 colors or several at once, for example, all the colors of the rainbow in the correct order, then you will get a rainbow bracelet. You can also weave figure eight or fishtail bracelets in double or triple sizes. But for this you will need a machine, since fingers or a fork are not enough to secure the rubber bands.
In general, making bracelets from rubber bands is not particularly difficult, you just need to strictly follow the instructions. Using such a machine, you can weave complex patterns that look like fish scales; they are also often called “dragon scales.” The main thing is to use bright and different colors so as not to get confused. Remove the loops with a crochet hook, while pulling the elastic bands, but not too much, so as not to tear them.

You can make bracelets out of rubber bands even easier. To do this, take one rubber band, cross it with a figure eight and fold it so that you get a ring. Secure with clasp. Take the second elastic band and also fold it in half, securing it at the other end of the fastener. Attach the second fastener to the second elastic band and attach the third elastic band to it, and so on. You will get a very simple bracelet made with rings. The main thing is to be patient and careful, then everything will work out!
Evgenia Smirnova
To send light into the depths of the human heart - this is the purpose of the artist
Content
Weaving baubles from rainbow looms rubber bands has recently become increasingly popular. For the first time, these materials for needlework became widespread in 2014, after which almost every child who loves to work with their hands wants to know how to weave bracelets from rubber bands. There are many ways to make stylish baubles, as well as hundreds of weaving patterns.
From the simplest ones that even a beginner can handle, to the complex ones that require experience. Below are several photos and video tips for creating beautiful, bright children's bracelets.
Instructions and patterns for weaving rubber band bracelets with step-by-step photos
Weaving methods using rubber bands have been known for a long time, but a big impetus for this direction of needlework was given by the invention of a special machine by the American Chin Chong, who wanted to surprise his daughters. Over time, this product spread throughout schools, and the creation of bracelets fascinated children: baubles became unique symbols of friendship. What is necessary:
- The machine is perfect for a child with large fingers; it allows even an adult to participate in the process of creating jewelry; weaving with it is easy and enjoyable.
- For those who do not have a machine, they have come up with many other ways to weave bracelets from rubber bands: using a fork, a plastic slingshot, only with a hook or on your fingers. And although a special device greatly simplifies the weaving process, baubles made using other devices look no worse. As they gain experience, children learn to create bracelets from hearts, decorated with flowers, roses, stars, and bows. Decorative elements are made according to a strict pattern using a thin hook.
- Elastic bands are used as the main material, although if desired, children can complement the bracelets with beads, ribbons, and other details. You can purchase them in special multi-colored sets for weaving from rubber bands or rubber rings of the same color in a bag separately.
Thanks to this type of needlework, the child learns to better control his body and develop fine motor skills. Weaving bracelets helps improve concentration, and as a result, better learning ability. Several master classes with photos will help everyone who wants to weave an interesting bauble in different ways.
On the rainbow machine
- To get started, take the first elastic band of your desired color. There can be several shades of material, it is advisable to start with three. They will have to alternate. First, place the first silicone ring on two posts: the middle one and the post next to it on the left side.
- Take an elastic band of a different color, put it on the leftmost post, which already has one loop, stretch it to the middle post, as shown in the picture. The elastic bands should be arranged in a zigzag pattern on the machine.

- Continue arranging your bracelet materials in the same manner, alternating the colors you like.
- Turn the machine over so that the arrow is facing you. So, while the bracelet is being woven, it will be easier to pick up the rubber rings.

- Next, work with the pillar that is closest to you. Using a hook, grab the elastic band from the middle row that is located below. Pass it through the top, swapping places with the adjacent loop.
- Place the removed elastic band onto the adjacent row, connecting with a figure eight. Repeat similar steps with all lower rubber rings. When working with the machine, the weaving should go to the left, regardless of how you turn the tool towards you.

- Advice for beginners: if you are unable to work with a crochet hook at first, do not despair, this technique requires some skill. Over time, creating a bracelet will be much faster and more enjoyable. As a result, you should have two rows of colored circles, as shown in the photo.
- To be able to wear the bracelet, attach special S-shaped clasps to both sides of the future jewelry. They can come complete with a set of elastic bands or be purchased separately.

- Using a crochet hook, carefully remove all the loops from the loom posts.
- Connect the two ends of the bracelet using a clip. A simple and beautiful bauble is ready! Based on this technique, you will later be able to create original, more complex weaving.

On the forks
A fork is a device that everyone has in their home. With its help you can create a beautiful, unusual decoration. Place 3 elastic bands on its teeth as follows:
- Pull the first one over the 3 teeth on the left, then twist it in a figure of eight, and put it on the 3 right teeth. The loops will intersect on the two middle columns.
- Place the second one on 4 prongs, and stretch the back part onto 2 middle ones.
- Put on the third one in the same way as the previous step. See how this weaving turned out in the photo:
- Take the hook. First, hook it on the left loop of the bottom elastic band, remove it from the fork and thread it between the two middle rows. Do the same with the second loop.

- Next, put on the rubber ring in the same way as you did in the first step in the last stage: place it on the four prongs, extend the back part to the two middle ones. Using a hook, continue to pull out the loops, first on one side, then on the other - this is how you will weave a fishtail bracelet.
- The length of the bauble requires that the future decoration be periodically removed from the fork. Do this as shown in the photo, hooking the outer elastic bands, then carefully move upward along the teeth.

- Remove the future bracelet completely.
- Carefully put back only the outer loops, continue weaving as you did before.

- Hook the clasps around the edges of the decoration. The beautiful bracelet is ready!
On fingers
- Choose several elastic bands in contrasting colors - this will make the bauble look more beautiful and brighter. If desired, you can use plain materials. For, use your middle and index fingers: take the rubber ring, twist it with a figure of eight on them. Place the next 2 rings without twisting.

- First, remove the bottom left loop, place it between your fingers, then do the same with the right loop. They should be in the middle, as you see in the photo.

- Add the next rubber ring. With the loops that turned out to be the lowest, proceed similarly to the previous step.

- Remember that when you weave a bauble, you should see three elastic bands at the same time. Lift the bottom loops up, release them, and put on the next elastic band. Continue weaving until you get the desired length of your product.

- If the bracelet comes out uneven, don't worry. After production is completed, the baubles take the required shape.

- When you have woven the ornament to the desired length, leave 2 loops, do not put on the next one. Carefully remove them from your fingers. You will need a fastener to secure the sides.

- A beautiful, multi-colored bauble is ready!
Using a hook
- If you have a hook and elastic bands, but you cannot weave a bauble solely on your fingers, use this method. First, fold 2 elastic rings into a figure eight.
- Next, squeeze them tightly between your thumb and forefinger. So that the untwisted edges are free.
- Slide the tool under the loose rubber rings.
- Hook the elastic band with the edge of the hook, pull it so that it is located approximately in the middle between the loose rings squeezed between your fingers. Be careful not to pull too hard, otherwise there is a risk that the material will fall out of your hands.

- Use your fingers to move a little closer to the new elastic bands and grab them.
- Thread the hook again as in step number 3.
- Pull the next elastic through in a contrasting color. Continue this until you reach the desired length of your product. This could be a finger ring or a bracelet.
- Secure the ends with clasps. Job finished!
Using a slingshot
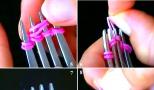
- performed as follows: take a slingshot, put 3 elastic bands on its edges: the first one, twisting it in a figure eight, the second one simply hooked on both edges, the third one is similar to the previous one. It should look like in the photo.
- Grab the right loop of the lower elastic band with a hook, thread it through the top and place it between the posts. Do the same with the second loop, which is on the left.

- Put on the next elastic band (it can be a contrasting shade or the same one that was used before). Use your hook to lift the loop on the right, which happens to be the bottom one, remove it from the posts, then do the same with the left one.
- Put on the next rubber ring, remembering to alternate colors, follow the technique of the previous steps. Continue weaving until the bracelet is the length you need.

- Next, you need to secure the bracelet on both sides so that it does not fall apart. To do this, fasten the clasp as shown in the photo, remove the bauble from the fork, and then take out the extra rubber bands.
- How it should turn out:

Today, crafts made from rubber bands are a fashionable and popular type of needlework. Because this type of hobby is accessible to absolutely everyone, regardless of age.
In addition to the fact that jewelry is made from rubber bands, they can also be used to weave items useful for everyday life.

The accessibility of this type of needlework lies in the fact that all materials are relatively inexpensive, and they are sold in many stores.
Advantages of crafts made from rubber bands
One of the main advantages of this type of needlework is the low cost of the material. Elastic bands and related products are sold in many stores.

Elastic bands can be used not only for weaving, but also for their intended purpose, for hairstyles. You can also make wonderful and original souvenirs from them for friends and relatives. For a small fee you can get the necessary and multifunctional products.

You can also spend family leisure time with this hobby. Which will bring joy not only to children, but also to adults.

It is very useful for preschool children to engage in this type of needlework. Because the following skills are developed:
- fine motor skills;
- imagination;
- thinking.
Crafts made from rubber bands for weaving develop a sense of beauty in children and give them the opportunity to express their imagination.

Another positive side of this handicraft is that it does not require special skills and knowledge. To start creating, just understand the technique of weaving elastic bands.

To help beginners, there are a huge number of master classes on crafts made from rubber bands. Therefore, at the initial stage there are no special difficulties.

Use of rubber items
Crafts made from rubber bands can be used in different ways. Let's consider possible areas of their application
Gift for loved ones
Rubber bands can be used to make various jewelry items or keychains. And give it to friends and relatives. Such a gift will not cost much, but at the same time the memory of it will be preserved for many years.

Toys for children
Many craftsmen create dolls, animals, and fairy-tale characters from rubber bands. They also make fairy-tale compositions for games with children.

Design element
These crafts can complement the interior of the room. With them, the room will be transformed, filled with individuality and uniqueness.
By making crafts from rubber bands on a slingshot, you can create unique New Year's toys and garlands.

Materials and tools for crafts
Those who are just starting to learn weaving will need to purchase elastic bands and a hook. For the first time, you can buy a special kit; it already contains everything you need to get started.

In cases where you want to learn how to make more complex products, you will need to purchase additional tools in addition to elastic bands and a hook.

Note!

- weaving machines;
- fasteners, fastenings;
- various additional accessories.
Weaving technique
Let's take a closer look at how to make crafts from rubber bands. In the first stages, a machine is not required. You can weave elastic bands on your hands. However, it is necessary to prepare a weaving pattern for the product in advance.

It is important that only simple products can be woven by hand. For more complex items, additional equipment is required.

After mastering the hand weaving technique, you can move on to working with tools, that is, use hooks and small machines.

Let's take a closer look at the weaving technique called "fishtail". This technique is the most popular among lovers of this type of needlework.

To get started, gently prepare the next tool - elastic bands, hook, machine.
Note!

- An elastic band is placed on the machine and twisted in a figure eight. The second is simply baited, and the third is twisted again.
- Next, the weaving process itself begins. On both sides you need to pry the bottom elastic band and pull it through the other two to the central part.
- Then the next elastic band is strung on top without twisting. Then the lower elastic band on both sides is moved to the central part. Weaving continues like this until the desired size. The result is a flagellum, which in appearance resembles the tail of a fish.
- Special fasteners are used to connect the two ends. As a rule, they are sold as a set.

There are many different weaving techniques. However, they are all built on the same principle of knitting and twisting elastic bands.

Crafts made from rubber bands can be supplemented with various decorative elements. For example, in the photo of DIY crafts made from rubber bands, there are different types of products that are impressive in their appearance.

Photos of crafts made from rubber bands


Note!


Making a wonderful and stylish accessory such as a bracelet from rubber bands is very simple! Material for weaving can be purchased at any office supply store, its cost is quite low. Most often, there are entire sets on sale that contain the main material for weaving, that is, the elastic bands themselves and special tools. To create such trendy and fashionable bracelets, there are many patterns and methods. Several of them are described in detail and step by step in this master class! As you probably already guessed, today we will tell you how to weave bracelets from rubber bands.
You will only need a few materials and tools, such as:
- small elastic bands for weaving;
- a small plastic hook;
- ordinary forks;
— special plastic clasps for fixing the bracelet.
The first weaving option is called “Fishtail”.
You can complete the entire weaving process using either your fingers or a fork. In this case, the creation of the bracelet will be done using a fork! You can choose the shades of the rubber bands used to suit your taste, since the color range of this material is very wide. The first rubber band should be twisted once and secured on the outer teeth of the fork.

Then, you need to add two more elastic bands to it, fixing them in the same way on the first and last clove, but you don’t need to twist them!

Then, using a special crochet hook, remove the bottom elastic band. It is better if the tool is small in size; it will be very convenient to work with!


The last one is also removed, then a new one is added, etc.


Soon the length of the product will increase, so it needs to be pulled back periodically so that it does not interfere with the process.


Thanks to this nuance, the elastic bands in the product will take the required shape!

After this bracelet has acquired the required length, it needs to be secured using special, tiny clasps. To do this, you need to remove the lowest element.


And insert a hook into the remaining ears on the fork.


Then, carefully pull the elastic bands and secure the small fastener on them.


On the other hand, when the product is almost finished, you need to repeat the previous step!

Thanks to this device, the bracelet will not unravel and will retain its appearance for a long time. As a result, after some time, we got a stylish, bright and wonderful bracelet! Because of this weaving method, it has a special density and strength!


The second weaving option is more original, but also quite simple! To create it, you will need to use two forks!

You need to put them together, and in this way you can start weaving.

To begin with, you need to secure the first elastic band by twisting it only once.

Afterwards, an elastic band is added to the two outer teeth of each fork, but of a different shade.

On the other hand, it is necessary to secure the rubber band in a similar way.

After, carefully hooking the last white elastic band, you should simply remove it from the forks. As a result, it should end up in the center, between the forks.


Afterwards, you need to add one more detail to the product.

It needs to be lowered as low as possible so that in the future it does not interfere with the weaving process, since it will no longer participate in it!


And then, completely remove the previous ones (pink ones).


Between each shade, you need to add one white elastic band, which does not need to be braided, but simply lowered down so that it does not interfere.

Gradually, the length of the bracelet will increase significantly, and more and more white elastic bands will appear.


Once the piece is the length you want, you need to finish it off by adding a tiny plastic fastener to the end of the piece. To do this, the last rubber band must be moved to one side of the fork.


Do the same action on the other side.

Then, transfer the loops to the fork where the entire bracelet is assembled.


Thread a white elastic band through them, and then fix the hook in it.

Then, you need to very carefully remove the entire product from the fork, without removing the tool from the final elastic band.


This is how we got a very original and stylish bracelet! On the handle it looks quite unusual and elegant!


And the last, third option for weaving a bracelet from rubber bands is called “Circle”. To create it, just like in the first weaving method, you only need one fork.

The first rubber band needs to be twisted once to form a figure eight and secured to the tines of the fork you are using.

Then, add another part, but you don’t need to twist it!

The lowest elastic band must be removed so that it is in the center of the previous one, in the form of a “double” circle.


Afterwards, on the two rightmost cloves you need to add a folded elastic band.

Then, another one.


But then, using a tool, remove the previous (pink) rubber band.


After which, the lower, transparent elastic band should also be removed from the fork and fixed between its teeth.


In this simple way, continue creating the product further. Gradually, with increasing length of the product, it needs to be brought to the back of the fork. So, it will not interfere and distract from the process!


The last (yellow) rubber band needs to be removed from the fork using a small plastic hook.

Then, thread one of the loops into the other.

Later, you will need to attach a small clasp to this loop.

You need to find the same elastic band at the other end of the accessory and do the same thing!

The stylish bracelet is ready!


Such an original bracelet will look great on your hand! He is quite unusual and cute!


As you understand, it will be very easy to weave such bracelets. Even a child can master some weaving patterns! As a result, you get the most varied, stylish and bright bracelets! You can also experiment and come up with something of your own, or try your hand at creating a rainbow bracelet, which is in no way inferior in beauty to those presented above.
Weaving a “Spikelet” bracelet is a good way to spend time profitably.
A bracelet made of colored rubber bands, made in the “Spikelet” style, is a bright, original accessory, the creation of which can be an interesting activity for any creative person. Made in colorful, summer colors, it will perfectly highlight your individuality, regardless of the chosen clothing style. And so, in order to weave a “Spikelet” with your own hands, you will need:
a simple weaving machine - “Slingshot”;
silicone rubber bands of 2 colors that match each other (the quantity will depend on the length of the bracelet);
hook;
S-clip for fastening.
By following step-by-step instructions, you can learn how to create original jewelry yourself.
Step 1. You need to turn the machine you are using with the open side towards you (in this case, the rubber bands will be easy to grip).

In this master class, small elastic bands of two colors are used: the sides of the bracelet will be orange, and the middle in the form of a spikelet will be light green. First, you should put on the first rubber band (orange), twisting it in the shape of a figure eight.


You need to put another orange rubber band on top of both columns (no need to twist it).

Step 3. Pulling back the green elastic band with the back of the hook, pulls out the bottom one (orange) and drops it onto the center of the “Slingshot”.

A green rubber band is screwed two turns onto the left column (on top of the other rubber bands). A single orange one is placed on top.

Step 4. By pulling the green elastic band from the left column, the lower orange one is pulled out and removed to the center.


Starting from the next step, the technology of weaving the “Spikelet” bracelet changes slightly.
Step 5. Now, through the green rubber band folded in half, all the rubber bands located at the bottom are pulled out. They still drop to the center. You should start with the right column (it was on it that the green elastic band was put on before).


Step 6. Already from the left column, all the elastic bands are pulled out again through the green elastic band and thrown into the center.


Step 7. Without disturbing the sequence of alternating elastic bands, the bracelet is woven to the desired length (depending on the circumference of the wrist).

The longer the product becomes, the stronger its pattern will be drawn.

Step 7. When the desired length is achieved, you can proceed to the final stage - closing the bracelet.

Finally, remove the green rubber bands from both posts in the center.


The two remaining orange rubber bands are transferred from the left column to the right one. A clasp in the shape of the English letter S is threaded through them.


The final look of the craft. Photo 1.

The final look of the craft. Photo 2.

The final look of the craft. Photo 3.
After you have already woven this beautiful bracelet, try making another pattern, namely the “Friendship” bracelet. Link .