Hat knitted with pearl pattern: knitting secrets. Hat with a fashionable pearl pattern How to reduce loops in a drawing
A lot can be said about the pearl pattern knitted with knitting needles. After all, it is quite universal, easy to perform and does not require special decorations. That’s why you can so often find descriptions of women’s hats knitted with pearl patterns. They look great, because they keep their shape perfectly, do not wrinkle when worn and do not lose their relevance. To keep the hat warm, use thick yarn.
How to knit a hat with a pearl pattern
Size: 53/55 – 56/58 cm.
What you need to knit a hat with a pearl pattern:
— yarn 50g/75m;
- knitting needles No. 4.5.
Knitting density of the pearl pattern with knitting needles: 17 loops * 30 rows = 10 * 10 cm.
First, decide what pattern you want to knit your hat with - large or small.
If you decide to knit a hat with a double pearl pattern (large):
Row 1: k1, p1, alternate until the end of the row;
2nd row: knit over knit, purl over purl;
3rd row: purl loops over knit stitches and vice versa – knit stitches over purl stitches;
4th row: like 2nd.
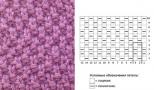
Hat with pearl pattern with knitting needles: pattern diagram

Cast on 80-88 stitches on the needles.
No. 4.5 20-21cm. The last row is the front row.
Decrements are made with a shawl pattern (all stitches are knit).
4th row: every 5th loop we knit two together. So we cut it by 16-18 loops. We should have approximately 64-70 loops left.
Row 8: remove another 13-14 stitches evenly. 51-56 loops remain.
12th row: remove another 10-11 loops. 41-45 loops remain.
16th row: remove 9-9 loops. 32-36 loops remain;
Row 20: knit two loops together. There are 16-18 loops on the needles.
Row 24: We also knit two loops together, leaving 8-9 loops.
Knitting is the most common type of needlework among women. This is a simple activity, skill in which accumulates with experience. Starting to knit with simple patterns and light patterns, the knitted products and the design of the selected pattern gradually become more complex. One of the simplest relief patterns is the pearl pattern - it is perfect for beginner knitters who have mastered the technique of knitting knit and purl stitches. They can be used to knit both children's items and products for adults. Pearl knitting looks like a scattering of small pearls or pebbles. Many people call this pattern “rice” or “tangle”.


This pattern looks like double-sided knitting - the fabric is the same on the front and back sides. In addition, it holds its shape well and is suitable for making jackets and even coats.
Products knitted with this pattern do not require steaming with an iron - simply soaking the parts in cool water and drying them on a towel is enough. The pearl pattern is used as decoration - children's blouses and sweaters, trimming cuffs and trims on the product, decoration in the middle of rhombuses and other variations. Even an inexperienced craftswoman can handle the presented pattern. The main thing when mastering it is not to lose track of the correct knitting and alternation of loops.
 How to knit
There are two types of pearl knitting - small and large - and each of them has its own pattern and description.
Small pearls
 This is a rather dense fabric with small protrusions that look like grains. For the sample, cast on the knitting needles a number of stitches that is a multiple of 2. Then knit using the following description:
1. First row. Remove the edge, continue knitting alternating knit and purl stitches until they are finished. Knit the edge loop at the end of the row with a purl stitch so that the edge of the fabric is even. The alternation of loops occurs according to the principle of knitting a 1×1 elastic band.
2. Second row. Remove the first loop, and then continue working, changing the loops - knit the front one with the purl one, and knit the purl one with the front one.
3. Do all odd rows like the first, and all even rows like the second.
The result is an attractive pattern with small “pearls”. It is used mainly for decorating the knitted product.
Large pearls
 The fabric knitted with this pattern has a more relief structure - the resulting relief looks like oblong pebbles. For the sample, cast on an even number of stitches and knit using the following pattern:
1. First row. Slip the first stitch and knit the entire row with a 1×1 rib (knit and purl).
2. Second row. Continue knitting with the same elastic band.
3. Third row. After the edge, start making shifts in the same way - knit a purl loop over the knit stitch, and a knit stitch over the purl stitch.
4. Fourth row. In this row, knit stitches according to the pattern.
From the fifth row, continue knitting, starting from the first row, that is, with the loops shifted relative to the last row.  In “simple language”, large pearls are knitted by shifting the loops in every second row.
If you look at the photo, it becomes clear how the two variants of the pattern differ.
On circular knitting needles
Separately, you should consider knitting the presented pattern on circular knitting needles. The pearl pattern on circular knitting needles is also knitted offset by one or two rows, depending on the chosen pattern. You just need to mark the beginning of the row and start shifting the loops in this place so as not to get confused.
Note! The pearl pattern may have other variations. For example, knitting knit and purl stitches can be alternated according to the principle of knitting a 2×2 elastic band. Use offset options, both in each row and every 2 rows - you will get completely different variations.
What can you knit with this pattern?
To get better at making the presented pattern, you should start with the simplest product. Knitting a scarf for a child or an adult - nothing could be easier. For a scarf, you need to choose soft yarn. Its thickness depends on the fact for whom the future product is intended - children can take a thin thread, but adults, especially men, will use thicker yarn. The technique of knitting a scarf is simple: cast on the required number of loops and knit with a pearl pattern to the required length, then close the loops.
This type of knitting is ideal for knitting a snood. The product turns out dense and embossed, the edges do not curl, the pattern itself looks beautiful and unusual. Since the pattern is quite simple, the work progresses quickly. Knitting the product in simple rows will also speed it up, but in this case the snood will have one seam. You will need to cast on the required number of loops - it must be even - and knit with any type of pattern: small or large. Alternate rows until you get the desired width of the snood, then close the loops and sew the edges using a hook or a large needle.  If you knit a snood with circular knitting needles, you need to accurately calculate the number of loops for it. They must match the width of the product. Cast on the required number of loops and knit according to the pattern - any of the selected types of patterns. Having knitted the first row, close it in a circle, mark the beginning and continue knitting the pattern in the circle, making offsets at the beginning of the marked row. Snood is knitted quickly and easily; you can make yourself several different models and colors - they will enliven your wardrobe, give it femininity and unusualness.
A hat or beret knitted with a pearl pattern will always look perfect. This is explained by the fact that the pattern holds the shape of the product well, does not wrinkle and is fashionable at any time. The product will require thicker yarn to keep it warmer. Cast on as many stitches as required and knit to a head height of approximately 20-21 centimeters. Next, you need to make decreases, for which you should switch to garter knitting - that is, knitting all the time in stockinette stitch. This is done so that when the loops are decreased, the places where this is done do not become visible. Otherwise, these places will stand out strongly on the pearl pattern. Decrease stitches in every fourth front row - decrease every fifth stitch 4 times, and knit the last 2 rows 2 together each time. Connect the remaining loops and tighten. So just knit a hat - it looks perfect with the same scarf.  A jacket or sweater knitted with a pearl pattern does not even require additional decoration. You can wear braids, but in a minimal amount and only in front. If the product is intended for a child, then you can add other patterns as decoration. You can do embroidery with the same yarn or knit an applique. A good knit for decorating the trims at the bottom of the jacket and on the sleeves. It holds its shape and looks very elegant. You can knit a sweater or jacket in a simple style without making the trims and cuffs with a different pattern. This will look good on men's items.
Even a beginner can master this simple and unusual pattern and use it when knitting any product. If something is unclear in the description or in the photo, you can watch the master class in the video below. Fantasize even with such a seemingly simple knitting pattern - get new variations and use them for your chosen purpose.
Step 1 - STARTING KNITTING First, we knit an elastic band (in 12-15 rows) and then (without adding loops on the knitting needles) we knit the patterned fabric of the hat. We get a model similar to the photo of the purple cap above. Or after knitting the elastic, we can add loops on the knitting needles... and our fabric will begin to expand... and we will get a model of a fluffy hat (like the pink model in the photo above). An important rule for adding loops. When adding loops when knitting a hat with a pattern, only one thing is important - the total number of loops on the knitting needles should be DIVIDED BY THE REPORT OF THE PATTERN (by the number of loops that are repeated in the pattern pattern)... For example, the report (repetition) of our pattern is 8 loops... that means the total number loops on the knitting needles should be divided by 8... For example, there should be 160... or 168... or 176 loops... (edge-edge loops do not count). Step 2 – BASIC KNITTING. Next, when the loops have been added, we begin to knit the pattern... repeating the reports... We run the patterned fabric into 40 rows, if you want the usual size of the hat... (here it also depends on the thickness of the threads) Trying it on your head... in the process of knitting, you yourself will understand when it’s enough to drive in a straight line and It's time to narrow the canvas at the crown. (You can run this patterned fabric longer so that the cap is higher... or finish it earlier so that the hat flows around the head and does not stick out or hang down - everything is up to your taste) Step 3 - COMPLETING THE KNITTING OF THE HAT. Then, when our hat approaches the back of the head (or the length you have in mind)... we begin to cast off 4 (or 6... or 8) stitches in each row - the more stitches you cast in a row, the faster your knitting will end. Since knitting is considered complete when 16-20 loops remain on the knitting needles. An important rule is DECREASING loops. We know that there are fewer loops on the knitting needles if two loops are knitted together (as one)... But in order for the decrease in loops to be UNIFORM, you need to do this decrease in any and all places... and in certain sectors of the hat... (so that these decreasing places are on the same distance from each other). That is, we divide the entire circumference of the hat into sectors (like dividing a round cake into equal pieces with a knife)... the sectors are usually an even number, maybe 6... or 8 or 10... If you have a hat with a pattern (in which some kind of pattern-report is repeated) - then the pattern itself can be a sector... Then we make a decrease in a certain (your choice) place in the pattern - and so in each repetition of the pattern we knit two loops together as one. For example - we have 160 stitches on our knitting needles - and we have reached the top of our hat and we need to decrease. We decide to decrease evenly in 10 places in each row... This means we need to divide our hat into 10 sectors. Then we divide 160 by 10 and we get the number 16... (that is, we mentally divide the hat into sectors - 16 loops in each sector). And that means further we... In our first decreasing row, at the end of each 16-point loop we will knit two loops together (that is, we will pick up each 15th and 16th together and knit as one)... In the second decreasing row of loops in the sector there is one less left (and we will already hook together every 14th + 15th loop in the row)…. In the third decreasing row, there are even fewer loops in each sector (and we will knit every 13th and 14th loop together). And so on... until the total sum of all stitches on the knitting needles is 10-15 (20 for thin threads). That's it - now you can complete the knitting. We collect these remaining loops onto a thread... we pull the thread together, collecting all the loops into a bundle and tie it into a knot (we hide the ends of the knot inside). We close the back seam of our hat... and we're done.
Knitting a hat with knitting needles: a simple but fashionable pattern. For this pattern, it is enough to learn how to knit two main types of loops: knit and purl, and alternate them according to the pattern. Thanks to DROPS NEPAL yarn, knitting a hat is very easy. As a result, you will get an unusually fashionable headdress that matches any outerwear.
Hat sizes: S/M - L/XL (53/55 - 56/58 cm)
Materials required:
yarn DROPS NEPAL gray, 50 g/75 m
Yarn consumption: 100 g
Knitting needles: 4.5 mm thick
Knitting density: 17 stitches. and 30 rows - square 10 x 10 cm.
Double (large) pearl pattern:
- 1st row: (front side) *K1. st, purl 1* st. alternate until the end of the row.
- Row 2: Knit over knit and purl over knit.
- Row 3: Purl over knit and knit over purl.
- 4th row: same as 2nd

Shawl pattern:
We knit all rows with knit stitches.
Description of knitting a hat with a pearl pattern:
Cast on 4.5 mm needles for 80 (88) sts.
Knit with the double pearl pattern described above for 20-21 cm.
- 4th row: decrease 16-18 stitches (about every 5th stitch), you should get 64-70 stitches.
- 8th row: decrease 13-14 stitches (about every 5th stitch), you should get 51-56 stitches.
- 12th row: decrease 10-11 stitches (about every 5th stitch), you should get 41-45 stitches.
- 16th row: decrease 9-9 stitches (about every 5th stitch), you should get 32-36 stitches.
- 20th row: knit 2 sts. knits together, you should get 16-18 stitches.
- 24th row: knit 2 stitches. knits together, you should get 8-9 stitches.
Cut the thread and pull it through the last remaining loops, pull it off, and fasten.
You can easily update your wardrobe with such a wonderful and simple hat. This is ideal for winter walks and going to work. A hat with a rice pattern is knitted so simply that you can handle it even if you picked up knitting needles for the first time. All you need is knowledge of knit and purl stitches. This pattern is also called “Putanka”. Alternating purl and knit stitches will create such a beautiful and unique pattern.
To knit a hat with a rice pattern using knitting needles, you will need:
— 100g yarn (wool);
- knitting needles No. 4;
- needle;
- centimeter.
How to knit a hat with a pattern Fig
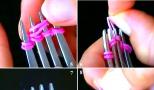
We start knitting with the “Cartridge Tape” elastic band.
Double-sided rib is easy to knit, but looks great and stretchy.
Cast on loops the number of which is a multiple of 4 + 2 edge stitches.
For example, 98 loops on the sample.
The elastic band is knitted with facial loops.
1st row: 1 edge, 3 knit loops, slip 1 (thread before work), 3 knit loops to the end of the row. To complete the row you need 3 knits. 1 remove, 1 edge.
Row 2: 1 edge, 2 knits, slip 1, 3 knits, slip 1. Repeat until the end of the row. At the end of the row: knit 3, slip 1, knit 1, edge 1.

We knit by alternating these two rows to get the following fabric:

The width of the elastic will be whatever you like. In the example it is 6 cm.
Row 1: K1, P1, K1, P1.
Row 2: knit 1, purl 1.
The second row is knitted according to the pattern, as the stitches look.
3rd row: over the front loop we knit a purl one, and over the purl one, on the contrary, we knit a front one.
4th row: according to the picture.
Face loop:

Purl:

Knit the required length of the hat.

Decrease the loops while maintaining the pattern in Fig. This is done on the remaining five centimeters of the cap.
Divide approximately the fabric of the hat into 5-6 equal parts. In each of them, knit 3 loops together - where the loops get tangled, knit over the purl.
Three loops that need to be knitted.

This is what decrease looks like 

We do this until there are 20-25 loops left on the knitting needles. But you can leave more loops if you want the crown to be freer.

There are 35 loops left here.
Transfer the loops to the thread using a large sewing needle and thread.

Our hat with a rice pattern turned out to have such a beautiful crown.