Step-by-step extensions using tips. Nail extension with tips at home
Almost every woman dreams of beautiful and long nails. However, lack of vitamins, washing dishes and many other factors prevent you from growing the desired length. Fortunately, there is such a procedure as nail extensions, which allows every woman to become the owner of beautiful and well-groomed nails. This article will tell you what types of this procedure there are and what their differences are.
Types of extensions
Currently, such a procedure as nail extensions has become familiar to most women, because it allows you to forget about manicure for about 1 month. However, before going for the procedure, it is advisable to familiarize yourself with all its types in advance in order to choose the most suitable method for yourself.
There are two main methods of extension:
- on tips;
- on forms.
Let's look at each in more detail.
Tips
Tips are plastic plates that are attached to the nail at one end and form its free edge with the other. They are glued to approximately half the area of the nail plate. The length of the free edge should not exceed the area of the glued tip, otherwise the nail may break in the future.
The most durable tips are made from special ABS plastic. This material is not afraid of high temperatures and aggressive detergents.
Plastic can be of very different colors (transparent, milky, etc.), length, bend, which allows you to choose the ideal option for a wide variety of nail plates.
The plastic is attached to the natural nail with a special glue, after which it is given the required length using a special tool - a tip cutter (cutter). Next, the surface of the nail plate is leveled with a file (the border between the nail and the tip is removed), and it is given a shape. The plastic is finally fixed to the nail using gel or acrylic.
It is worth remembering that the specialist removes the length of the tips with a small margin, since after laying out the gel or acrylic, additional cutting and formation of the required shape will occur.
With high-quality extensions, such nails last from 3 to 4 weeks.
Forms
They are disposable products made of paper or foil, with the help of which the free edge of the nail is formed. The outer side of the paper is covered with a special layer that does not allow the extension material to stick to it. The other side of the product is adhesive, which allows it to be securely attached to the finger.
In addition to disposable forms, there are also reusable options that are made of metal and secured with special clips. This variety must undergo a sterilization process before each new use.
The form is fixed on the finger by placing a special window under the free edge of the nail. After the form is fixed on the nail, its free edge is formed using gel or acrylic. There are special markings on the product that characterize the future length; you just have to choose the one you need. After choosing the length, the master lays out the extension material on top of the form, reaching the required border. Then, after the substance hardens and the nail plate is formed, the form is removed.
The disadvantage of this method is that the natural nail must have a small free edge, at least 1-2 mm, otherwise the form simply will not hold. Therefore, for short-cut nails, extensions using tips are more suitable.
Once the free edge and nail bed have been formed, the forms are removed and discarded. Tips remain for the entire time the nails are worn until they are corrected or completely removed.
Extension material
If we consider the extension according to the material used, it is divided into two main types: helium and acrylic.
The main differences are that acrylic dries in the open air, while gel requires drying in a special lamp.
Let's look at each material in a little more detail.
Gel
It is a thick, jelly-like substance.
There are 2 types of gel:
- Single phase. This type of material suggests that in one jar there will be 3 types of gel at once to create different layers (base, modeling, protective). This option is ideal for beginners.
- Three-phase. This variety consists of 3 gels located in different jars. Three-phase gel is more often used by professionals, as it guarantees better and more reliable extensions.
The main advantages of nail modeling using gel include:
- appearance. Nails look natural, they shine and do not turn yellow;
- no unpleasant odor;
- ease of use. The material is able to spread on its own over the nail plate; it does not dry out in the air, so you can work with it longer, shaping each nail more carefully. In addition, this material is easier to cut and give the required shape;
- ease of correction. During corrective actions, it is not necessary to file off the entire surface of the gel; it is enough to just file away the overgrown or peeling parts.
However, in addition to the advantages, the gel also has disadvantages:
- firstly, for this modeling method a special lamp is used, the ultraviolet rays of which can lead to premature aging of the skin;
- secondly, a material such as gel is less durable. For example, with a strong temperature change, the surface of the nail may crack;
- thirdly, in order to completely remove the gel, you have to use a filing technique, which thins the nail plate. In addition, dust generated during sawing can be harmful to health if inhaled. That is why when working you should wear masks, gloves and use a hood.

Acrylic
Acrylic is a material for nail modeling, which consists of powder and monomer. A liquid substance is added to the powder, as a result of which it acquires the state of a paste. This mixture hardens in air. Surface hardening occurs quickly (within a few minutes), but complete polymerization is achieved after 24 or even 48 hours. That is why, when applying acrylic extensions, physical impact on the nails should be avoided during the first day.
This material also has a number of advantages and disadvantages.
The advantages of acrylic include:
- strength. This material has higher strength;
- just shoot. To remove material from the nail, it is not cut off like gel, but dissolved using a special solution;
- With its help you can make beautiful decorative elements on your nails.
The disadvantages of this method include the following points:
- possible allergic reaction and unpleasant odor. Often a person is allergic to acrylic, and not everyone likes its smell;
- less natural look. When extensions are made with acrylic, the nails do not look so natural; their surface will be matte and may turn a little yellow over time;
- It dries quickly in air, so you need to work with it very quickly.
In addition, acrylic is considered more harmful to the body than gel. When choosing acrylic extensions, you should definitely pay attention to the composition. A substance such as methyl methacrylate is very toxic. That is why you should choose products containing ethyl methacrylate, which causes less harm.
other methods
In addition to acrylic and gel extensions, there is a combined method that combines all the best qualities of each type. This variety allows you to get strong and shiny nails.
The master can perform combined extensions in several ways:
- The base coat is done using acrylic. Next, a gel is applied on top of it to give the nail plate shine.
- The base of the nail is gel, on top of which acrylic is applied. In this case, acrylic is used to create decorative elements (flowers, etc.).
- The specialist uses gel to correct acrylic nails.
- The master alternates materials.
Another type of extension is silk. This type uses fabric: fiberglass, linen or silk. These materials are pre-soaked in a special solution, which makes the fabric hard. Silk extensions help preserve the health of your nails and make them more beautiful. However, this method is less popular.
There is also biogel extension, the composition of which is more natural. Among the components of the biogel there are useful substances (proteins, vitamins, etc.). This material allows the nail plate to breathe, it is safe and elastic. It is used not only for nail extensions, but also for strengthening the natural nail plate. The undoubted advantage of biogel is that it is removed not by filing, but using a special liquid, thereby eliminating mechanical damage to the natural nail. The disadvantage of this build-up is its fragility.
Main stages of extension
To roughly understand how the procedure works, let’s consider the main stages of its implementation.
Gel
The main stages of extension on forms:
- Disinfection, filing natural nails and moving the cuticle (if this has not been done previously) using an orange stick or pusher. If you do not carry out such treatment, then when the nail grows, the gel will come off precisely in the places where the material comes into contact with the cuticle.
- Removing shine. Using a coarse file (about 180 grit abrasive), you should remove the shine from the nail plate and give it roughness. The most important thing is not to overdo it, otherwise you can ruin the nail plate.
- Removing dust and treating the nail with an antiseptic.
- Next, the forms are placed under the nail, and its surface is treated with a primer (improves the adhesion of the gel to the nail plate).
- After this, a thin layer of gel is applied to the natural nail plate and dried in a lamp. The exposure time depends on the gel itself and the power of the lamp.
- Then, without removing the sticky layer, use the gel to form the free edge of the nail, extending slightly onto the natural nail plate, and dry it in a lamp.
- Then the third layer is applied more densely, which is also dried in a lamp. Using the modeling layer, a bend is formed and the nail is secured to the free edge.
- Next, remove the form, remove the sticky layer and begin shaping the nail. It is filed down, leveled, its surface is sanded with a buff, and dust is removed with a brush.
- When the nail is completely formed, it is degreased and the design is performed.
- Finally, the finish is applied in a thin layer, the free edge is sealed, and then the nail is dried in a lamp. To soften the cuticle it is treated with a special oil.
If a three-phase gel is used, then each new layer (base, modeling, finishing) should be drawn from a different jar.
When applying the gel, you must ensure that it does not come into contact with the skin and nail folds, otherwise the material will subsequently begin to peel off.
Acrylic
If acrylic is used, the extension steps are as follows:
- Nail treatment before extensions is carried out in the same way as with the gel modeling method.
- After treating the nail with a primer, the master dilutes the acrylic powder with a monomer and places an acrylic ball on the brush.
- After this, he transfers the ball to the nail, evenly distributing it over the entire plate using patting movements of the brush.
- If forms are used, the specialist begins to apply acrylic from the free edge of the nail, starting to align the acrylic ball from the marked length down to the nail itself. After applying each bead of acrylic mixture, you must thoroughly dry the brush.
- As soon as the free edge has been formed, the master begins laying out the nail bed, making sure to step back from the nail folds and cuticle.
- Before the material hardens, it is given a bend.
- Once the acrylic has hardened, the forms are removed and the nails can be straightened, designed, and given shine.
These are only the main stages of extension, without mentioning most of the nuances.

To ensure that your nails delight their owner with beauty for as long as possible, you should remember a few simple rules:
- It is best to go to the procedure with the cuticle removed in advance. That is why you should have a manicure 2-3 days before extensions.
- On the day of the procedure, you must avoid taking a bath and using your hands. Moisture and fat that remains on the nail plate are difficult to remove even with the help of special products. If the surface is not completely degreased, this will affect the quality of the extension.
- In order not to aggravate the condition of the nails, you should not carry out extensions on too thin or damaged nail plates.
- Refuse the procedure for the entire time of taking or antibiotics, which may affect the duration of nail wear. Chemotherapy is also a contraindication for extensions.
- It should be taken into account that the quality and duration of wearing artificial nails can be affected by some diseases, as well as hormonal imbalances (during pregnancy, menopause, etc.).
- When washing dishes or working with other household chemicals, be sure to use gloves.
- If you do not have nail extension skills, you should not remove or file your nails yourself; it is better to carry out all actions with an experienced nail technician.
- Treat the periungual ridges and cuticles with special oil, and take care of your hands with creams containing vitamin E.
- To minimize the harm from extensions, it is recommended to take breaks periodically and at this time resort to restorative procedures for the nail plate.
Beautiful nails will decorate absolutely any woman and make her look truly complete. The most important thing is to choose the most suitable procedure for yourself, and also contact only experienced professionals, follow all his recommendations and carry out corrections in a timely manner. And then your nails will always delight you with their beauty and impeccable appearance.
Currently, there are various types of manicure that can make any fingers well-groomed and beautiful.
Lovers of long nails often face the problem of getting such a manicure on their nails. Nail extensions will solve this problem by offering various options. The easiest of them to do yourself is extensions with tips. To perform this procedure at home, you need to know how to properly extend nails with gel on tips.
Tips come in plastic forms that are glued onto natural nails and covered with a layer of gel on top. They vary in shape, quality, and price. When choosing tips, you need to pay attention to the material from which they are made. They should not have harmful components that, when entering into a chemical reaction with the nail plate or skin of the fingers, can be harmful to health.
Thick and heavy tips break faster and look unnatural. To achieve a good result, it is not necessary to choose the most expensive ones; you just need to carefully study the information about those that are available.
The most well-known materials for tips are:
- ABS plastic;
- nylon;
- polyflex.
The main goal of nail extensions using tips is to bring the result closer to natural nails.
How to properly extend nails with gel onto tips for a natural look:
- The plastic from which the tips are made must be thin and elastic.
- Select the shape and size of the tips as accurately as possible to the size of your own nails.
- For flat or convex nails, use special forms of tips.
- For wavy nails, you need to choose the right glue for tips (usually in these cases a gel glue is used that fills the unevenness).
The nail extension procedure will not only lengthen your nails, but also smooth out their unevenness and hide small defects. It is easy to implement and with due diligence you can get a good result the first time.
The technique of gel nail extension on tips will require the following tools and means:
- cuticle softener;
- cuticle stick or pusher;
- file or buff (polisher) for nails;
- tips;
- type cutter;
- special glue;
- special napkins (lint-free);
- gel;
- brush for treating nails after filing;
- tassels;
- sticky layer remover;
- primer;
- degreaser;
- cuticle oil.
Step-by-step guide for gel nail extensions on tips
 Despite the apparent ease of nail extension with tips, the procedure requires certain knowledge and skill.
To better understand its implementation, you need to visit the salon and watch how a professional does step-by-step nail extensions with gel on tips.
After the procedure for nail extension with tips has been studied, you should make purchases to perform it. For this purpose, you will need to buy a kit for nail extensions at home.
Tips and tools for working with them must be purchased additionally if they are not included in the kit.
Independent step-by-step nail extension with gel on tips:
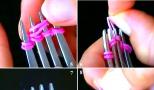
- Prepare a workplace, tools and equipment for work. Select tips, arrange them in the order of gluing in accordance with the nails. Tips should not exceed 2/3 of the natural nail at the place of gluing. The excess must be carefully cut off. You cannot glue tips that are narrower than the nail. It is better to choose one that is wider and carefully file its width with a file, adjusting it to the size of a natural nail.
- Wash your hands with soap or use an antiseptic. Remove excess cuticle especially carefully, as remaining pieces of skin can later lead to peeling of the gel. Cut off the free part of the nail to 0.5 millimeters and file it. Use a buff or file to remove the shiny surface from the nail plate. Clean it with a brush.
- Apply glue to the tip up to the step line, which when gluing is applied to the edge of the nail. For better adhesion, you can apply glue to the nail in the area where it joins the tip. Apply the tip to the middle of the nail at a slight angle and press the rest of the nail. The line of the step should coincide with the edge of the nail. Hold for 15 seconds to adhere. If bubbles appear between the tip and the nail, try to squeeze them out or re-glue the tip.
- After gluing the tips, they are processed to their final shape.. Using a tip cutter (cutter), cut off the excess length, giving the nail the desired shape. Use files with large cells to file the tips for leveling. Use a buff or the same file to clean the surface of the tip for better adhesion to the gel. Particular attention should be paid to the junction of the tip and your nail. Use a file to clean this area as thinly as possible so that the transition is invisible. Use a brush to remove dust from your nails and finger skin. Treat nails with a degreasing solution, apply primer and dry.
- Get started with the gel. Apply the first thin layer. It is necessary to retreat about a millimeter from the cuticle and side ridges. Dry with a UV lamp for 2-3 minutes. Apply the next layer, denser, to the middle of the nail, gradually reducing it towards the sides. Dry the nails in the second stage for at least 3 minutes. If you feel pain from heating your nail, you can take a break and then continue drying. When interrupting drying, you must turn the nail down so that the unformed layer of gel does not spread. After drying, the sticky layer is removed with a special product.
- When all the nails are covered with the main layer of gel, it is necessary to give them their final shape. Using a file or buff, you need to process the surface of the nail, removing the unevenness of the arch. Clean the sides and area of the nail near the cuticle, removing as much coverage as possible. File the tips of your nails so that they are as thin as natural nails. Finish any uneven areas on the free edge. Brush off dust with a brush.
- At the final stage, a finishing gel coating is applied.. It should lie on the nail in a thin, even layer. In the last coating, also use the previously left spaces along the side ridges and cuticles. Dry in a UV lamp. Some manufacturers produce a topcoat that does not have a sticky layer. If there is such a layer, then remove it. The marigolds are ready. At the end of the procedure, rub the oil into the cuticle.
One of the most popular solutions for effective nail extensions is the use of tips - special overlays that have many tangible advantages. The range of such products is very impressive, which helps to bring your wildest design fantasies to life. The ease of extension using tips is also noteworthy: to solve this problem, it is enough to know how to use them correctly and have a set of necessary tools.
What it is?
The described products are artificial overlays used to give the nail plates the required length and shape. They owe their name to the English word tip, meaning “tip” or “tip.”, and their design assumes the presence of two parts. The first creates a free edge of the extended nail, while the second ensures contact with the natural surface, which is why it has a significantly shorter length and thickness.
To make tips, materials are used that organically combine strength and elasticity - qualities that ensure long-term wearing of false nails.


As for the origin of the products in question, the first mentions of them go back to ancient times. Such overlays were used back in Ancient Egypt: there they were made from parchment, precious stones, ivory and other materials. Since the 70s of the last century, tips began to be made from polymers - compounds that are optimally suited for solving this problem.
The use of overlays made of ABS plastic, polyflex or nylon allows you to obtain artificial nails with a shape that suits the client, an ideal surface and the desired design. Provided that the basic rules of extension are followed, such products last from 3 to 4 weeks, attracting the admiring glances of others.


Advantages and disadvantages
Like any other procedure, nail extension using tips has its advantages and disadvantages. The list of the first can be found below.
- Using overlays you can achieve the desired result even if the natural nail plate has a minimum length.
- Considering the loads that the stress zone of extended nails has to face, it can crack and even break, which is especially important if it is not strengthened properly. The use of overlays allows you to avoid this trouble.
- Extending nails using tips is not difficult, but the same cannot be said about using forms. To successfully perform a procedure using onlays, no special skills are required (with rare exceptions), which makes visiting a specialized specialist unnecessary.
- Using tips, you can create complex shapes of nail plates with maximum ease.


In addition, damage to the overlay most often leads to its peeling off without dangerous consequences for the natural plate - unlike nails extended using forms.
As for the shortcomings of the products described, the main one is the “template” appearance. Despite the quality of the tips, they look less natural than nails extended using forms. Another noticeable disadvantage of the overlays is the large thickness of the tip, due to which some representatives of the fair sex do not like them. And also some girls note that such products often come off. This problem should not be considered typical, since it is caused by the use of low-quality glue and other gross violations on the part of the performer.

Kinds
To successfully extend nail plates, manufacturers offer many types of tips, which allows you to find a product that is ideal for the specific situation. The main criteria for classifying such linings include several points.
- Contact zone (CP). Products distinguished according to this principle are deep, short and non-contact. The choice of a specific option is determined by the size of the nail plate: for example, for a small bed you need overlays with a miniature cap.
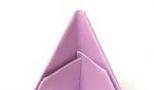
- Form. Depending on her preferences, the client can choose classic, curved, straight, tapered and other variations of tips. The most common is the first variety, the shape of which is as close as possible to the natural one. The “American” one, which has a more pronounced curve, is also popular.


- Purpose. In addition to the universal variation, overlays are used to work with problem nails and some other, less popular varieties.
- Size. The standard classification according to this principle involves the use of 10 product options (the lower the number, the smaller the overlay). Guided by such tips, you can find suitable tips with minimal time.
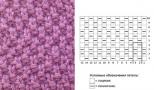
- Color. The greatest demand is for products that have a natural tone, transparent and decorated overlays, as well as tips for performing French manicures.


Special attention should be paid to the materials used, which most often are different raw materials.
- ABS plastic. It is the most popular, due to its excellent elasticity and high-quality adhesion to the natural surface. It is especially often used in the manufacture of the classic type of overlays.
- Nylon. The main advantages of the material in question are elasticity and resistance to strong mechanical stress. The only disadvantage of nylon tips is the difficulty of fastening, which requires the appropriate skills of the performer.
- Polyflex. The popularity of this material is explained by its elasticity and resistance to aggressive chemical compounds. It is also worth noting the good contact that occurs when polyflex overlays adhere to natural nails.
A special type of the described products are liquid tips. Unlike other overlays, they are not attached to plates, but are used as upper forms for artificially lengthening nails. The use of such products allows you to create curves with fewer difficulties than with standard gel extensions.


Selection rules
There are several rules for purchasing false nails, compliance with which allows you to achieve the best results.
- To make the tips look more natural, it is advisable to choose products with the smallest thickness.
- One of the main qualities that the material of the products of interest must have is elasticity. Ignoring this condition leads to the purchase of tips that are prone to cracking.
- In order for your extended nails to look perfect, the overlays you purchase must optimally match them. Experts also advise taking into account the features of the planned design by selecting products of a suitable color.
In addition, the buyer should not focus on products of dubious origin. They are often made from materials that do not meet safety requirements, which can cause allergic reactions and other health problems.


How to use it correctly?
In order to guarantee high-quality gluing of tips, as well as their removal, it is enough to familiarize yourself with the recommendations listed below.
How to glue?
Before you start modeling the overlay, it must be securely glued to the natural nail. This procedure involves performing several steps.
- Select products that best suit the nails being transformed. Such overlays should completely cover the natural plates, fitting tightly to them.
- Paste the tips. First you need to apply glue to the inner surface of the lining, “armed” with a small brush. Next, you can apply the tips, maintaining an angle of 45° relative to the edge of the natural plate, smoothly lowering them. Finally, press the products you are using tightly, wait 10 seconds and remove excess glue with a manicure napkin.
- Trimming overlays. This operation involves the use of a special tool – a tip cutter. It should be carried out in such a way that there remains a small margin on the workpiece necessary for sawing.
After trimming is completed, you need to carefully process the edges of the tips and transition lines using a hard file. The result of this action should be a smooth surface of the plate, without any noticeable flaws. Next, all that remains is to remove the dust from the nail using a wide brush.


How to remove at home?
Despite the fact that tips can be worn for quite a long time, they still have to be removed - due to the growth of nails or due to the replacement of a boring coating. The optimal solution to this problem is to use the appropriate liquid, which is available on the shelf of any specialized store.
This product effectively softens artificial materials, facilitating the safe removal of linings. To do this, a small amount of this liquid is enough, which needs to be applied to the nails and wait (the duration of the procedure depends on the characteristics of the composition used).


If there is no special product, you can remove the tips using acetone. It is not recommended to immerse your nails in it, and therefore it is advisable to carry out the treatment using cotton pads thoroughly soaked in this product. To achieve the required result, the pads must be wrapped not only with the indicated products, but also with foil. Some representatives of the fair sex suggest getting rid of tips by immersing your hands in a container of hot water. The effectiveness of this technique is determined by two main factors - the total duration of the procedure and the quality of the glue used.
The final stage of all the procedures described above is the treatment of the nail plates with nourishing oil.


Design ideas
Experience shows that choosing the appropriate design option for false nails is not only an important, but also a very exciting task. Let's look at the most remarkable design ideas used when working with tips.
- Refusal of monochromatic design. To make your nails truly original, you need to choose less prosaic combinations.
- To make the plates unique, you can use rhinestones and rivets, sparkles and stickers, foil and other decorative elements.
- One of the most popular design solutions is painting nails in different colors and shades, as well as combinations of glossy and matte finishes.
- The design of the overlays can correspond to the time of year. In summer, bright and colorful designs with images of flowers and tropical fruits are popular, and for winter, variations associated with the New Year holidays are suitable.
French, matte and marble design varieties, suitable for manicure at any time of the year, deserve special attention. It is also worth noting the original volumetric compositions that turn the nail plates into a full-fledged work of art.


Doing a manicure step by step
When performing nail extensions using tips, It is advisable to adhere to a certain algorithm.
- Treat your hands with a disinfectant that prevents the development of pathogenic microflora.
- Lubricate the cuticle with a softening compound, carefully pushing it aside with an orange stick, and thoroughly degrease the nail plate.
- Finish the free edge of the nail with a standard file (this should leave a small tip). Afterwards, you need to remove the shine from the plate so that its surface acquires a matte milky hue. This operation is performed using a round file and should not affect the cuticle.
- Remove dust from the nail being treated and begin gluing the tips, described in detail in one of the previous sections.

There are so many manicurists, so many different approaches, techniques, and nuances in nail extensions using tips. It is not surprising for an inexperienced beginner to get lost in this flow of information. What basic stages does the procedure for such extension consist of, what materials are needed at the start, or what is the difference between top forms and liquid tips? Let's take it in order.
Tips are plastic overlays or template forms that are used by masters as a substrate or as a stencil for forming an artificial nail plate.
This is the most convenient and popular extension option for beginners. It is also popular among experienced craftsmen, especially if it is necessary to reduce time and simplify the procedure. There are several varieties of tips, each with its own peculiarity in operation and design nuances.
To form an artificial nail plate, acrylic, gel, biogel and acrylic acrygel, which is a combination of the first and second materials, can be used. Acrylic dries in air, and gels dry in a lamp.
Tips-tips

They come in different sizes within one set. It is necessary to select it individually for each nail, and, if necessary, pre-file it in width so that it perfectly matches the width of its plate. After gluing, the length is cut and filed. Next, everything is covered with camouflage extension material to create an outwardly complete nail plate.
White tips are very convenient for extending French manicure. This is a ready-made perfect smile line; you just need to cover the nail with a thin layer of base or camouflage gel or acrylic, and then with a top coat to add shine.