DIY head bandana: tips on how to sew or knit it yourself. DIY bandana
The hot summer sun is loved by many, but sometimes it can cause harm: hair burns under its rays, and an uncovered head can get sunstroke. Therefore, hats are no less relevant in summer than in winter. The most versatile is a bandana, which is easy to sew yourself.
To create a bandana with your own hands, you need to determine what kind of bandana it will be. Even this headdress has several versions. The simplest is a medium-sized square scarf, tied on the head and having a knot below the back of the head.
For such a bandana, patterns with complex patterns are not required - just choose an attractive piece of fabric, make a square with the required dimensions, trim the edges, and the headdress is ready. The classic parameters for a square bandana are 63*63 and 70*70 cm.
As for the choice of material, there are no clear recommendations. Today, bandanas are not only a sign of belonging to certain subcultures (bikers), but also an accessory that is on the list of fashion trends. Therefore, they can be made from almost any material, including fur. For the summer it is worth choosing natural silk: it does not overheat the head and does not slip off the hair. Cotton is also good in this regard. And for cooler weather, you can turn to knitwear, jersey, or even leather and wool. Knitted bandanas, which look interesting during the off-season, are also in demand.
In addition to the classic square pattern, a bandana can be created from separate pieces of fabric: for example, a rectangle with a ribbon, a cap with ends for tying at the back, or a wide rim with a ribbon. Those. The main feature of a bandana is not its shape, but the ability to tie it, since the name of the headdress comes from the Spanish verb meaning “to tie.” Moreover, the original version of the bandana was tied at the back 2 fingers above the eyebrow line, with the free edge of the product tucked under the knot. And today he has moved to the lower hairline at the neck, which is in many ways more convenient. A bandana tied in pin-up style is a 100% fashionable accessory that has no protective functions. However, this does not make it lose its charm, and every woman should have one in her wardrobe.
DIY knitted bandana

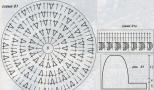
Crochet bandana is an interesting headdress for women for the cold season. It can be made from any dense yarn, preferably containing wool. Approximately 100 g of it is consumed, but it depends on the expected size. Professionals recommend using hook No. 3 for work.
To find out the dimensions by which orientation will be carried out, the head circumference is measured. The radius of the circle shown in the diagram will be 0.25 of this value. You should start knitting with 6-8 loops, for each new row you remove 2 loops from 1. When the circle in diameter is 10-12 cm, rows with and without increases begin to alternate. After 12 cm in length from the center of the bandana cap, it is necessary to follow the turning knitting pattern, spreading the halves of the headdress, between which a slit will appear. On each side, a chain 20 cm long and 4-5 cm wide is created - they will become the ends for further tying. The edge is tied with a “crawfish step”.
A crocheted summer bandana may look more airy, the threads chosen for it are no longer so thick. And here you can resort to a different scheme, making a headdress of 2 semicircles, a long transverse ribbon and a middle strip. Here you will also need the head circumference value, but now you will need to calculate the radii of the semicircles and the size of the middle stripe. The latter is determined by eye, based on personal wishes. The optimal size for her will be 12-14 cm. Then the radius of the semicircles will be equal to the size of the head circumference, from which the width of the middle stripe is subtracted, and the resulting value is divided by 4.
Knitting semicircles is also done with 6-8 loops, the pattern is chosen arbitrarily: you can go with the simplest pattern, adding a loop to each row. Or you can knit from 1 loop 2 or 3 at once, in the next step, on the contrary, connecting 2 loops into 1 to get an openwork knitting. However, it is important to remember that the shape of the pattern is a semicircle, so the expansion must be present one way or another.
It is recommended to make the middle strip in the form of a long rectangle with the same pattern as the semicircles. The elements are connected using simple single crochets. After that, tying begins along the bottom, often using an elastic band or other tight knitting method, creating long chains (15-20 cm) that are located at the back.
Bandana for a boy: pattern and step-by-step instructions

For a small child, a bandana for the summer is a more comfortable headdress than a Panama hat. It can be made either by crochet, according to the previously discussed pattern, or from textiles. Whether it is oriented towards a boy or a girl does not matter: the pattern of the bandana remains the same. It is important to choose a thin fabric, width and length no less than 50 by 40 cm, soft linen elastic 3-4 cm wide and 17-20 cm long. You will also need sewing tools: needles, chalk, threads, scissors and pins .
This bandana will have 3 components. It is formed from a wide rectangle, which is the main part, and a narrow ribbon, represented by a pre-prepared elastic band, which becomes the element that secures the bandana on the child’s head. It is enough just to cover the elastic with fabric, that same 3rd detail, so that its appearance fits into the overall color of the product. The edges of the elastic must be secured with a simple fine stitch. There is a little more work on the main part.
When cutting out a rectangle, it is important not to forget about the seam allowance on the outer sides: 1-1.5 cm is enough for this if the fabric is not loose. After this, the edges are processed with an overlocker or on a regular machine by folding them and zigzag stitching. It is definitely worth ironing the part at this stage so that distortions do not occur later.
Now you need to move on to the moment of assembly: turning both the large rectangle and the ribbon with an elastic band, the short side towards you, you should put them on top of each other. This is done so that the strip with an elastic band runs along the long side of the main part, and their corners are aligned. Here it is advisable to fix the parts together with pins, after which the edge of the main part is folded. The wrong side of it faces up, the strip with an elastic band is between the layers. The opposite long edge needs to be placed with the front side on top of the wrong side of the edge that is connected to the elastic band.
The last point with this side is that an “accordion” begins to be assembled from each edge from the free part of the main part. It is important to do it evenly so that on each side of the elastic you get the same number of folds-layers. After which they are carefully stitched by hand - the needle of the machine will not take such a thick layer. The whole procedure is repeated for the other end of the elastic band. Finally, just turn the bandana right side out.
Pattern of a bandana with a visor

A bandana with a visor protects not only the head, but also the eyes from the sun’s rays, which is important for all ages. Its pattern is not much more complicated than the previous options, so even a novice seamstress can cope with this task. There will again be 3 parts: the visor, the transverse line, which is the ties, and the main panel. Each is single-layer, excluding the visor: for density it should be sewn from 2 layers of fabric.
The selected material is folded in half, and each part is applied in the place indicated by the dotted line on the pattern to the fold line. The outline is done with chalk or, if the fabric is light, then with a pencil. Be sure to cut with a small (1-2 cm) seam allowance at the junction of the parts. The edges of the parts should be processed using an overlocker or a zigzag stitch. The middle zone and the transverse part are basted and sewn on a machine with fine stitching.
After this, the halves of the visor are folded with their right sides on top of each other and connected, but the seam is not cyclic: it is necessary to leave space to turn the part out. It makes the most sense to do this on the side that will be attached in the next step to the transverse line of the bandana, sewing to it. This completes the sewing according to this pattern. If necessary, you can make a more dense headdress by initially cutting out a double for each part and sewing them together, as was done with the visor.
- This is a summer headdress in the form of a scarf. Very often, children's bandanas are equipped with elastic bands (to make it easier to put on) or visors (for additional eye protection from the sun). The advantage of a bandana is its simplicity. Such a headdress is easy to put on, can be cleaned (washed) without any problems, and is sewn without the slightest problem.
In this article we will talk about how to sew a bandana for a boy or girl at home. Believe me, this is easier to do than it might seem.
DIY children's bandana
To create a bandana with an elastic band according to our pattern you will need:
Please note that the sizes we indicate are designed for a head volume of 52-54cm. If the volume of the child’s head is larger or smaller than stated, the pattern should be adjusted accordingly.
Completing of the work
- A bandana pattern for a boy (girl) consists of three parts: two rectangles and an elastic band. Since our elastic band is ready, you will only have to cut two rectangles. Please note that on the outside of each part you should leave 1 cm (seam allowance). As a result of the allowance, the dimensions of the main part (larger rectangle) will be 42x26, and the side drawstring part (smaller rectangle) will be 28x7cm.
- We fold the small rectangle (smaller part) facing inward and pin it together using pins. After this, the part is stitched, with a distance of 1 cm from the edge (in this case, the threads must be secured). If there are excess edges of the seam allowances, they can be trimmed, but keep in mind that the free edge must be at least 5mm.
- After this, the small rectangle (drawstring) should be turned out and ironed. In this case, it is most convenient to place the seam on the side.
- Then insert an elastic band into the finished drawstring. To make this as simple as possible, you can use this device:
- After the elastic is inserted into the drawstring, its edges need to be fixed. The easiest way to do this is to simply sew them together at a distance of about 5 mm from the edge of the fabric.
- After all the parts are cut and processed, we begin assembling the product. To do this, a large rectangle is placed face down on the drawstring (the raw edge of the rectangle is on the short side of the small part)
- The second edge of the main part should be placed on top so that the drawstring is inside the “pipe” of a large rectangle.
- Then we turn the “pipe” so that the drawstring is along its edge.
- We turn the part over so that the chipped part is at the bottom.
- After this we begin to make an “accordion”. This part of the work should be done very carefully and carefully. First, we bend the edge of the part, placing it on top of the drawstring and the gathered edges of the rectangle. We check that our bookmark is equal in width to the width of the drawstring. If this is the case, everything is in order, but if not, mix the parts so that both widths match. For ease of work, you can pin the resulting “package” together with pins.
- We stitch the resulting “accordion”. Of course, stitching repeatedly folded fabric is not very convenient, but considering that our bandana is made of light fabric, it is still possible to do this. Then you should carefully trim off the excess edge of the fabric.
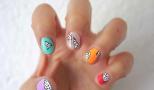
Bandana is a lightweight headdress suitable for almost all ages of men, women and children. A simple bandana pattern can be made even by sewing beginners. Many varieties allow you to choose a model to suit your taste.


You can use the product as a fashionable head protection from the scorching rays of the sun, a universal neck scarf, or an original accessory worn on the wrist.
The retail chain sells quite a few types of bandanas; you can buy different hats for the whole family. But in order to emphasize personal individuality and style, it is advisable to make comfortable “clothes” for your head with your own hands.
Types of headwear:
- The classic look is a square piece of fabric in which each side is equal to the circumference of the head. In this case, the size for a child corresponds to 50 cm, for a woman – 60 cm, the average volume of a man’s head is 70 cm. Since the product does not require exact dimensions, the standard option is chosen;
- Bandanas with elastic bands are worn mainly by women and children. The pattern consists of two parts: a base covering the head and a strip of fabric, the ends of which are tied in a knot;
- A headdress with ties is suitable for a person of any age and gender;
- A universal transforming model that can be used as a hood and headdress from the sun and wind;
- Bandana is a buff, which is made in the shape of a tube from an elastic, durable and lightweight material.
Classic model
The basis for most models is a regular square made of bright durable fabric, where the side of the rectangle is equal to the circumference of the head. In this case, the fabric is folded into a triangle, the length of the fold - the hypotenuse of which is enough to tie a supporting knot.
How to dress a classic model:
- Fold the product into a scarf. Place the fold of fabric on the frontal part of the head. Tie the ends at the back of the head. Hide the bottom corner by wrapping it around the knot;
- Place the main part at the back of the head and tie a knot in the front. Women's version: place the ends of the scarf above the ear;
- Form a fabric strip from the scarf and tie it around your head to secure your hairstyle;
- Place the base on the front of the neck, and wrap the ends of the scarf around the neck, tying it in front with a beautiful knot;
- Tie a scarf - a bandana, like a pioneer tie, decorating the knot with a shiny brooch;
- Wrap the scarf around your wrist several times, securing the bandage with a beautifully designed knot.
- We have posted many different options for tying a headscarf on this page.
How to sew a classic bandana yourself:
- cut a square of suitable size from fabric;
- Tuck the edges in and hem with a hidden seam on the wrong side. Alternatively, you can zigzag stitch the edges of the product;
- roll up into a scarf.
Bandana with elastic band

The headdress is suitable for summer sundresses and denim outfits. The material is selected from natural components in bright colors.
To work you need to prepare:
- product pattern (2 rectangles measuring 38x18 cm, 28x10 cm);
- scissors;
- needle and thread;
- elastic band 10-14 cm long;
- 2 pins.
How to sew a women's bandana with an elastic band:

- Take a smaller rectangle. Fold in the edges of the long sides by 0.5 cm, hem from the inside with a hidden seam;
- Fold the side (18 cm) into a fan and secure with pins;
- The smaller rectangle must be sewn lengthwise from the wrong side. Turn the product onto your face. Insert the elastic band inside. Stretch it to the length of the strip, then sew it with a zigzag, moving 1-2 cm from the edge;
- Insert the fanned edges of most of the pattern into the holes of the strips on both sides. Sew the pieces together by machine or by hand.
The stylish headdress is ready.
Bandana from an old T-shirt

The simplest option on how to make a pirate bandana from a T-shirt, without reshaping the product:
- prepare a T-shirt with long or short sleeves, the neck of which is presented without a collar, buttons, or zippers;
- cut off the tag on the wrong side of the back;
- wear a T-shirt with the neckline on your face;
- tie the sleeves at the back just below the back of the head, securing with a pin so that the knot does not unravel;
- Gently tuck the puffy folds above the ears inward.
The product can be worn with the entire face exposed, or with the bottom edge of the T-shirt neck raised towards the eyes, similar to a balaclava.
Knitted bandana

The “buff” model is a cylindrical product that is worn as a stylish headdress on the head and neck. This will require less than a square meter of material. For children, the size of the finished headdress is used (24x40 cm). For adults, it is recommended to cut a rectangle of 100x52 cm. It is necessary to add allowance for the seams (1.5 cm).
We sew a bandana from elastic, durable knitwear.
The procedure for making a buff bandana from knitwear:
- The rectangular pattern must be folded in half along the longer side;
- Sew the cylinder from the wrong side;
- Hem the top and bottom edges by 0.5-1 cm, making a blind seam.
- Turn the product inside out.
Put on a knitted headdress, placing the opening of the cylinder on the circumference of the face. The rest covers the head and neck with folds.
There are a lot of techniques on how to sew a bandana. The type of product is the envy of the skill and imagination of the master.
Video on the topic
An original and always fashionable bandana headdress is always relevant.
Since it is already summer and the sun is baking, it is therefore necessary to beware of its insidious rays, which can lead to unpleasant consequences.
And a bandana will help protect your head; it is always a fashionable and very versatile item in your wardrobe. And anyone can sew a bandana because it’s very easy to do.
Choose any fabric according to your taste and your creativity. In total you need 40x90cm. fabrics.
It is done on graph paper according to the drawing where 1 square = 2 mm. Seam allowance already included = 5mm.
The diagram shows one symmetrical part of the frontal and occipital parts.
After cutting, sew the finished parts along the AB lines and the remaining edges need to be hemmed using an overlocker. If your imagination goes further, you can decorate it at your own discretion.

Download the bandana pattern for free from pattern.ru:
(downloads: 3162)
OPTION II

In addition, a bandana will help to hide your head from the heat. The bandana pattern is easy to make.
Bandanas have been around for a long time. For example, in America during the Wild West, cowboys wore a bandana as protection from dust. It was tied around the neck so that later the airways could be quickly closed :) And in Central Asia, bandanas were used by horsemen to protect their heads from overheating.
It is noteworthy that for all the times that the bandana has been around, its main purpose has remained virtually unchanged. Of course, now bandanas have begun to be worn not only for utilitarian purposes of protection from the weather, but increasingly for decorative purposes. And they started tying a bandana not only on the head, but also as an accessory on the arm, or maybe you use it as a cute belt.
These days, bandanas come in a variety of colors, cuts, and can be made from all sorts of materials. In general, there is room for choice!
Let's look at a bandana pattern, cutting and sewing which will take you 15-20 minutes :)
The bandana pattern is shown below.

Schematic pattern of a bandana.
After looking at the pattern, choose the fabric for your bandana. As a material for a bandana, you should choose elastic but dense fabric. For example, it could be soft drape, leather, denim, or linen; in general, any fabric that matches the description. Its size will be 40x90 cm.
As you can see from the bandana pattern, it consists of two parts. After you select the size, cut out the fabric pieces. Don't forget to mark the places where the parts connect. Having aligned these marks together, stitch them from point 2 to point 1. Do not forget that the given pattern is applied to the folds of the fabric, and after unfolding, on the other side of the pattern you need to put and combine exactly the same marks.
Now your bandana is ready! Congratulations on your successful sewing :)
Bandana. Galia Zlachevskaya "Genetics of cut".
http://www.youtube.com/watch?feature=player_embedded&v=WTCeOLwUXoE#!
A light headscarf has always been one of the most popular ways to protect the head from the scorching sun. Nowadays, a bandana is worn even in the cold season, choosing a headdress made of warm material. There are a huge number of options for bandana models in the store, however, making a bandana on your head quickly and easily with your own hands is not difficult even for an inexperienced needlewoman. You just need to turn to the materials in this article for help, having first selected the fabric for the headdress and the person for whom it will be intended.
Bandanas are most often worn by women and children, but men can also benefit from sun protection. It is best for a young man to use cotton fabric and protective colors.
Making a head bandana with your own hands in MK
The easiest and most common option for making a bandana. This scarf will provide excellent protection from the sun, and will also become an indispensable addition to a pirate costume (if the color matches).

You will need:
1) Fabric (preferably cotton);
2) Pencil or pen;
3) Scissors;
4) Needle and thread;
Stages of work:
1) Take a fabric whose size is 60×60 cm. Draw a square on it using a felt-tip pen or pen. You can use a ruler to get more precise lines. If the corner of the fabric is square, you should simply fold it over and trace the outline.
2) Cut the material. It is enough to cut the cotton fabric and then tear it exactly along the line.
3) Fold in the raw edges and carefully stitch. You can use an overlocker.
4) We decorate the resulting product at our discretion.
This bandana can be worn in different ways, for example, folded into a triangle to protect your head from the sun, or tied over your mouth. You can also fold it lengthwise and wear it as a headband, making an interesting beach scarf.
A guide to sewing a women's bandana with ties with your own hands. The fabric is selected depending on the time of year in which you plan to wear this accessory. For the summer season it is better to take cotton or linen material, for cold days - fleece, suede or even leather.
You will need:
1) Selected material (minimum size 40×90 cm);
2) Paper;
3) Chalk, pen or felt-tip pen;
4) Scissors;
5) Needle and thread.
Manufacturing stages:
1) First, we make a paper pattern according to the pattern shown in the picture. Then we transfer it to the selected fabric, marking points A and B for stitching. Cut out the details.
2) Combine points A and B, doing this on the visible and mirror sides of the pattern. We sew the seam, moving from point B to A, and then to the mirror image of point B.
3) We process the edges, giving the product a finished look. It is best to overcast them using an overlocker, but you can use a zigzag stitch or a regular stitch.

For such a summer hat, it is best to use light fabric. You can take already multi-colored material, for example, with images of cars. This bandana is perfect for a boy. Or you can decorate the finished product with embroidery or applique - such a hat will be an original accessory for a girl.
You will need:
1) A piece of fabric (at least 40×50 cm in size);
2) Linen elastic (length about 20 cm);
3) Needles, threads, pins;
5) Scissors.
Pattern:

Step-by-step instruction:
1) First, we create an elastic band that will secure the headdress on the child’s head. To do this, we cover it with the same fabric from which the main part of the bandana will be cut. We fix the edges with a regular stitch.
2) We begin to manufacture the main part. To do this, cut out a large rectangle, not forgetting the seam allowance of 1 cm. We process the edges and iron the part.
3) We assemble the parts of the bandana into one whole. Place the elastic band and the rectangle on top of each other. The strip with an elastic band should go along the long side of the main part, their corners should be aligned. We fix it all with pins.
4) Then we bend the edge of the main part so that the strip with the elastic is between the layers. We place the opposite long edge with the front side on the wrong side of the edge, which is connected to the elastic band. We assemble an “accordion” from the free part of the part; an equal number of folds should be obtained on each side of the elastic band. We stitch the layers manually.
5) Turn the elasticated bandana right side out and wear it with pleasure!

Video materials on the topic of the article
This article discussed only a few models of bandanas and the materials from which they can be made. The selection of videos provides step-by-step tutorials on how to knit or crochet a headdress, as well as many ideas for creating your own original accessory.