Gel nail coating without extensions. Step by step instructions
Unfortunately, not all women are blessed by nature with strong and durable nails. This issue can be easily resolved, you just need to visit a beauty salon and use the nail extension service. This process can be done with your own hands. We will consider two types of gel extensions: on tips and forms. We’ll also briefly talk about the types of extensions in French style with visual photos. And, if you have no desire to visit salons, then our article will tell you about gel nail extensions step by step.
What to choose: forms or tips?
Nail extensions can be done using forms or tips. When there is a nail base on the finger, it is necessary to use tips. In order not to make the right choice, you need to take into account the width of the nail surface, what kind of bend you want to get at the end of the work and do not forget about the height of the nail hole. When we talk about using forms for gel extensions, we mean recreating from scratch the length and shape that you or your client prefer, not forgetting to take into account the structure of the nails and the size of the fingertips. When the type of work that suits your client has been chosen, you need to know that there are five types of nail structure:
- slightly convex;
- snub;
- flat;
- cat's nail;
- wavy.
The most common are cat's toenail and snub-nosed nail growth.
"Cat's nail"
Extension of cat nails should not be done using tips, since as the nail grows, its free edge will bend down. This will create a space between the tip and your nail, therefore allowing dust and water to enter. In this case, you need to use a nail extension form.

"Snub" nails
If you are working with snub nails and decide to do extensions on forms, do not be surprised that in the future the nails will lose their correct structure. And in this case it is better to use tips.
The final result of gel extensions also depends on the type chosen, one of which is used most often - three-phase gel extensions:
- Base gel
- Construction gel
- Finish – gel polish coating

Nail extensions at home
In order for your work at home to be coordinated and complete, you will need to stock up on these tools; they can be purchased at ruNail:
- UV lamp;
- antiseptic;
- modeling agent - adhesive;
- the basis;
- degreaser - dehydrator;
- tips;
- forms;
- sculptor;
- clinser;
- flat brush;
- file 220/280 grit;
- file 240 grit;
- finishing gel;
- glue for tips;
- lint-free wipes;
- orange sticks;
- dust brush
- cuticle oil

Step-by-step instructions for beginners
Gel nail extension on tips:
- We prepare the nail surface using an orange stick: we peel back the cuticle, create the desired shape for the freed edge, and polish the nail area with a rectangular file 220/280 grit, it prepares the nails for polishing, smoothes and eliminates scratches.
- Apply degreaser
- Apply a thin layer of glue for tips to the free edge of the nail and the places where the tips come into contact. You need to place the tip to the nail at an angle of 45 degrees, and lower it so that the line of the tip’s foot and the edge of the nail are aligned.
- Next, without disconnecting, carefully lower the tip onto the nail and spread the glue in the same amount over the entire area with rubbing movements.
- We place the tip again at an angle of 45 degrees, bring it to the stop line and, after hearing a crack, gently lower the tip onto the nail. You need to hold it for about 10 seconds.
- We shape the tips according to the client’s wishes, taking into account the structure of the nail.
- We get rid of dust particles and degrease.
- Apply modeling agent to the nail area.
- Using a slightly damp brush, apply the base gel along the entire length of the future nail and place your finger under the lamp for 1 minute.
- Using a flat brush, apply the sculptor, taking into account the structure of the nail. Leave under the lamp for three minutes.
- Using a lint-free cloth, remove the sticky layer with cleanser.
- Using a buff, we polish the area of the nail.
- Degrease and coat with finishing gel. Place your fingers under the lamp again for three minutes.


Below we offer you video tutorials on extensions:
How to extend nails with gel on forms
- We treat our hands with antiseptic.
- We clean the surface of the nail using a 220 grit file.
- Cover with degreaser.
- Next, cover with the base and place your hands under the lamp for two minutes.
- Clean the top layer.
- We attach the form.
- Using a brush, apply the gel, while turning your finger nail down so that the gel is evenly distributed.
- Place your hands under the lamp again for three minutes.
- Cover with gel again and form an “S” bend.
- After the lamp we clean the sticky layer.
- Getting rid of the form.
- Level the surface with a buff.
- We clean off the dust with a brush and cover it with finishing gel.
- Place your hands in the lamp again to dry for two minutes. Degrease the surface of the nails and apply oil to the cuticles.
Below we propose to consider step-by-step extensions in photos and videos:


Ageless French
Under each type of jacket, you can see the finished work in pictures, as well as a video on the design:
- French Millennium

Step by step nail extension with gel is a labor-intensive, but at the same time uncomplicated process. Artificial nails have firmly entered the everyday life of the modern woman, who often does not have enough time to regularly do manicures to keep her hands in perfect condition. Varnishes often begin to wear off quickly from doing housework (washing dishes, laundry, cleaning), and from exposure to chemicals, women's nails become thin and brittle, no longer holding their shape. And here gel nails come to the aid of female representatives, which retain their design and length for a long time, making their hands well-groomed and neat.
What is needed for gel extensions?
Gel is a special material that, when exposed to ultraviolet rays, hardens, forming a strong coating on the nail plate. Proper gel nail extensions will allow artificial nails to look as close as possible to natural ones and increase their durability. Many salons now offer their services, but if you want to save money, you can do your nails at home yourself. The technique of gel nail extensions requires some skill, but everything comes with experience. The main thing is to have all the necessary equipment for this. You will have to purchase the following materials and tools:
- degreaser (primer);
- special forms for extensions;
- nail files with different abrasive surfaces;
- tools for manicure;
- brushes of different thicknesses made of natural fibers for applying gel;
- special gel;
- ultraviolet lamp.
Gel nail extension technology
 There is a certain sequence for creating nails using gel. The gradual build-up is divided into 3 sections:
- preparation of the nail plate;
- extension;
- processing the gel with files to give the desired shape.
Gel nail extension technology requires mandatory completion of all stages of the process. The first and mandatory step is to treat your hands and work surface with an antiseptic.
At the second stage, using a simple file, the nail is prepared for applying the material to it. The free edge should be filed for high-quality interaction of the nail with the gel and brought to the required length for further use of special forms. The third step is working with the cuticle. To soften it, a special product is applied, then using a wooden stick, the cuticle is moved away from the nail. This is very important, because getting the cuticle under the gel can lead to detachment.
The next step is applying primer. This product serves to degrease and disinfect the plate. It does not harm the natural nail and cuticle, but ensures reliable adhesion of the nail surface to the gel. If stage-by-stage extension is performed correctly, its use can reduce the likelihood of detachment to zero. Primer treatment should be done with 2 or 3 fingers at a time, because it dries quickly and loses its effectiveness. At this point, the preparation of the nail plate ends and work with the gel begins.
 The fifth step is the application of the primer gel. Leaving a small distance between the cuticle and the gel, you need to apply a very thin layer of the composition to the nail, spreading it well over the surface with a brush. Dry in an ultraviolet lamp for 30 seconds; this procedure prevents the material from peeling off.
At the sixth stage of creating gel nails, we install a special shape under the regrown edge so that it becomes a continuation of the natural one. Using a brush, the gel is applied to the nail in small parts. The length of the extension is adjusted according to the markings that are usually present on the forms. It is worth noting that it is at this stage that the gel must be laid out immediately in the required model (oval, square), which will help save material when filing the gel nail. The hand is placed in an ultraviolet lamp to speed up the hardening process of the material. The first layer should be thin because it is preparatory. After drying with nail polish remover, the sticky layer of gel is removed.
Next, the next layer is laid out, the nail is modeled and dried again in a UV lamp. The procedure is repeated until the new nail is ready. After the nail is formed to the required state, it is processed with files and a buffer to remove irregularities, excess gel and model the correct free edge. Then the nail surface is sanded and polished with files. The desired design is created on a sanded and polished gel plate using acrylic paints, colored gels, stickers and other accessories as desired. The last stage of gel extensions is the finishing coat, which will fix the design, strengthen the nail and add shine. This layer is dried in a UV lamp to completely dry the sticky layer.
Possible errors when building up
It is very important to carry out step-by-step gel extensions correctly, which will allow you to wear artificial nails for a long time, and correction will not take much time.
But there are common mistakes that are worth remembering:
- Poor treatment of the cuticle area.
- No polishing.
- Touching the surface of the treated nails with your fingers.
- Getting the product on the cuticle.
- Poor quality materials for work.
Horny skin particles require mandatory removal from the nail plate.
The dust that remains from filing must also be removed, because all these small particles will interfere with the quality of adhesion of the nail to the coating material. Failure to polish will result in flaking because the surface must be perfectly smooth before applying the gel. After polishing the nail plate, any touch to it will subsequently lead to peeling. Getting the gel on the cuticle will also lead to rapid peeling of the gel.
Poor quality and cheapness of the material used will lead to the fact that you won’t be able to wear a manicure for a long time.
Do not forget that gel nails require constant care, namely correction. It must be carried out regularly and not allow the nail plate to grow too much, because this can lead to breakage of the nail and the need to grow it again.
Everything in a person should be beautiful: his soul, his thoughts, and even his nails. A well-done manicure with a perfect finish is a decoration for every girl.
But what to do if nature has deprived you of a beautiful shape of your nails, because of their fragility it is difficult to grow even a small length, but you don’t want to do extensions? Gel nail coating without extensions will come to the rescue.
It will help you grow the desired length and, if necessary, slightly adjust the shape of your natural nail. Very often, girls confuse strengthening nails with gel with gel extensions. However, in fact, they have only one similarity: both procedures help make nails beautiful and well-groomed.
The differences between them are significant:
- for nail extensions the nail bed is lengthened and the shape of the natural nail may change, while with conventional strengthening it is impossible to increase the length of the nail;
- when covering nails with gel without extensions, a small amount of material is applied to the natural nail, which means there is no thinning or weakening of your own nails;
- strengthening nails with gel Helps improve the condition of the nail, reduce its fragility and prevent delamination of the plate.
Strengthening nails with gel is an excellent option for those who do not want to resort to extensions, but want to have long and beautiful nails.
Advantages and disadvantages of gel nail coating
The advantages of gel nail strengthening include:

Despite all the advantages, this procedure has enough disadvantages:
- The need for regular correction. As the nail grows, the boundary between the natural nail and the strengthened gel becomes noticeable. The frequency of correction depends on the rate of nail growth, on average it is once every 2-3 weeks.
- Duration of the procedure. When covering nails with gel in a salon with a manicurist, the procedure takes from 1 to 1.5 hours; if you strengthen it yourself, the duration increases by at least 2 times or more.
What is better to use gel or biogel to strengthen nails?
To determine what is best for strengthening nails, you first need to understand how these two materials differ. The gel is a synthetic glass-like polymer; it hardens when polymerized in a UV lamp.
Biogel –It is a rubber-based polymer being a very elastic material. 
| Type of coverage | Advantages | Flaws |
| Gel nail strengthening | 1. Nails covered with gel, even without extensions, are very strong. 2. The gel allows you to increase any length. 3. Duration of wear is about 3 weeks. 4. Overgrown nails can be corrected by correction, without completely removing the old material | 1. Using the gel requires cutting down the natural nail before applying it. 2. The thickness of an artificial or strengthened nail is much greater than that of a nail coated with biogel. 3. Nails lose their elasticity, as a result of which they are susceptible to chips and cracks. 4. Cannot be soaked with special liquids; material is removed by sawing off (the exception is gels with a soak-off formula). |
| Biogel nail coating | 1. Nails coated with biogel are much more elastic, bend easily and are less susceptible to chipping. 2. Positively affects the natural nail plate. 3. Does not require cutting down the natural nail before coating. 4. Easily removed by soaking in a special liquid. 5. Does not require a large layer thickness when applied. | 1. Relatively short duration of wear (no more than 2 weeks). 2. Impossibility of correction without removing old material. 3. It is necessary to prevent contact of nails strengthened with biogel with acetone-containing liquids and alcohols. |
Thus, for those who do not want to lengthen the nail plate, but want to strengthen natural nails, biogel is the ideal material. It will cause the least harm to your nails and give them a beautiful and well-groomed look.
Materials and tools needed to strengthen nails with gel
To cover your nails with gel you will need the following materials:

Gels come in several types: single-phase and three-phase. In the case of a single-phase gel, only one gel is needed; in the case of a three-phase gel, a base and top coat are also required.
Be careful: When carrying out the procedure of covering nails with gel without extensions in the salon, it is necessary to ensure that all the instruments that will be used to perform the trimmed manicure are sterilized, since there is a high risk of infection from non-sterile instruments.
Gel nail coating without extensions: step-by-step instructions at home
Covering nails with gel without extensions at home is not so difficult. You just need to follow the correct sequence of all actions and practice a little in order to reduce the time for the procedure.

It is important to know: If the gel does not dry out, the lamps must be replaced. When using LED gels, they can be dried in a LED lamp, then the polymerization time will be reduced to 30 seconds. 
- Application of gel. The application rules are the same, each layer is dried in a lamp for 2 minutes.
- If any design is required, you need to remove the sticky layer from the gel and cover your nails with gel polish or decorate them with decorative elements.
- Application top coating.
- Removing the sticky layer. When using a topcoat without a sticky layer, this is not necessary.
Design ideas for gel nails
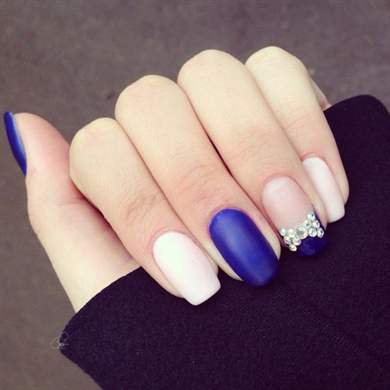
One of the most common designs when covering nails with gel is the French manicure. This option is universal, it will suit any look and style. In addition, when the natural nail grows out, the transition will not be noticeable for much longer. 
A manicure made with plain gel polishes with some design on the nails of the ring fingers will look interesting.
Recently, various nail pigments and mirror rubs have become increasingly popular, making nails look as if they are covered with metal.

The ombre or gradient design, in which the nail is covered with two contrasting or, conversely, similar colors, and the border between them is shaded, is also in demand.
How long does gel nail polish last?
The durability of the gel coating depends on what material was used for strengthening. If it is a simple gel, then this coating will last at least 3 weeks, after which correction will be required. However, this is more likely due not to the fact that the coating will deteriorate, but to the fact that overgrown nails look very unaesthetic. When using biogel, the coating lasts about 2 weeks.
Note! In addition to the type used to coat the material, the durability of the gel coating is influenced by the following factors:
- insufficient preparation of the nail plate;
- insufficient time for gel polymerization in a UV lamp;
- contact with chemicals, such as detergents and disinfectants, as well as acetone-containing liquids without gloves.
In order for extended or gel-coated nails to retain their original appearance for as long as possible, it is recommended that all housework be done with gloves.
Strengthening nails with gel: price in the salon
The cost of covering nails with gel without extensions in salons varies, but if you take the average amount, it will be about 1000 rubles or more. The final amount will depend on the chosen coating, the complexity and quantity of the design completed, as well as the popularity of the particular salon and manicurist.
It should be remembered that there is no need to save on such things, since this can lead to the fact that a cheaper master will ruin his nails or cause some kind of infection by performing a manicure with an untreated tool.
Useful tips from experts: how to perform high-quality nail strengthening with gel
- In order to avoid detachments, A few hours before applying the gel, you should not use moisturizing creams or oils.
- To ensure that the coating lasts as long as possible, Manicure should be done dry, without soaking. If you need to steam your hands before a manicure, it is best to apply the coating the next day.
- In order for the nail plate to be perfectly smooth, Additional leveling can be done using a rubber base.
- For perfect coverage, It is necessary to remove the pterygium from the surface of the nail as thoroughly as possible.
- Do not allow the base to leak on the cuticle and side ridges, this will lead to detachment of the gel.
- Be sure to seal the end of the nail at all stages of material application to avoid chipping.
Gel coating allows you to keep your nails in order, giving them an aesthetic appearance. Moreover, their strengthening can be done not only in the salon, but also at home, having previously stocked up with all the necessary materials.
Gel nail coating without extensions: useful video
Covering nails with gel at home without extensions in this video:
White French at home. Covering nails with gel without extensions in this video:
Not every woman can boast of strong, beautifully shaped nails. However, it is possible to get the perfect manicure using nail extensions. Many resort to the services of nail specialists for this, but with the advent of the gel system, which is easier to use than acrylic, it has become possible to lengthen nails or restore broken ones at home.
List of tools and materials you can’t do without when doing extensions
Nail extensions in a salon are an expensive procedure, and many people decide to save money by mastering the technology of modeling gel nails at home. However, in this case, you should be prepared for the fact that at the initial stage you will still need to shell out a tidy sum, since the necessary materials and equipment cost a lot. When purchasing consumables, it is extremely important to focus on time-tested brands, because the ease of learning, as well as the final result, depend on the quality of the materials.
Three gel systems are used for nail extensions:
- Three-phase - includes three components (layers) with different functions. The first ensures safe interaction of the nail with the composition and improves adhesion. The second layer is intended directly for modeling the future nail. The third is protective and is responsible for strength, smoothness and shine.
- Two-phase - consists, respectively, of two components. The first combines the functions of grip and modeling, while the other provides durability.
- Single-phase - carries all three functions and is the most universal.
Minimum list of tools and materials required for extension:
- UV or LED lamp 36 or 48 W;
- a set of files of different abrasiveness (100, 120, 180, 240 grit);
- buff for removing gloss from the nail plate;
- a metal pusher with a spatula for pushing back the cuticle and a hatchet for removing pterygium;
- scissors with curved blades for trimming cuticles or a cuticle softener;
- a brush with soft bristles to remove sawdust;
- a set of brushes with synthetic bristles;
- clamp tweezers used for modeling arched nails;
- lint-free wipes;
- disposable lower or reusable upper forms;
- liquid for cleaning brushes from gel;
- 3 in 1 product for degreasing, disinfecting and removing the dispersion layer (or purchase separately: alcohol-based antiseptic, degreaser, sticky layer remover);
- dehydrator - nail-prep (necessary only for high humidity of hands and nails);
- acid primer or ultrabond (ultrascoupling primer);
- gel base (if a three-phase gel system is used);
- structural gel (can be single-phase, two-phase and three-phase) or a set of colored gels for a jacket;
- finish gel (if a three-phase gel system is used);
- regenerating cuticle oil.
When choosing a gel for extensions, you should remember that nails made from this material can only be removed by filing. The exception is biogel, which can be removed by soaking, as in the acrylic system. For beginners who have no experience working with a cutter, it is better to start with this material, since when removing it, the danger of injuring the nail plate is minimized.
When choosing the main components - lamp and gel, their compatibility should be taken into account. Thus, ultraviolet rays have a wide range of effects, so lamps with such radiation are suitable for almost any material, while diode devices are suitable only for gels marked LED. For beginners who have not yet decided which gel systems to work with, an excellent option would be to purchase a hybrid lamp that combines two types of radiation.
Table: differences between LED and UV lamps, their advantages and disadvantages
| Type of radiation | Light source | Materials that are polymerized in the apparatus | Average polymerization time of various materials | Total operating time | Is repair possible | Harmfulness of radiation |
| LED | LEDs with a power of 3 W | Only new generation materials developed specifically for LED lamps with LED markings on the packaging. |
| Up to 50,000 hours of device life | LEDs are not replaceable. | The radiation is harmless. |
| UV | Fluorescent lamps 9 W each | Any materials, both marked UV and UV/LED |
| Up to 3,000 hours of operation. | Since regular UV lamps lose power and burn out over time, it is recommended to replace them every 3 months. | Ultraviolet radiation in this range dries the skin of the hands and has a harmful effect on vision. |
Photo gallery: tools and materials that will be needed for various extension methods
Files are the main working tool when extending and removing gel nails, so you should not skimp on their quality and quantity  Paper forms allow you to model nails of any configuration
  A metal pusher is necessary at all stages of extensions. Choosing a gel is an important step, so before purchasing it you should consult with a professional, and also do not forget about compatibility with the lamp. The upper forms have different widths and degrees of convexity, are reusable and can withstand up to 50 extension procedures. If you choose classic manicure, then you can’t do without cuticle scissors, but you can use them 3 days before extensions or after the procedure. Brushes with synthetic bristles are suitable for working with gel. To prevent a beginner from getting confused in liquids for removing dispersion, degreasing and disinfecting, you can immediately purchase the product , which has all three properties. Most extension gels dry only in UV lamps, however, such devices are short-lived and require constant changing of fluorescent lamps. Dehydration product will only be needed by those whose hands and nail plates are prone to moisture. LED lamps are considered to be a new generation of devices, they have high power and reduce operating time
  Bonder is the first thing you need for gel extensions. It creates a base for modeling and does not allow the gel to peel off
Step-by-step instructions for gel extensions on lower forms
First of all, you should prepare your workplace. This could be a desk, near which there is a socket for connecting a lamp, as well as an artificial light source. It is important to avoid direct sunlight on the materials, as natural light also contains a small amount of ultraviolet radiation, which helps the gel harden. Therefore, after use, brushes should be washed in a special solution and stored in a case that prevents polymerization of residual material on the bristles.
Basic set for a beginner nail extension artist:
The extension procedure will require a lot of time and patience, so at home you can divide this process into two stages. First, perform, for example, a hygienic trimmed manicure, and then, after a break of at least 3 days, model your nails with gel. It’s better for yourself to start with your right hand and only after all the stages move to your left.
The first stage is preparing the nail plate
To properly prepare your nails for extensions, you should:

Since the gel tends to spread, you should not apply extensions to all fingers of one hand at once. At the subsequent stages of installing the forms and the gel extension itself, the described actions should be performed on each finger in turn, until the final stage - filing and design.
The second stage is the correct installation of the lower form on the finger
When modeling nails on the lower forms, you can use reusable patterns, as well as disposable templates made of foil paper with a sticky layer. Craftsmen prefer disposable forms, guided by their safety, ease of use and the ability to give the extended edge any shape. The result of the entire extension process depends on how correctly the shape was installed.
Sequencing:
- Remove the template from the paper backing and squeeze out the center along the perforations. We glue the remaining foil oval on the back side of the template for additional rigidity. We tear off the upper petals, which will be attached to the finger above the nail, and round the template. We do not glue the lower ears together.
- We place the form under the free edge of the nail, trying on its placement. If the shape does not fit flush with the natural nail and forms gaps, you should adjust the oval cutout to fit the “smile” line using scissors. It is important that the cutout is symmetrical to the center line that is marked on the template. If there are high side ridges that prevent the mold from fitting tightly to your finger, you can make two cuts.
- After trying on, remove the form and glue the lower ears so that their edges are symmetrical. If the ears are connected unevenly, distortions may occur during the extension process.
- We set the form again, placing its inner oval cutout under the free edge of the natural nail, and using the upper petals we secure it to the finger. We check the correct installation by looking from the side and from the end. If the edge of the template rides up or down, you can correct its position by moving or lowering the upper petals above the nail bed. So, by moving them apart when fixing, we lift the “nose” of the pattern up, and to lower it, we should reduce the distance between the petals on the finger.
- When the form is installed correctly, and its extreme point is parallel to the nail bed, we crimp the template for a more reliable fixation on the finger.
The wider the distance between the two upper petals on the finger, the higher the edge of the template is lifted, and, accordingly, vice versa
Since the diameter of the fingers and the shape of the nail plate are different for everyone, when installing forms it is necessary to select the distance between the petals on each finger individually.
Video: how to correctly set the shape when building up
The third stage - gel nail extensions
To model a nail, you need to take the following steps:

The stress zone is the highest point of the nail, created specifically in an artificial nail so that it is strong and does not break. And also so that the load is in the correct place of the nail bed.
Video: modeling nails with single-phase gel on lower forms
How to work with top forms
Stages of work when building up onto upper forms:

Video: gel nail extensions on top forms
What other options are there for extensions using gel?
In addition to the methods of nail lengthening described above, the gel system is compatible with such extension techniques.
Lyubov Ivanova
Reading time: 5 minutes
A A
At the end of the twentieth century, extended nails were a curiosity. Today, for girls, nail extensions are a common cosmetic procedure. In this article I will tell you how to extend nails at home with gel, silk and acrylic.
According to women, it is convenient, and sometimes necessary. There are often cases when there is no time for a manicure or nails do not grow due to their high fragility. Extension helps solve problems.
Extensions also have disadvantages. It negatively affects the condition of natural nails. It is impossible not to note the cost of the procedure, the calculation of which takes into account the work of the specialist, depreciation of equipment and consumables. Fortunately, you can get your nails in order at home, time and money. And with experience, you get an excellent result that is not inferior to its salon counterpart.
Women have been growing their nails since the second half of the last century. Over the course of half a century, the cosmetic procedure has become indispensable for ladies seeking to lengthen their nails or correct defects. At the initial stage, extensions were made using acrylic, now gel is popular.
Extended nails have any shape and help you to acquire. They are beautiful, durable and protect natural nails from mechanical damage. On the extensive surface of extended nails, qualified masters demonstrate their own art.
Many young ladies consider home extensions to be a costly task. This is partly true, because buying a set of tools is not cheap. If you don’t have the required amount, I advise you to cooperate with your friends and purchase a set for the company. You will spend less money and will be able to exchange not only tools, but also the experience gained during work, which is important.
How to extend nails with gel at home - step-by-step instructions

The gel is suitable for beginners for extensions because it has one remarkable quality: when hardened, it evens out and eliminates minor flaws. Despite the loyalty to the lack of experience, the product requires careful handling.
- First of all, prepare your work area. A regular table will do. An ultraviolet lamp can be easily installed on it, and there is enough space for manipulation.
- The main thing is that there is an outlet near the table and that direct sunlight does not fall on the surface. The gel quickly hardens under the influence of ultraviolet radiation and in daylight the rate of hardening will not allow the formation of nails.
- Before starting the procedure, prepare your natural nails. Carefully cut them and use a nail file to give them shape and length. Remove cuticles and sand the surface with a block. After carrying out these manipulations, remove the pollen from cutting with a napkin or brush.
- The next step involves degreasing. If this is not done, the gel will not adhere well to the nail plates and will peel off. Use a special product. Craftsmen call it a primer because it provides preliminary preparation.
- Apply a mold to the prepared nail, which should fit under the edge of the nail plate. To secure it, wrap the free edges with adhesive around the pad and press lightly. The extension form is designed in such a way that even a beginner can determine the correct position. The main thing is that there are no holes.
The foil template ensures the length and shape of the nail and the correct position. If installed incorrectly, the extended nails will protrude to the side. Check the position of the mold from above and in profile.
- Once you have the template in place, begin applying the gel using a small brush. As a result, the nail plate should be covered with a continuous, uniform layer. Then turn on the lamp and dry the applied gel under the violet rays for 30 seconds. Do not use .
- Then take the brush again and continue shaping the nail. Extend it according to the template, guided by the length indicator. Use a mesh to make your nails the same length. Then hold it again under the lamp for about a minute to completely fix the gel. When the extended nail becomes hard, remove the template from underneath it. It is disposable and will no longer be needed.
- Use a nail file to smooth out any unevenness and adjust the length. Carry out this procedure immediately or after all your nails have been extended. The second option is preferable because it allows you to achieve symmetry.
- I advise you to paint, draw or decorate your extended nails. To achieve the effect, craftsmen make decorations from several types of multi-colored gel. At home, limit yourself to standard coloring.
Step-by-step video instructions
If you have a good tool, home extensions using gel are a doable task. If the technology is followed, the extended nails hold up well, but after a few weeks there will be a need for correction, which is due to the growth of natural nails and the displacement of the gel layer. This is not difficult to do. Ultimately, extended nails in combination with a hairstyle will make the look unique.
How to extend nails without gel - silk extensions

Silk extensions also help to get beautiful nails. This technology provides a more natural-looking result. Natural nails suffer minimal damage. Silk extensions are based on the use of small pieces of silk, fiberglass or rayon.
The cosmetic procedure is performed by masters, since beginners, due to lack of experience during extensions, choose an overly aggressive approach to nail treatment or overdo it with the amount of adhesive.
Silk is a light and thin material, which is an ideal option for brittle and weakened nail plates. Its use does not prevent natural nails from breathing, which cannot be said about gel or acrylic.
Due to its high fragility, silk is not suitable for girls who engage in sports or manual work. In all other cases, silk extensions are an excellent option.
Advantages and disadvantages of silk nail extensions
Silk extensions have advantages, including: low operating costs, excellent repair qualities, minimal harm to natural nails. Silk nails look natural and realistic. By comparison, achieving such a result with acrylic is problematic. Find photographs of finished works on the Internet and compare the results. The difference is noticeable.
Silk extensions are not without their disadvantages. We are talking about low strength and short-term results. Silk nails last no longer than a week.
If you decide to get silk extensions on your nails, I advise you to do it in a salon, which will minimize the likelihood of damage to your natural nails. Otherwise, it will take a long time to perform the operation at home.
- First of all, clean your natural nails thoroughly, degrease and polish so that the material adheres well to the nail plate. After nailing, cover with a layer of special adhesive.
- Place a piece of silk fabric on the glue that matches the length and shape of the nails you want to get. Using an orange stick, carefully smooth the silk and remove the excess using nail scissors.
- Apply a layer of activator gel. Once dry, sand and varnish if desired. But many beauties refuse to use decorative products, preferring “clean” silk nails.
If you are trying to temporarily cover a damaged nail plate with silk extensions, I do not recommend using varnish. As a result, the damaged nail will be able to grow unhindered, and you will be able to monitor growth and make adjustments if necessary. Below you will find a video that will reveal the secrets and subtleties of silk extensions.
Video instruction
How to extend nails with acrylic
Any beauty salon will offer acrylic extension services. The masters will make your nails beautiful and well-groomed, and thanks to the author’s design, also unique. This kind of procedure can be carried out at home.
Acrylic extensions help in apartment conditions to increase the length of nails and apply a beautiful design to the surface. But despite the low complexity of the procedure, it is impossible to do without preparation and tools.
Carrying out a cosmetic procedure requires the availability of a comfortable workspace. All activities and manipulations can be conveniently carried out on a spacious table. This work surface is enough to place tools and install a lamp.
- Wash your hands and treat with an alcohol solution. Remember, acrylic extensions are carried out only on a grease-free surface.
- Using an orange stick, remove the cuticle. If this is not done, it will cause a lot of inconvenience, and the nails will turn out sloppy.
- Using nail files, treat the surface of the nail and remove shine. The technology under consideration involves working with a rough surface. When processing the nail plate, act carefully, otherwise you will damage it.
- Glue the shapes onto short nails and press down so that there are no voids. If you are undergoing a cosmetic procedure for the first time, I advise you to make nails that are half a centimeter longer than natural ones.
- Treat the surface of the plastic template with a nail file to give the required shape. Next, coat the surface of natural nails with a degreasing agent and wait until it dries.
- The next stage involves working with a brush and acrylic powder. Soak the brush in the monomer, and then make acrylic lumps from the powder. Make small strokes using pressure.
- Distribute the lump over the plate to form a film, the thickness of which should increase towards the edge of the nail. The extended nail should be thicker at the tip than the one above the natural one.
- The next step is to smooth out the acrylic nails using a brush and monomer. Don’t forget, this surface will later have a design on it.
- After drying, process with nail files and polish. All that remains is to apply the image to the surface using varnish. Acrylic nails turn yellow when exposed to ultraviolet light. Therefore, protect them from such radiation.
Using the instructions above, you can grow your nails without any problems without the help of a specialist. When creating a design, you will need a classic manicure set and polish in several colors. Just remember, acrylic does not like decorative products that contain acetone, since this substance destroys its structure.
Is it possible for pregnant women to get nail extensions?
A woman always strives to look unsurpassed and the period of bearing a child is no exception. By and large, this cosmetic procedure is harmless. Extension materials contain chemical compounds that could theoretically cause harm to the unborn child, but their concentration is not enough for this.
It is not prohibited to carry out the procedure using high-quality materials. They should not contain methyl methacrylate, a substance that is prohibited in America and Europe. At high concentrations, it leads to serious disruptions in fetal development. At the same time, Korean and Chinese manufacturers still use it.
- a responsible period. Therefore, I advise you to carry out the procedure in a ventilated room. Use all kinds of antiseptics. During the procedure, I recommend that the expectant mother wear a medical mask, and after completion, wash her hands and rinse her nose.
- During pregnancy, it is not prohibited to use extension gel. It is not characterized by a pungent odor, but evaporates during hardening. Before entering the maternity hospital, be sure to remove extended nails, as doctors will examine the nail plates.
- As for acrylic, it is characterized by a pungent odor. Therefore, extensions should be carried out under conditions of enhanced ventilation. Otherwise, you will inhale the fumes, which will not benefit either you or your unborn child.
During pregnancy, the structure of nails changes under the influence of hormones. As a result, the girl’s nail plates become brittle or strong. As for extended nails, they do not attach well and are easily torn off.
I don’t recommend building up your hair during this interesting period and waiting for beauty until better times. Nail dust causes severe irritation of the nasal mucosa and leads to an allergic reaction. Due to calcium deficiency, natural nails become brittle, which once again proves the undesirability of the procedure.
Care for extended nails

Maintenance is easy. Periodically visit a beauty salon and make corrections. The master will easily and quickly correct the length and apply the material to the part that has grown back.
Between visits to the salon, take care of your extended nails yourself. It's simple if you strictly follow the generally accepted rules.
- If you don’t have a nail polish remover in your arsenal that doesn’t contain acetone, be sure to buy one. Acetone is a solvent that can ruin the appearance of extended nails.
- Wear rubber gloves when using aggressive detergents. They will protect the nail plates and skin of the hands from the harmful effects of chemicals.
- Often, between visits to the salon, there is a need to treat the edges of the nails. Files used for natural nails are not suitable due to their high softness. You need files that have low abrasive characteristics.
- Artificial ones seem durable, but this does not mean that they cannot be broken. I do not recommend pinching, crushing or gnawing them. By damaging the extension plate, you will cause a lot of trouble for your natural nail.
- The materials used for extensions are not friendly to high temperatures, the impact of which leads to the appearance of cracks and yellowing. This does not mean that you need to give up the sauna or solarium. The main thing is not to expose them to sudden changes in temperature.
- After extensions, the cuticle grows more slowly. Sometimes you need to remove it yourself. It is better not to resort to the mechanical method; you will damage the nail. Buy a special product aimed at removing cuticles. Apply it to the skin adjacent to the nail, wait a little, and then remove it with a wooden stick.
- Regularly moisturize the skin around your nails with oils. Penetrating deep, they nourish the nail plate and improve growth.