Weaving a beaded cord with a needle. Beaded harness
Beautiful and unusual harnesses are special accessories, cords, from which African original culture breathes. At the same time, if you change the pattern, the mood also changes - from carefree summer to business and sophisticated or light spring.
The decoration looks great as a separate accessory, and the basis for a cameo, pendant, pendant, which can be braided with the same material or attached separately.

Weaving pattern
For beginners, ready-made picture patterns from the Internet are suitable, experienced craftswomen will be able to create their own unique pattern. This can be done on paper in a box, but for convenience it is better to use a program like DB-bead or Jbead.

The latter meets with a Russian translation, if there are difficulties with decoding, look for Russian-language guides on creating a pattern - everything just seems complicated at first.


Beads
With continuous weaving, it is very important to choose it in the same size, otherwise the pattern may go, in general, there will be a discrepancy with the pattern and confusion.

Try to buy beads made in the Czech Republic, Japan or brands of similar quality. If an openwork technique is chosen, when beads of different sizes are specially taken, irregularities may be less noticeable.

Fishing line, monofilament or kapron thread
The choice of material on which the beads are strung depends on their size and the decoration technique. The first cord will be more convenient to weave on a fishing line with medium, not small, beads.

Thin needle and hook No. 1 or No. 2. In another way, such a needle is called a bead. The product can be completely made with her power or crocheted.

In the photo of the beaded cords, you can see the basic manufacturing techniques
- Crocheted. When creating decorations, columns and semi-columns are used.
- Mosaic. In each turn, there is an odd number of beads, and the next row is attached to the previous one, alternating.
- Square. It is assembled with a needle and an equal number of beads of the same diameter along the edges, in cross section it looks like a square. Quite a complex scheme.
- Flat. It is created similarly to the knitted version, but around the elastic band, due to which, in the cut, during work, it looks more like a flattened oval than a circle.
- Openwork. Great for a set of thick cord, from different types of beads. It turns out airy and soft - there are small gaps between some beads.
- American. Easy for beginners, especially beautiful when using at least two different colors. As a result, it seems that two beaded ribbons are intertwined, embracing each other.
- Turkish. A simple option, differs from other methods in the presence of glass beads and elongated beads. Created by crochet.


Do-it-yourself step-by-step knitting of a tourniquet
- Decide on the length of the finished product. For beginners, it is better to start with a short tourniquet exactly around the neck - 40-44 cm.
- Choose a scheme and count the number of beads you need for the desired length.
- Dial beads on a fishing line or thread in strict accordance with the scheme. If a mistake is made in color and only once, it will not be evident, but if a bead is missed, the whole pattern may “float”. Therefore, be extremely careful at this stage.
- Weave the cord.
- Fasten and decorate the ends of the accessory with caps or huggers, attach fasteners to them. Ready!


Master class on beaded cords for beginners
Let's figure out together how to make a mosaic tourniquet.
- String an odd number of beads on the fishing line (5, 7, 9, 11, etc.), the fewer of them, the more accurately it will be possible to weave the decoration.
- Pull the line through the first bead, closing the row in a ring.
- Leave about 15 cm free at the end of the fishing line, after tying a knot. This will come in handy for anchoring.
- In the second row, we pass the thread through the beads of the first row through one, that is, after the first, the third will go, then the fifth, the seventh ...
- The third row is already attached to all the beads of the second.
- The fourth - like the second, the fifth - like the third, continuing to alternate rows to the desired length of the flagellum.
- The ends of the fishing line can be melted for reliability with a lighter, the main thing is not to burn the knots.
- Pass the fishing line through the caps, trying not to stick out anything beyond them, attach the lock and hide the ends in the decoration.

Other instructions and patterns for weaving harnesses that will interest both amateurs and professionals can be found below.

Beaded harness


Note! 


Note! 


Note! 


No woman can resist seeing a beautiful accessory - a beaded flagellum. But you can make yourself such a decoration. And if you wish, you can make several of them in different colors and different weaving. Then for each of your outfits you can choose your own accessory and be gorgeous in it. All patterns of beaded harnesses are simple, since they show how many, which beads to wear and in what sequence.
Preparation for work
Before you start making harnesses from beads, get everything you need. The most important component is beads - this is the material on which you do not need to save.
The better the beads, the brighter and prettier it will look in finished form.
You also need to buy special threads or fishing line, beading needles, all kinds of fasteners for necklaces and bracelets.
One of the weaving methods is a simple stringing of beads in a certain order according to the schemes. According to the schemes, you can weave both monophonic bundles and multi-colored ones.
- First, string 4 beads alternately, then pass the needle through the first bead;
- Then the next 3 beads, then insert the needle into the 3rd bead of the first circle;
- Then 3 more, the needle at this time is pulled through 1 bead of the second circle;
- String 2 more beads, balancing the edge of the bundle with this;
- Then again 3 beads and then weave in the same way.

light flagellum
The second option for weaving harnesses. Beads also need to be worn on a thread or fishing line. Only it is going not with a needle, but with a hook.
- The first thing to do is a knot so that the work is held firmly. Next comes the bead, grab the thread with a hook, then to stretch it into the resulting loop - this is an air loop.
- When you have made the required number of loops, tie them in a circle. Next comes the next stage - knitting single crochets. For an air loop, you need to have one loop, and then make another one from an adjacent air loop, and after that, stretch the working thread through both of these loops. And continue the same steps.

The main thing in this weaving is to evenly string the beads.
Simply put, do not collect all the beads in one area and do not knit with only one thread.
1 bead, 1 crochet loop, 1 bead, etc. And then you will get a beautiful crochet harness.
Small master class
According to the scheme, you need to collect beads with a needle.

Then you need to make a crochet loop on the thread, it will be the first.

Then you need to grab the thread immediately after the first bead and stretch it into the first loop made.

Do the same with all the other beads of the row.

The next step will be the design of the ring. To do this, grab the thread behind the first bead.

Like this:

After that, pass the hook under the second bead of the first row and grab the thread behind the second bead of the second row.

Pull the thread into the loop and get:

When knitting, make sure that the beads always lie on top to the right of the previous row. To make the bracelet voluminous weave, it is necessary on a special basis, if it is not there, then take the rod.
When you have woven the product of the required length, you need to finish it, for this, knit one row with a semi-column, but without beads.
And one more tip: to keep your product volume, insert an ordinary lace inside.
Reading charts correctly
Let's figure out how to weave beautiful products. To do this, you need to be able to read diagrams.
Look at this diagram:

In it, the number 9 indicates how many beads the circle consists of. The second circled number means the number of beads in the rapport.
rapport - this is the size of the pattern, which at the end will be repeated until you weave a bracelet or necklace, depending on what you want.
There are several columns, each with squares of different colors, and numbers next to it - this indicates how many beads of a certain color you need to dial. The scheme starts from the leftmost column from the top, you need to type in vertical columns, that is, you type the first column from top to bottom, the second vice versa from bottom to top, etc. until the end of the rapport.
But look at the patterns of knitted harnesses:


It is worth saying that there are still many options for weaving, for example, square harness. Since it is complex, it is not suitable for a beginner. Things of this kind are strikingly different in form and method of manufacture.
The peculiarity is that you need to create several elements - top, bottom, and four sides. Beads need the same size, only in this case the product will have the correct shape.

- Put 4 beads on the thread. Roll them into a square shape;
- Next, we string 3 beads and pull the fishing line or thread into the third bead of the first row. Again we put 3 beads on the thread and thread through the second bead. It turns out two sides of the square;
- Then we drag the fishing line into the 5th bead and string 1 bead, pull the fishing line through the central bead;
- Then it is necessary to string 1 bead again on the fishing line and stretch it through the central bead of the other side. Fasten the thread well. The cube is done. Then everything repeats the same.
There is another type of knitting - turkish tourniquet. It weaves easily, so it is suitable for beginner craftswomen.
Video on the topic of the article
Having considered the various ways of weaving and telling them the principle of creation, I would like to wish everyone one thing - a pleasant pastime.
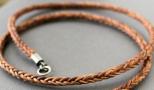
Braided beaded cords are quite a modern and very fashionable accessory. The harness is a woven cord. It can be either dense weaving, or lace or openwork. The thickness of the harnesses varies depending on the desires and needs. An elegant accessory came to the modern world from antiquity. Once upon a time, craftswomen made a ribbon that was flat, after which they sewed it into a cord.
The process of making cords has now been modernized a bit, and the accessory has received different shapes: a square, a spiral, an outer braid. The original decoration in the form of a tourniquet is in demand due to its versatility. They can be worn as a separate piece of jewelry, or combined with various pendants or chains.
One of the ways to make harnesses is knitting. Such cords are quite elegant and look great, and the variety of patterns for them will allow you to make such an ornament that will fit both a specific outfit and be universal.
In order to understand the process of making jewelry, learn its secrets and learn the technique, let's consider a knitted beaded cord.

A matter of technology
Before proceeding with the manufacture of the bracelet, it is better to try to make a small pattern. So you will understand both the weaving technique and how all the objects in your hands behave.
To make a test pattern, you will need:
- Beads of different colors.
- Needle for stringing beads.
- Knitting thread for weaving lace.
- Hook number one.
To create a pattern, you need to understand the scheme, understand it and study it in detail. The accessory can be made according to a ready-made scheme, or you can create it yourself in a special program.
We will try our hand at creating a tourniquet on multi-colored beads. The basis of the harness is 7 beads, and below is the weaving pattern itself.

At first glance, everything may seem either super complicated or too simple. Let's figure it out. At the top right, you can see how wide the tourniquet will be, in our case it is equal to seven beads.


- Draft - represents the outline of the pattern in expanded form.
- Corrected - has a mosaic look, the pattern itself is in weaving.
- Simulation - type of finished product.


To facilitate the stringing of beads and determine their number, as well as their order, they are duplicated in separate columns located on the right.
Weave a pattern
After you have figured out the scheme, you can start weaving the pattern.


- As a result, we have the following form:

- Then the hook must be passed under the blue bead located in the first row and the thread should be captured behind the next blue bead located in the second row.


Note:
When you knit a bracelet, keep a close eye on the beads of the new row. They should lie directly on top and to the right of the bead of the previous row. Because of this, we recommend holding your beads while knitting. To add volume to the tourniquet, its weaving must be performed on a special basis, if it is absent, then you can use the rod. To avoid slack, the thread you are working with should always have the same tension. As in any business, it is difficult to just start, when a part of the bracelet is connected it becomes much easier, work and hold the thread, and all the beads are put in their place, like pieces of a puzzle.
When the bracelet is connected, it must be completed. To do this, weave the last row of the bundle with half-columns, only without beads.


Types of beaded cords
Beaded cords resemble hollow cords created with an openwork or dense method. As for the execution technique, it can be knitted and woven.
By type, such products are divided into:
- openwork;
- twisted;
- square;
- mosaic;
- Turkish.
For all methods of creating such decorations, the same tools are used:
- fishing line;
- beads;
- needle;
- accessories;
- scissors.
The main condition for this work is the correct tension of the beads. Therefore, you must strictly adhere to the scheme and make sure that in the process of creating jewelry, each element is woven with the same density.
Mosaic tourniquet
Such beaded cords are the most popular due to their ease of work. For beginners, this is the best start to practice. Its feature is that the product is made up of an odd number of elements. On the video you can see a detailed master class of its creation.
The process of making a harness
The weaving pattern of this product is very simple:
Harness square
 A master class for weaving such a thing is quite complicated. Therefore, it is not suitable for beginners. Similar products are very different in form and method of creation. A feature of the scheme is the manufacture of four elements: top, bottom and 4 sides. A feature of weaving square beaded cords is that you need to use beads of the same size in your work. Only under this condition, the decoration will turn out to be of the correct form. Before you start making such a product with your own hands, it is better to watch the video instructions for creating it.
How to create a square harness:

Twisted (spiral) tourniquet
Twisted beaded cords are distinguished by their unusual structure and beauty. There are many different weaving patterns for this decoration. But for beginner beading lovers, we have prepared a simple master class.
For the harness you will need:
- fishing line or special thread;
- black and red beads;
- needle;
- scissors.
Preparation method:
Manufacturing process:
american tourniquet
This is one of the most interesting harnesses. The master class for its manufacture is quite simple, so any needlewoman can handle this work. Such beading is very popular among needlewomen.
For manufacturing you need:
- fishing line;
- red beads;
- black beads.
Creation method:
- The weaving pattern is easy and affordable. First, you need to put on one bead on the fishing line and fix it tightly by threading the end of the thread in both directions;
- Then you need to dial seven beads. Four black and three red. We stretch the end of the fishing line through the first four elements. Get a loop;
- Then we string one black and three red beads. The first one needs to be attached to the base, add one element and push the end of the fishing line through the remaining beads;
- This method should be used to make all subsequent tiers. That is, each time we add four beads. Where one will be the main and three side. The main feature of each step is that you constantly need to draw the line through the four main beads;
- After the entire tourniquet is ready, the ends of the fishing line must be well fixed. The master class ends here. It remains only to attach the fittings on both sides.
Today, jewelry made from small beads is very popular. All fans of beading know how to weave a beaded rope. But this skill has not become known in our time. Even in the old days, similar little things made by hand were popular. Although then the materials were somewhat different in color and structure. For many nations, plaits made of small beads or, in our version, made of beads are not only an ornament, but also a magical amulet. And if some kind of ornament is made on such products, then it acquires stronger effects.
From beads, you can make both light and airy things, as well as massive-looking, dense bundles that amaze those around you with the beauty of an intricate beaded pattern. You can decorate your wardrobe with such harnesses, using a work of art as a belt or necklace, or include them in more complex beaded jewelry.
The first impression that a beaded cord makes is the incredible complexity of weaving. Yes, this is a difficult technique in which crochet techniques are used along with beading. Nevertheless, after studying our video tutorials and carefully following the actions of the instructors, you will learn how to perform this complex weaving and amaze everyone with the amazing beauty of your creations.
We offer a brief overview of video tutorials on creating harnesses:
Beaded harness.
Actually, the purpose of this video is to dispel the fears of beginners. Yes, getting started is hard! The hooks are thin, the beads are small, everything gets tangled and scattered... A familiar story?! To begin with, very briefly for those who have never tried it at all: a beaded cord is crocheted from beads, previously worn on the warp thread.
Further subtleties: a combination of bead size and thread thickness, choice of hook size, reading skill, and then creating patterns for beaded cords... But you have to start somewhere, right?! Having some learning experience, I can say that too much information at once for a beginner is also a problem. But you will learn how to knit a harness.
Video lesson:
Crocheted beaded harness.
In today's video, we'll talk about how to crochet a beaded cord and what we need for this:
- it is preferable to use Czech or Japanese beads;
- it is desirable to use cotton thread;
- a hook, instead of which you can use a regular needle;
- coil of wire;
- lock, connecting ring, caps.
Before we start knitting a beaded cord, we need to put our beads on the spool of thread, 10 beads in a row. On a thread, we crochet 10 air loops and close them into a ring. We advance 10 beads and begin to knit our flagellum
Video lesson:
Master class on how to crochet a beaded cord.
We will take Czech beads, number 7, but you can take any other. To begin with, we make air loops, we need 9 of them, we close our loops into a ring. After that, we will need to weave a bead into each loop.
After the work done, we put the working thread on the hook, move the beads away from the working thread on the hook and stretch through two loops, make the second row of our flagellum. A prerequisite is that the beads in the row are perpendicular to each other. We do the same job several times. This bracelet can be a great decoration for you.
Video lesson:
Harness with a single crochet.
For work you will need:
- Czech beads 10;
- thread Jeans or Canarias;
- hook 0.75 or 0.5;
- beaded needle;
- piece of thin sewing thread 15 cm.
First, we will knit several rows without the beads themselves, we will do this so that our flagella turn out to be even and beautiful. You can find knitting patterns on the Internet. We start weaving a tourniquet. To begin with, we make a sliding loop, take the hook and insert it under the thread, while grabbing the working thread that goes to the ball.
Video lesson:
Harness a column.
Russian way. In the video we will talk about knitting with a column, as well as the difference between a column and a half-column, we will talk about knitting techniques. Let's start the master class. The difference between a column and a semi-column is only visual. At the half-column, the beads are laid horizontally, and at the column - at an angle. Both of these methods are good in their own way.
For work, we took Czech beads number ten, hook 0.5, thread. We start each plait connected with a column with a chain of air loops, and the number of air loops in the chain is 2 times less than the circumference of the plait that we knit.
Video lesson:
Beaded one-color harness.
To make it, you will need beads, threads to match its color, a beaded needle, a 1.5 hook and scissors. With the help of a needle, beads are collected on the thread for its entire length. We crochet two loops on the thread, after which we pull eight beads to them and continue to make air loops, grabbing one bead into each of them.
This is how the first row of beads is obtained, which closes in a circle. Further, the second row is knitted from the next eight beads. Such weaving of the tourniquet continues until it is ready. Each row uses the same number of beads.
Video lesson:
Patterned beaded cord.
There are many patterns for knitting harnesses, both black and white and colored. There is a special computer program for creating such circuits. You can use existing schemes or develop new ones using the program to your liking. Depending on what color is provided in the scheme, beads of the required color are selected.
The instructor explains in detail how to use the diagrams and calculate the amount of beads needed for work. All rows of beads are knitted from left to right. When creating a bracelet, you will be able to accurately determine the number of beads of each color.
Video lesson:
Harness of beads with semi-columns and columns.
For those who are learning how to crochet a beaded harness, two popular weaving techniques are offered - a half-column and a column. Harnesses of small diameter are knitted using the half-column method, up to 10 beads in a row. The thread is matched to the color of the beads or is a contrasting background with it.
With the help of a needle, beads are collected on the thread, after which the needle can be removed. At the beginning, two air loops are knitted, 8 beads are moved to them, and knitting with air loops begins, one bead is knitted into each of them. It turns out a neat chain, which we close in a circle.
Video lesson:
Beaded harness.
Consider how to crochet a beaded cord, in accordance with the scheme, resulting in a product with a multi-colored geometric pattern. According to the drawing, the necessary colors of the beads are selected. In addition, we will need:
- denim threads;
- needle with a wide eye;
- hook 0.8;
- trailers for the ends of the bundle;
- rings;
- magnetic lock.
You can choose a pattern for knitting a harness on the Internet. The schemes are very different, we will consider a simple version of a full harness of 235 rows. We get an American beaded harness. When moving to the central rows, each row is made one more bead, and after passing through the center, we begin to remove one bead at a time, providing a narrowing.
Video lesson:
Beaded tourniquet half-column.
The master class is held for greater clarity on large beads and thick threads, respectively, a large hook is taken. It is described in detail how to get the first loop on the thread. This loop is a ring on which as many double crochets are knitted as we will need beads for the full thickness of the bundle.
Then the ring is tightened, and all the columns form a neat flower. The beads are pulled up, and knitting begins with its use. After knitting to the end of the row, a neat beaded ring is obtained.
Video lesson: