Volume flowers from felt. DIY felt flowers
Today, dear needlewomen, we want to tell you about how to make a flower out of felt with your own hands. This master class with an assembly diagram presents four options for creating felt flower templates, and all of them are quite easy to make. A step-by-step instruction with a photo and patterns of flowers from felt will tell you what to do and in what order.
Tools and materials Time: 3 hours Difficulty: 4/10
- felt of various shades for flowers;
- green felt;
- twigs;
- glue gun and glue sticks;
- scissors;
- pencil;
- buttons or large golden beads for the middle;
- jar lids or ready-made circles (we used 8 and 15 cm in diameter).
Step by step instructions with photo
These cute felt flowers are the perfect birthday present for mom! Moreover, they will please her for a very long time, because they will never wither and die. Please your beloved mom and give her amazing handmade felt flowers, and she will undoubtedly appreciate your present!

In this master class, we used the following materials and tools:

Step 1: Make a Double Flower
To make double flowers with a golden bead in the middle, cut out 8 circles of felt with a diameter of 8 cm. Make four circles of them in one shade, and the other four in a different color.

Take one circle and fold it in half and then in four. You should end up with a quarter circle petal. In the same way, fold the remaining three circles of the same color into four.
Using a hot glue gun, glue four petals folded in four into one circle.

Next, fold in four the remaining four circles of a different shade. In the same way, glue them into a circle. Glue one circle of folded petals on top of a second circle of a different shade. Glue a gold bead or button into the center of the craft.
Step 2: make a rose
Cut out a 15 cm circle from the felt.
Draw a spiral 2.5 cm wide in this circle. Make an incision along the spiral with scissors.

Starting from the center, roll the strip into a roll. Secure the end of the roll with hot glue.

Step 3: Create a Double Flower
To make a double flower, cut a strip of felt 5 x 22 cm or 6.5 x 30 cm, depending on whether you want a larger or smaller flower. If desired, you can create both flowers.
Fold the strip in half lengthwise. If necessary, secure the strip from the side of the edges with small drops of hot glue.
Using scissors, make small cuts at the top of the strip, 1 cm apart, as if you were making a fringe. Cut carefully so as not to cut the entire flower. When finished with the cuts, roll the strip into a roll. Secure the end of the craft with hot glue.

Step 4: Make Tender Buds
To make delicate buds, cut out three circles with a diameter of 8 cm from felt. Fold the circles in four as described in the first step.
Glue three quarter-folded circles into one bud. When gluing, slightly lift the petals up.
Original decorative decoration in Handmade style - felt flowers. It's easy to do and pretty quick, but it turns out very unusual and beautiful.
Felt flowers look original on handbags, hairpins, as a decoration for hairbands, as well as in the design of any gift souvenirs.


Materials for flowers from felt
- felt
- scissors
- glue for fabric
- pins
- thread and needle
- all kinds of beads, beads and buttons of different sizes for decorating flower cores;
- floss threads, the shades of which should differ by several tones in one direction or another from the original color of the felt. They are used to decorate the edges of future flowers.
Felt flowers, patterns of which can be found in large quantities in the catalogs of online magazines, as a rule, are very plainly designed. An ordinary chamomile pattern can be used as a basis. But the work, made in several layers of contrasting or monochrome colors, acquires a completely different idea. Cut out paper petals. This will be the template. Here are some ready-made patterns for felt flowers:


Consider the assembly process using the example of a flower made according to this pattern:

First, you need to recreate the template pattern directly on the fabric.


Then the edge of each petal is sheathed with a skillful seam using floss or not processed at all.
We put the petals on top of each other from largest to smallest (or vice versa) and sew in the center to form a deepening of the future flower (you need to sew tightly). And let's move on to creating the core. A circle cut out of felt is planted on glue and placed in the middle of the flower.

Sequins, pre-prepared beads, beautiful beads will give the author's originality to the resulting work of art.
Depending on the intended purpose of the product, we attach a pin or sew an elastic band to its reverse side.

We post a few more photos of flowers that inspire new creations. In each of these flowers, as an additional decoration,french knots :


The felt flowers presented below are master classes from the masters of needlework. These works will help beginners master the simple creativity of creating decorative floral elements.
Felt rose (master class)
This amazing accessory is ready to "sit down" on an evening dress or coat of its resourceful owner.


Let's start at the base of the flower. To do this, prepare a circle, the diameter of which will be 10 cm. Cut out semicircular petals along the edges of the circle, gradually moving from the outer edge inwards.

The central part is rolled up, thus forming the core of the future rose.

It must be fixed with a pin and filled with a layer of glue. After the glue dries, it is necessary to wind the rest of the felt on the resulting bud and close the cut from the bottom side.


Here is such a wonderful rose will turn out in the end!

If you make a few roses, glue them to a piece of fabric and sew on a metal clasp, you will get a wonderful brooch!

For clarity, a few more roses made according to a similar principle:


Felt violet (master class)

Materials for work:
- felt (sheets of two different colors: lilac - for petals, green - for leaves)
- scissors
- threads, the color of which must match the color of the violet
- needle

Let's prepare 5 templates for future petals (diameter - 4 cm):

Take one of the petals in your hands and fold it in half twice. We get a petal in the form of a corner:

With a couple of stitches we attach a corner to one of the blanks:

Repeat the steps for the rest of the corner petals. To achieve the desired neat effect, carefully monitor the direction of the petals (they should be directed in one direction):


At the end of the work, the flower should be well straightened:

Let's move on to cutting the leaves:

We sew them together:

Raising the petal, we fasten the leaves with the base:

We enjoy the result!
With such flowers you can decorate, for example, a rim:

Chrysanthemum from felt (master class)

The strip of felt must be folded in half (in width). For reliability, fasten with sewing pins.

On the side where the fold was made, we form the same cuts.

We sew a strip with matching threads with large stitches and roll it into a roll, forming petals. We fix by sewing the layers together in several places.

It remains to straighten the felt and form a beautiful flower!
This flower will consist of a large number of petals.

Having cut out rectangles from felt, we have a fringe on one edge, and round off the other. Petals should be about 20. They should all be different sizes.

We pinch the edge that was rounded and fix the petal with glue.

We form a flower:

Cut out a yellow stripe. Cut it on one side. Then we roll it up and fix it with glue. We get the finished core.

To use a flower as a brooch, you need to attach a small piece of felt to the base from the wrong side, and then chop everything with a pin or a metal clasp.
Felt hydrangea (master class)

Flower materials:
- felt
- scissors
- glue gun
It is necessary to cut out 13 felt circles of the following sizes: 1 piece - 3 cm in diameter, 12 pieces - 2 cm in diameter.

We apply glue (hot) to the center of each circle and thus form the future petals.

Products made by hand amaze with their beauty and decorative effect. They allow you to emphasize your individuality and delicate taste. Complex details add conciseness and ease.
Flowers made of felt are especially popular among needlewomen. They are used as decorative items. These miniature flower arrangements look great as a brooch.
The manufacturing technology of such a product is quite simple. How to make flowers out of felt? Our material will help to understand this.


The main characteristics of felt
Felt is a thin felt cloth. It is excellent for the production of clothing and furniture. The dense base has a soft surface that adds a touch of comfort. Recently, it has been used to decorate various kinds of surfaces.

They make out the covers of albums, books, jewelry boxes, hair ornaments and accessories. For the production of felt cloth, environmentally friendly products are used. Basically, it is the wool of a goat or a rabbit.

If synthetic compounds were used in the manufacture of felt, then convex areas will appear on the surface.

Making flowers from felt with your own hands at home is quite simple. The material is highly deformable. It can be purchased at any department for needlework.

There is a wide range of sizes available for sale. The smallest is 30-45 cm. The thickness of the textile reaches about 2 mm. A wide color palette allows you to choose the desired shade.


What types of flowers are made from felt?
Many needlewomen ask themselves the question: “What flowers can be made from felt?”. We offer some interesting ideas and patterns for beginner craftswomen. The production technology includes simple elements. This type of activity is ideal for co-creation with preschoolers.

Here are some beautiful color options. Most often, roses, daisies, poppies are made from this material. The soft texture of the fabric allows you to add texture and smooth lines to the future product. Before proceeding with the manufacture of flowers, it is necessary to figure out what parts the composition will consist of.

A circle is taken as the basis for blanks for poppies. Two methods have been developed for the production of this model. In the first case, the side borders of the round base are carefully cut towards the center. The edges are seamed over the edge.
In the second method, the circle is divided into several elements. In the future, they will act as petals. Then they are connected to each other with a thread and a needle.

For the production of chrysanthemums, a small circle is also used. To create many petals, it is folded in half and cut into thin ribbons. After that, they are sewn to the center. The result is a realistic imitation of a living plant. The photo of felt flowers shows the best options for needlework.


Felt hair accessories
Surely every girl wants to have accessories of exclusive design. Modern materials allow you to translate any fantasy into reality. We offer detailed instructions on how to make decorative flowers. They are perfect for decorating hair, bags and clothes.

Let's start with the simplest option - a bezel with felt decor. Volumetric flowers on this accessory add charm and femininity.
Handmade will never go out of style. A handmade thing will have no analogues, thereby emphasizing your delicate taste.


We bring to your attention a master class on making flowers from felt. To make jewelry, we need:
- scissors;
- felt of different colors;
- templates;
- threads;
- needle;
- plastic bezel;
- glue;
- faceted beads;
- simple pencil;
- thin beige ribbon.

Let's start the workflow. It consists of several stages:

- Roses will decorate our hair accessory. To do this, we need a wave pattern. We circle the pattern on the surface of the felt. Next, cut out the necessary detail.
- We begin to twist one end to the other. In the manufacturing process, we carefully form the petals. We begin to sew the resulting element in the area of the lower section. We make a few more details using the same technology.


We pass to the surface of the rim. We wrap it with ribbon. Before proceeding with the winding, it is necessary to lubricate one end with a small amount of glue. In the future, this will extend the operational life of the product.


The final action will be fixing the flower arrangement on the rim. To do this, the lower edge is abundantly lubricated with adhesive. After that, we fix the floral decor anywhere. When the decoration is tightly fixed, we begin to sew on small beads.
Photo of felt flowers


Do not hesitate, release the muse and create ^_^
Master classes are quite simple, children can create bright felt flowers with their own hands (of course, under the supervision of adults). After the finished flower can be used as a decoration: arrange in the form of a brooch, hairpins or attach to a hair band; as an element of room decor: just put it in a vase or, for example, decorate decorative pillows.
Let's start, perhaps, with several options for making roses from felt.
Felt roses
Which of the girls does not dream of receiving a “million scarlet roses” as a gift? After all, roses are delicate, exquisite flowers, a real symbol of femininity and beauty. Below are 3 workshops that will help you get your own felt roses.
simple felt rose
Felt is a material that provides opportunities for imagination and creativity! From it you can make many interesting and unusual things, as well as flowers of different types. This rosette is one of the ideas and probably the simplest! Anyone can do it without any special skills.
You will need:
A small strip of pink felt, scissors, a bead and a needle and thread.
 Pretty felt rose by twisting
 Cut out a strip of felt and make a zigzag edge as shown in the photo. To one end, it should taper a little. 
Roll up the strip, starting at the narrow end and working towards the wider end.

To secure the rosette, sew it on by making a few punctures at its base.

A small bead in the center will be an eye-catching accent! Just sew it on top of the flower.

Decide for yourself what will decorate this beautiful and easy flower!
bicolor rose
This two-tone rose is a pleasure to make, and it's the shades that make it stand out!
It looks realistic, but will take a little longer than the rose from the previous MK.
 See how pleasantly the felt of two colors is combined in this rose!
 In order to cut out a circle, simply take any object of a round shape and click on the material. Drawing with a pencil on felt is quite a difficult task, and in this way everything can be done quickly and easily!


Now it's quite simple to cut out the resulting circles. Make circles out of two different colors and sizes of felt—large, medium, and small—and then cut each circle in half.

Next, work with each semicircle separately. First, take the smallest semi-circle and start folding it, then take a semi-circle of the same size, but in a different color, so continue to work, twisting the petals from smaller to larger.

Each petal must be secured with a thread.

Attaching petal by petal, changing color each time, finish the work when you realize that the rose has formed. You can sew a bead in the center of your choice.

Well, what do you think about this flower? Will you try to do it? You will not regret it!
Delicate rose brooch
DIY jewelry is always distinguished by originality and originality. You can not care that you will meet a similar thing in the company of friends or at parties. She will always be loved, because it is in her that the warmth of your hands and your creativity is invested.
A felt rosette looks so realistic and gentle that many will envy such an ornament.

To make a rose you will need:
Pink and green felt, scissors, needle and thread.
Draw five circles on the felt (you can circle something round for this) and cut them out with scissors. For the four resulting circles, make the edges wavy, as if they were petals. Take green felt - it will turn out two small leaves as in the picture.

First, take an even circle and sew two green leaves with a few stitches. Then get to work with the remaining circles. Each must be folded in four, as shown below.

Sew these circles alternately to the middle of an even circle.

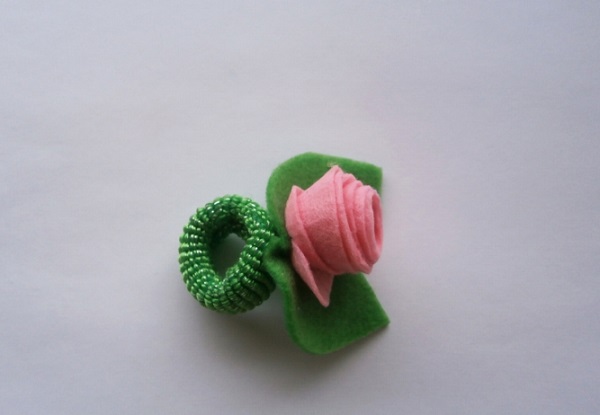
Our rose is ready! See how simple it is! It can be attached to a hairpin or hair band, decorate your home or gift box. It will always look cute, and, most importantly, it does not take much time to make it.
Adorable felt flowers by Purl Soho and Purl Bee
The end of spring and summer is a wonderful time, giving us an abundance of flowers and greenery. Dive into your vivid summer memories by creating this floral charm. Use your favorite colors of felt, reminiscent of the last colors of summer.
 Look what a variety of colors!
 This tutorial was created Purl Soho and Purl Bee. All rights to the pattern and model are protected by copyright law. Neither the template nor products derived from it may be used for sale. You can find the original tutorial on Purl Bee. It was translated by me (Anastasia) from English into Russian. Purl Soho and Purl Bee cannot verify the accuracy of this translation, but if you have any questions, they are always happy to answer them in English in
You can not follow the rules, but try to create yourself, and then you will get a unique inimitable bouquet, maybe even flowers that do not exist in nature. And best of all, they are quite easy to make. If you want to find a practical use for your products, the created flowers can be attached to hair clips, pins or hair ties. And if you like something unusual in the interior, just scatter a handful of flowers on the table and create a summer mood in the house! They will undoubtedly bring joy to others and evoke memories of summer warmth even in the winter cold.
 Dreaming of summer...
 Basic elements of colors

You can vary the prepared parts for flowers, creating unique products and having fun. I enjoyed arranging the most unusual flowers and watching how the different colored pieces fit together. I'll show you three specific flowers that I made, but please be free in your creativity.

Narcissus
You will need: three equal parts of a flower of different shades of the same color, one button and a thread of your choice.

Lay the pieces on top of each other so that the petals do not match, but peek out from under each other. Place a button in the center and sew through all three layers, tie a knot on the wrong side.

Camellia
You will need:
The inner, largest part of the camellia, the outer part of the flower is slightly smaller, the blank of the middle and the thread to match.
First, put the larger part of the flower on the table, place the smaller part on it and the middle of the flower on top. To sew the layers together, pull the thread along the outer edge of the middle, catching it, and pull the thread back to the inside.

Sew in this way along the entire edge of the middle.

Buttercup
You will need:
The prepared middle of the flower, its main part, the leaf of the flower and matching threads.
Sew the center to the main part in the same way as you sewed the camellia flower, over the outer edge. A green leaf is sewn to the back with small stitches.

Here are such a variety of buttercups:

In addition, you can sew felt anemones in the same way according to the following master class:
Shutdown
I will give you some practical advice on how to use bright colors. To do this, you will need hair ties, hairpins or pins.

The flower can be sewn to the elastic hair band, work carefully and take your time. For girls, you can make a flower ring in the same way.

You can fasten the flower on the pin with a thread, as shown in the picture. Make stitches evenly, without piercing the front side with a needle.

Sew the flower to the barrette by sewing stitches on the right, left and in the middle. Make sure nothing is visible on the front.

These are just a few ideas and examples of what can be done with flowers. They can also be sewn together as a garland or attached to a shirt. Get creative and create your own flower charm!

Other felt flowers
bright sunflowers
Bright sunflowers are associated with hot summers. No wonder their name comes from the word - "sun". These large bright flowers create a joyful mood and give us their warmth. They say that the presence of these flowers in the house brings good luck, which means it's time to make them!

Bright sunflowers are very easy to make and so funny. Of course, it will take a little time, but you will not regret it. If you want to make the same flowers as in the photo - keep reading and follow the instructions below.
Start cutting out a circle from black felt, and then cut out squares from yellow felt - 18 large and 12 small ones.


Now take one yellow petal at a time, fold it and sew it to the middle with a few stitches. Continue to work around the circle, applying them close to each other. Don't worry if you haven't used all the petals if there are any left. Nobody counts!

Cut out two circles from black or brown felt, one larger and one smaller. Make cuts along the edges of each of these circles.

Sew a few beads into the very middle. Your bright sunflower is ready! Sew a few more of these flowers in different colors and sizes.
 Such sunny sunflowers made of felt
 And here is a video lesson on sewing sunflowers from felt from Elena Volodkevich
beautiful chrysanthemums
Almost all flowers created by nature can be made from felt. Today it is the turn to decorate your home with felt chrysanthemums. Although they do not smell, they will bring mood to the house, and can also be a great decoration for a blouse or jacket.
This flower is similar in technique to the sunflowers going up above.

Fabulous? Yes! Cheap? Certainly! Easily? Undoubtedly! Do you want to do the same? Prepare squares of three different sizes, you will need about 12 - the largest, 10 - slightly smaller and 7 - small.

Give each square a petal shape as shown in the photo. You can cut it the way you want, of course, they will not all turn out exactly the same, but in nature there are no identical petals. Cut out a circle for the base.
Start sewing each petal with a few stitches to the circle, folding them at the base.

Sew the petals close together, pinning them well. The photo turned out to be a flower with 11 petals.

Start sewing the next row, closer to the middle. Continue sewing the petals in the same way as the first row. The second rad will consist of 9 petals.

For the third row, use about 7 petals, the petals should completely cover the middle.

Take the unused squares and cut circles out of them. Make cuts all around.

Lay the smaller circle on top of the larger circle.

Sew them into the center of the flower. When you pull the thread, the circles will drop, and the incised parts will stand up and look up.
 Such a bright flower is not ashamed to give for a holiday =)
 OK it's all over Now! Beautiful chrysanthemums will delight you even in winter.
Video master classes
Finally, you can see "live" the whole process of creating felt flowers
Very fast felt flowers:
Content
Not only beautiful toys are obtained from felt, but also no less beautiful picturesque flowers. With such products you can decorate women's or children's clothes, make a beautiful brooch or hairpin out of a flower. Whole bouquets of felt flowers look very beautiful.
Felt rose looks absolutely amazing. This is the textile decoration that always attracts attention, causing general admiration. It will not be difficult to make it, but still, you need to know some of the nuances. Detailed master classes on making roses from felt will help us to understand all the intricacies.
Tender rose
Such a rose will complement the spring image of any woman or girl. It can be used as a brooch, attached to a hair clip or hair hoop.
For work we need:
- Pink and green felt;
- Needle;
- Scissors;
- Pink and green threads.
Manufacturing process
To begin with, we cut out a circle with a diameter of 10 cm from paper and a leaflet 5 cm long.

We transfer patterns to the material. From pink we cut out a circle, and from green two leaves.

Now cut the circle with sharp scissors in a spiral. For convenience, it is better to first mark the circle with a pen or pencil, and then cut it.

Starting from the outer edge, slowly twist the workpiece into a tube, fixing it with small stitches so that it does not turn back.

The result is a small but very realistic rose bud, which we additionally fix from below with a few more stitches.
Now we sew two leaves to the base of the flower, slightly squeezing them in the center.

It turns out a beautiful little rose that can be sewn to an elastic band for hair or glued to a hairpin.
Felt Rose
Here is another option for creating a rose. For the manufacture you will need a burgundy or pink dense material. You can also use black or any other color.

For work you will need:
- Felt;
- pins;
- Threads with a needle;
- Scissors.
Manufacturing process
From the burgundy material we cut out a rectangular piece 20 cm long and 6 cm wide. Fold it in half lengthwise. Cut one of the corners diagonally. So that our workpiece does not unfold, we sew it manually with a basting seam.
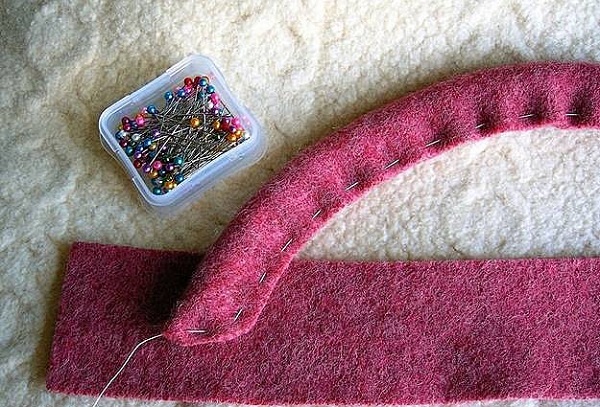
Now, starting from the cut edge, we twist the workpiece with a tube. In this case, the basting seam should be at the bottom. During twisting, it is important to firmly hold the bud with your hand so that it retains the shape we need. In the process of twisting, we fasten the turns with stitches of matching threads so that they are less noticeable.
When the base of the flower is already twisted, you need to give it a characteristic splendor. This is easy to do by pulling the edge of the basting thread along the edge of the workpiece. This simple procedure will make the flower more attractive and realistic.
Now it remains to twist the rest of the workpiece around the base. We fasten the flower with tight stitches. They will help to strengthen the product, give it the desired shape. It is better to pull the threads harder so that they sink into the felt. Then they are practically invisible.

Now we take some green material, wrap it around the base of the rose, imitating the sepals. In this case, no additional processing is necessary, because. the resulting leaves will harmoniously fit into the composition.
Having made three of these products, you can collect a beautiful bouquet. It will become a spectacular decoration for clothes or hair.
bicolor rose
Working on such a delicate two-tone rose will be a lot of fun. The highlight of this product lies in very gentle harmonizing shades of felt, realism and a beautiful flower shape.

For work you will need:
- Pink and coral felt;
- Needle and thread;
- Scissors;
- Large mother-of-pearl bead.
Manufacturing process
For the rose, we need to cut out 8 circles (4 pink, 4 coral). Four large mugs, two medium, two small diameters.
To quickly mark the felt, you need to pick up any three objects of a round shape and different diameters. Plastic or iron jar lids are ideal.
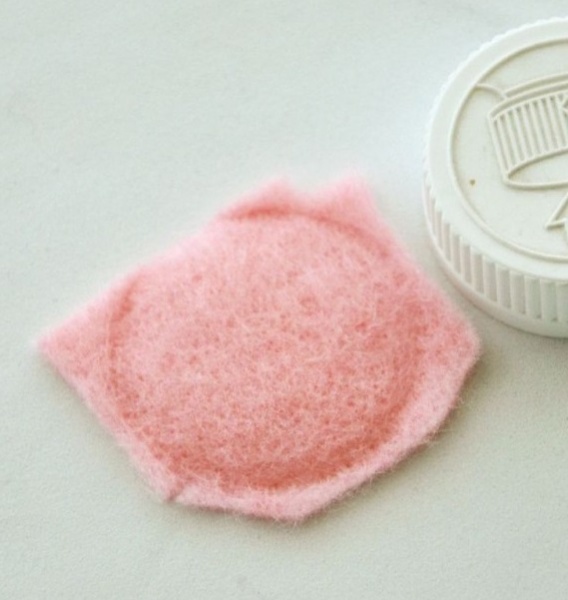
It is enough to press the lid on the felt with an effort and a clear imprint of the circle will appear on it. We just have to cut the blanks with sharp scissors.
Cut each circle in half into two equal parts. So the petals are ready for the future two-color rose.

Now let's start collecting the bud. We put together the two smallest petals of different colors and begin to fold it into a spiral. Next, take a semicircle of the same size, but of a different color, apply it and continue to fold.

In order for the flower to be durable, not to lose its shape, we fix each new petal with a needle and thread, making a few stitches.

Thus, alternating colors and moving from petals of a smaller diameter to a larger one, we fold a two-color rose.
When all the petals are collected, we sew a bead with mother-of-pearl coating into the middle.

This completes the work on making a flower. Then we connect the imagination and find a worthy application for the product.
rose brooch
Felt jewelry looks very feminine and elegant. A brooch with a beautiful rose will add femininity and charm to your look. But, it is not necessary to overpay for exclusive handmade big money. You can make such a brooch with your own hands, spending very little time, effort and money.