Macrame for beginners. Fundamentals of technique and patterns of basic weaving
Macrame is a knot tying technique with which you can weave a lot of interesting crafts, such as jewelry, Christmas toys for the Christmas tree, figurines of Santa Claus, Snow Maiden and a rooster, hanging swings for children, curtains, baskets, napkins, key chains and much more. Until recently, it was believed that it originated in China and Japan, but during recent excavations, similar products were found in Egyptian tombs, which proves that this technique was also used 4,000 years ago. Also, the first nodular writing, which was invented by the Incas, can also be attributed to macrame. Now, such crafts have found a worthy place in the interiors of modern houses.
In order to learn how to weave using the macrame technique, you can buy specialized self-study books, thematic magazines, or sign up for courses. However, first of all, you need to decide on the materials that will be needed for weaving such products. The main material in macrame, of course, are threads. In needlework stores, they are presented in a huge number of types and colors. For figurines of angels, cradles, icons, animals, chairs and decorations on the neck, you will need threads of completely different thicknesses and textures. If you want to make an armchair, then it is better to knit it with thick enough cords and ropes, but it is better to knit jewelry and toys, such as an angel and butterflies, with thin synthetic and silk threads.
For beginners, fairly thick light twine will be the best material, it is most convenient for them to make various knot patterns because all the flaws are most clearly visible on a light product. In addition to the threads, you will need a special pillow to which the threads will be attached. It is a soft upholstery attached to a hard base. Such a device will greatly facilitate your work.

If you do not have such a pillow, then you can make it yourself. To do this, take a round or square piece of plywood or wood, foam rubber, cotton wool or sawdust, as well as a piece of dense fabric and assemble everything into a single structure.
Also, for weaving using the micro-macrame technique, you need tailor's pins, various accessories, a soldering iron or a lighter, scissors, glue, beads and other decorative elements, patterns. For beginner needlewomen, one pattern picture may not be enough; it is more convenient for them to work with a simple and understandable master class.
Macrame school: thread preparation
Before proceeding with the manufacture of the product, it is necessary to properly prepare the threads. They should be long enough to complete the piece without lengthening them. However, if it so happened that the lace you are working with turned out to be short, you can correct this shortcoming by attaching the desired length of thread to it with glue.

It is better to take pieces of thread about 6 times the length of the finished product, because it is easier to cut off the excess than to attach the missing part.
Also, the ends of the threads must be processed so that they do not fray. If you use a synthetic thread, then its tip can be set on fire with a lighter or soldering iron. Threads made from natural fibers are treated with PVA glue as they do not melt. Properly processed threads are easier to work with, do not tangle and have a neat appearance.
Macrame Lessons: Attaching Threads to the Base
To weave macrame original products, invented independently, you need to complete a full course of knot tying. This needlework includes such a variety of knot patterns that in order to understand how to tie them all, you will have to study a lot of themed magazines or take lessons at a special school. However, almost all models of patterns in this technique are built on four main nodes, one of which is the fixing one. With its help, the thread is fixed on the fittings, and not a single product can do without it.

Learning to fix the threads on the fittings:
- Fold in half all the threads that will be used in the manufacture of crafts;
- Place the folded threads under the fittings or the carrier thread with the loop up;
- Pass the ends of the thread through the loop formed, and shade it.
If you fasten the threads in this way, the knot will remain on the wrong side of the product. To position the knot on the front side, put the loop not under the fittings, but on it.
Macrame Tutorial for Beginners: Flat Knots
The flat knot is the most commonly used element in the macrame technique. With it, you can perform a huge variety of original patterns. Knowing the basics of any technique, you will be able to come up with new non-traditional ways to perform it, so we suggest you practice weaving a flat knot.

Step-by-step instructions for knitting a chain of flat knots:
- Attach 2 laces to the base. You should have 4 free threads.
- Mentally number them from left to right.
- Pass yarn 1 over yarn 2 and 3.
- 4 put the thread over the end of the 1st hanging near it, and wind it under the 3rd and 2nd thread.
- Thread the 4th thread into the loop of the first. The first left side flat knot is ready.
- Now the 4th thread has become 1, and 1 is the fourth.
- Weave three more left-sided flat knots in the same pattern, and you will see that the chain begins to turn to the right.
- Flip the chain 180 degrees and tie four more left-handed knots.
- Continue braiding the twisted chain, turning the bar over every 4 knots.
To tie a right-sided flat knot, follow all the steps described in paragraphs 1-5, but number the threads from right to left. If weaving a chain of right-handed flat knots, then it will twist to the left.
Macrame patterns for beginners: tying rep knots
The rep knot is also the basis of the macrame technique. It is vertical and horizontal. The rep knot is very often used for the manufacture of jewelry and beads are braided with it. From rep knots, you can weave rows, which are called brids. They can be horizontal or diagonal. To weave a horizontal brid, the main thread on which the rep knots will be placed must be laid horizontally, to make a diagonal brid, the thread must be run diagonally.

Making horizontal rep knots step by step:
- Put the main thread (for example, the leftmost one) on the threads that will take part in the creation of the bridle (they will be working).
- Take the first working thread, and make it two turns from top to bottom around the main thread.
- Pass the end of the working thread into the loop formed between turns.
- Tighten the structure. The first rep knot is ready.
- Do all the above steps with all the remaining threads.
With the help of a rep knot, you can weave an original decoration with stones, a rose or angels. Such an element in the macrame technique looks very voluminous and neat.
Macrame master class: weaving a vertical rep knot
The production of horizontal and vertical rep knots is distinguished by the fact that in the vertical elements the main thread is also a working one.

Making a vertical rep knot:
- Take two threads lying side by side, one of them will be working, the other auxiliary.
- Make two turns on the auxiliary cord with a working thread.
- Pull the thread through the loop formed between turns. Tighten the structure.
- Take the next thread, located nearby, and make a rep knot on it with a working thread.
- Make vertical rep knots on all threads of the row.
Before you start making a product, practice using several white threads to tie vertical and horizontal rep knots, as well as make brids. With the help of diagonal brid you can easily tie a small Christmas tree.
Macrame for beginners: how to weave square knots
Square knots are essentially a combination of a left-handed and a right-handed flat knot. However, due to this alternation, a flat and a square knot look completely different. A grid of square knots looks delicate and sophisticated. There are many ways to create original patterns using such elements.

Learning to knit square knots:
- Take 4 threads and number them from left to right.
- Put 1 thread on top of 2 and 3.
- 4 Put the thread on top of the adjacent part of the first thread. Then pass it under the 2nd and 3rd thread and pass through the loop of the first thread.
- Tighten the structure.
- Now number the threads from right to left.
- Take the first thread on the right and place it over the 2nd and 3rd threads.
- 4 put the thread on top of the adjacent part 1 of the thread and thread it under the 3rd and 2nd thread. Pass the 4th thread into the loop of the 1st thread.
- Tighten the structure. The square knot is ready.
Continue to weave a chain of square knots to the desired size. By slightly modifying the square knots, you can tie elements such as a “bump” or “picot”, as well as a “Chinese knot”.
You can make original baubles from chains of square knots.
In addition to the knots described above, well-known knots for knitting baubles-laces can be attributed to the macrame technique. From such a lace you can make a keychain in the shape of a heart, for a gift to your mother or girlfriend.
Macrame Weaving Patterns for Beginners: Making a Necklace
Using the macrame technique, you can weave an interesting decoration around your neck. It will be combined with both romantic looks and casual jeans, complete with a simple cut shirt. The necklace, the weaving of which we will analyze today, will be in the style of boho. This style of clothing is characterized by layering of textures, the presence of fringe and some carelessness. We will do this craft using square knots. It is so easy to make that you don't have to look at the pattern to figure out how to knit it.

Boho style necklace master class:
- 8 cotton threads 40 cm long. Treat their ends with PVA glue, put two threads together and attach them to the base ring in the manner described above (it is better if the ring is made of wood). You should get 3 bunches of 4 threads.
- 4 threads of the first bunch, and tie 3 square knots on them. Do this operation with the remaining two beams.
- Take 3 and 4 threads from the first bundle and 1 and 2 from the second, step back from the columns of square knots 0.5 cm down and tie two square knots from these threads.
- 3 and 4 thread from the second column and 1 and 2 from the third, and do with them the operation described in the previous paragraph.
- Take the first 4 threads from the left (the countdown starts from the last thread coming out of the first column, tied in paragraph 2), step back from the top column of 1.2 cm square knots and tie these threads into a column consisting of two square knots.
- The next 4 threads and tie two square knots on them at the same level. Do the same with the last four threads.
- Now take 3 and 4 threads from the first column and 1 and 2 from the second and step back from the column down 0.5 cm. Tie two square knots from the threads.
- Take 3 and 4 threads from the second column and 1 and 2 from the first, tie two square knots with them, according to the principle described in the paragraph above.
- Now tie the 3rd and 4th threads of the second column and 1 and the second of the third into three square knots, departing from the columns from which they come out 0.5 cm.
- Cut the remaining threads so that one of the center threads is the longest, and all the other threads running on the sides of it are shorter than the previous one by 0.3 mm (they should create a triangle).
- Put a bead on the end of each thread, tie a knot and fluff the ends.
A stylish boho style necklace is ready. As you can see, it is knitted very simply, but it looks unusual and fashionable.
Macrame for beginners (video tutorials)
Products made using the macrame technique are gaining popularity again, they are quite expensive in stores. With a little practice, you will be able to independently create crafts such as: a butterfly, a cradle and an angel, etc.
Evgenia Smirnova
To send light into the depths of the human heart - this is the purpose of the artist
Content
Now we will tell you what macrame is, how to create wicker things and why you need it. The word macrame is of Arabic origin, which means fringe, lace, braid, to put it simply, it is knot weaving.
Story
Over the centuries, people have created many types of needlework. One of them is macrame. Over time, they improved, and one day they turned into decorative, and then into artistic weaving. Knotted and knotless (pigtails), flat, figured - these types of weaving existed in Rus'.
Material
For macrame, you can use a large amount of material. The most common are: strips of leather, cords from various fabrics, vegetable fibers, sisal, fishing line, jute, twine, thin wire, cotton, silk, linen and woolen threads.
Beautiful products can now be created from synthetic materials. Not so long ago, needlewomen used natural tones in their work. Linen was considered very popular. There are not so many natural colors, so a little later they began to use thread coloring.
In most cases, lace is created in light colors, but multi-colored well-chosen combinations are also pleasing to the eye. Before choosing the necessary colors and material, you need to decide on the theme. In order for the material not to deform, it must be washed and boiled for 10-15 minutes. Only in this case, your product will have its original shape and appearance.
material requirements
The material must be strong, moderately twisted and pliable. If you want to get a clear embossed pattern, then the material for weaving macrame needs to be twisted tightly.
Threads can be lengthened, since it is not always possible to cut the required length. You can do it differently. You need to swap the long and short threads, but it is best to attach the ends to each other using knots. Any excess can be easily cut off. It is very easy to connect nylon material, as it melts.
Choice of macrame color
If macrame weaving is done with multi-colored threads, then the choice of colors must be treated with special attention. If you know, then color has a psychological effect on a person. Therefore, the colors for weaving must be combined. Each color has its own shade and character of impact on a person. Therefore, the impression received from a woven thing will depend on the colors chosen.
Tools for weaving macrame
Weaving macrame does not require special devices. For weaving, you will need scissors, a needle, a ruler, metal knitting needles, a hook, a spindle, clamps (for attaching the carrier thread), pads. If you want to do the installation of products, then you will need glue.
Weave macrame knots
The main thing in macrame is the Hercules knot. To tie it, you will need two threads of 10 cm each.
They must be laid vertically on the pillow, while the end of each must be secured with a pin. The right thread must be brought under the left, and the left must be brought from the bottom up and into the loop. After that, the resulting knot must be tightened.
First flat knot. To begin with, 2 threads must be fixed on the basis of an uneven fastening. After you do this, you should have 4 ends of the thread. Next, you have to distribute them. You need to count from left to right.
Let's summarize. The horizontal thread serves for fastening. The second basis is the threads 2 and 3, necessary for tightening the knots. Everyone who is going to seriously engage in weaving macrame needs to know this. And now let's move on to weaving a flat knot.
You need to take the right working thread with your right hand and bring it to the warp, as well as under the left working thread. After that, with your left hand, take the left working thread and wind it under the warp and from below into the loop that turned out between the warp and the right working thread. In this way you will weave your first flat knot.
Knowing how to weave it, you can try to make a left-handed twisted chain. All actions must be continued on the sample on which you wove earlier. Tie the first 3 flat knots. If you look at the sample, you will notice that the group of nodes has rotated slightly to the left. The sample on which you weave macrame must be rotated 180 degrees to the left.

After that, it is necessary to weave 4 more first flat knots. When everything is ready, the sample must again be rotated 180 degrees to the left. Repeat weaving 4 knots again. If you continue, you will end up with a left-handed twisted chain. I advise you to ensure that the base is not visible. If you did everything right, then your sample will be beautiful. And remember that for the convenience of weaving macrame, the sample must be secured with a pin at each turn.
And now let's try to learn how to weave the second flat knot. For weaving, it is necessary to strengthen the threads on the base 2. The right working thread must be taken with the right hand and brought under the warp, as well as on the left working thread. After that, with your left hand, you need to take the left working thread and lay it on the warp and insert it from above into the loop that turned out between the warp and the right working thread. Thus, you have received the second flat knot.
This way you can weave a right-handed twisted chain. Work must be continued on the started sample. Tie 3 second flat knots first. If you look closely at the sample, you will notice that it has turned slightly to the right. Your next step is to rotate the pattern 180 degrees to the right. Next, you need to weave 4 second flat knots. After that, the sample must again be rotated 180 degrees and repeat the above steps.
Square flat knot. For its weaving, it is necessary to fix two threads on the base. Next, tie the first flat knot, and immediately below it - the second. Combining them together, you get a square flat knot. In order to know for sure that it is finished, you need to create a lock, which can turn out both on the left and on the right side. It all depends on which knot was tied first. Knowing how to weave a square flat knot, you can create patterns.
Chain of square knots. Using the method of uneven fastening on the base, you need to strengthen 2 threads. After that, it is necessary to tie the first flat knot, then the second flat knot. If everything is done correctly, then you have a square knot with a lock on the right. If you alternate flat knots, you get a chain of square knots.
Clothing woven using macrame technique
A few examples of beautiful women's clothing, this clothing is a real masterpiece. Needlework - weaving macrame - is a rather complicated manual work, but the result is impressive. any woman will be jealous when she sees such an outfit on a rival.


Beautiful products can now be created from synthetic materials
Macramé art is one of the oldest among various types of applied arts. The history of this unusual craft originates in the East, in Ancient Egypt, China and Japan. Even the ancient Incas had a developed system of nodular writing, the secret of the messages of which is still trying to unravel the scientific minds of the whole world.
Gradually, the art of filigree weaving developed, acquiring an army of admirers on all continents. The basis of needlework is the ability to knit beautiful knotted combinations, which, with the skillful hands of craftsmen, turned into skillful products. A new generation of needlewomen has breathed new life, creating new forms, inventing new beautiful combinations, offering unique design solutions. For beginners, macrame weaving patterns are the main auxiliary tool, having mastered which you can easily create openwork products.
Work materials
Today it is difficult to answer who was the discoverer of an unusual weaving method, but the whole world is grateful to him. The uniqueness of nodular weaving lies in its simplicity, beauty and budget. To weave beautiful interior hand made gizmos and accessories, such as panels, owls and other amazing crafts, you will need quite a bit. First you need to determine the basis, choose the material for weaving.
 Before choosing the necessary colors and material, you need to decide on the theme
Most often used for work:
- hemp or linen ropes;
- cotton cords and twine;
- sisal and any flat braid.
In ancient times, macrame products were made from leather cords, straw, and even plant fibers. Modern materials will surprise even the most sophisticated craftswomen with a variety. For example, reinforced threads, colored floss, lurex, all kinds of cords and threads with a waxed texture will become the basis for an original and stylish decoration. Centuries-old practice shows that natural materials of linen or cotton are more malleable for knitting textured knotted patterns.
Threads and cords in macrame
It should be remembered that the threads for creating panels, handbags or bracelets using the macrame weaving technique should be as strong as possible, pliable and moderately twisted.
You should not choose threads with a “shaggy” texture for knot weaving. The increased “fluffiness” will hide the unique patterned relief of the product from us. A skillful combination of several types of applied art, such as embroidery, knitting or crocheting, beading, will create a truly exclusive masterpiece.
We select tools
Before proceeding with the study and selection of macrame schemes, beginners should acquire a “magic chest” that will contain all the necessary tools for creative work. One of the main advantages of such needlework is the minimum financial costs.
 If you want to get a clear embossed pattern, then the macrame weaving material needs to be tightly twisted.
For weaving, you will need the simplest sewing tools:
- safety pins to secure the threads;
- tailor's scissors with a sharp blade;
- sewing needles and threads;
- PVA glue to fasten the individual elements of the pattern;
- simple crochet hook
In addition to the simplest sewing kit, you should prepare a work surface. It can be a small pillow that is easy to sew with your own hands. The pillow can be replaced with a board, which is upholstered with foam rubber, then tightly covered with cloth. Such a simple device will not allow the threads to get tangled and will provide the craftswoman with comfort in the process of weaving.
After the pattern of macrame products is selected, the threads or rope are fixed on the surface, the components are neatly laid out in the desired order.
Master classes
Weaving from threads is exciting and interesting. Experience is valuable in any job. Skills will allow you to make elegant wall panels, original crafts, beautiful bedspreads, macramé napkins or curtains.
original crafts


You can also weave stylish accessories, jewelry, bags and whatever your imagination tells you.
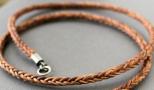
Wicker jewelry
To master macrame for beginners, it is enough to choose high-quality material, recharge your creative mood and get acquainted with detailed master classes from experienced needlework masters.
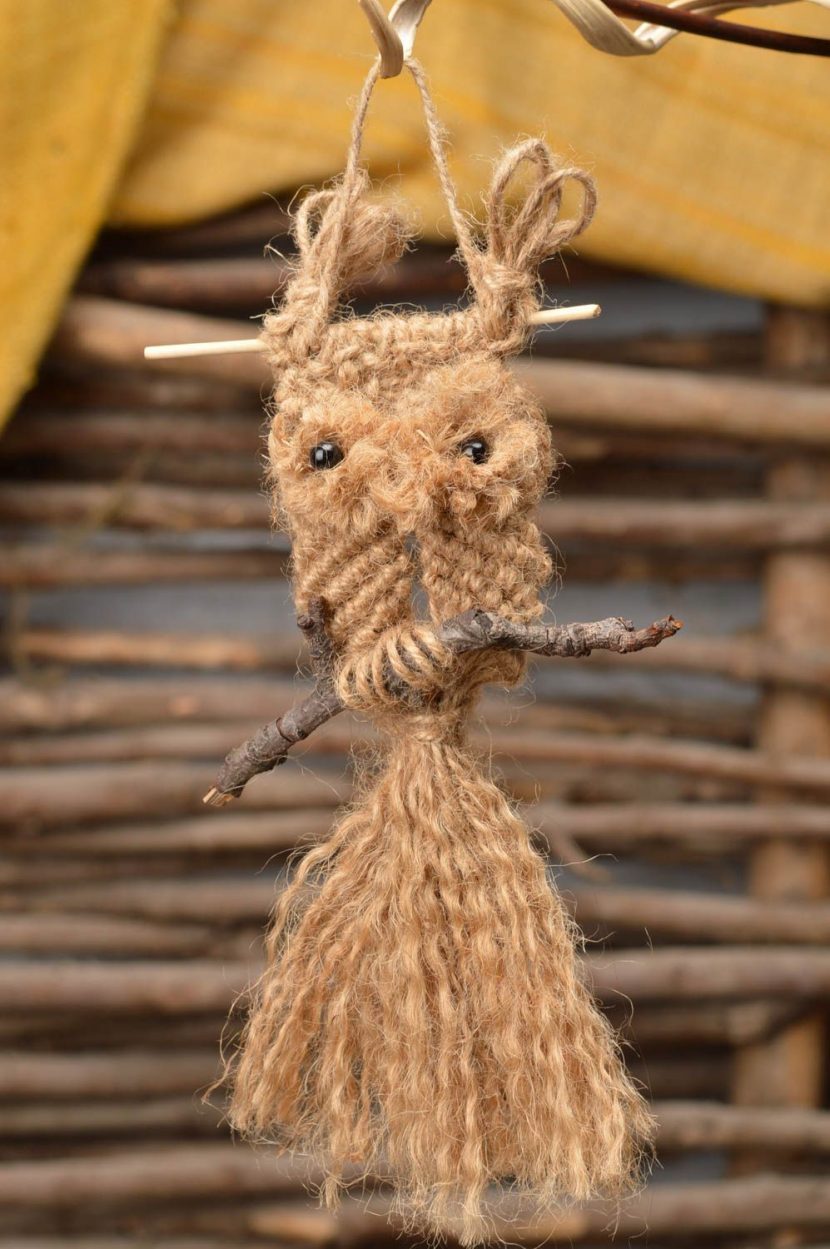
Original panel "owl"
A panel in the form of an owl is an original decoration for an interior of any style, which will emphasize the warmth and comfort of a family hearth. Interestingly, the wise bird in the house is the protector of wealth.
 One of the main elements of braided patterns are all kinds of chains.
According to the teachings of Feng Shui, owls protect the home from evil. The most popular of all macrame products is the owl panel. To make it, we need strong and thick threads in a skein 10 meters long, two round sticks, paints and a brush, two beads and PVA glue.
If during the weaving process the thread suddenly runs out, do not despair. We tie a new thread, tying the two ends with a knot on the wrong side of the product.
The weaving algorithm is as follows:
- We divide the length into ten equal segments 1 meter long. We fix them on a stick with a simple knot-loop, as a result we get 20 working threads.
- We fix the stick on the table with electrical tape, so that it is more convenient to weave a pattern. Weaving is carried out according to the scheme, starting from the frontal part.
- Weave knots using the simplest checkerboard pattern. The result should be a triangular-shaped canvas.
- Separately weave the eyes of a bird. From the first two threads on the right, we knit a right-hand loop knot, repeat the element with two adjacent ropes, and so on to the end, we frame the right eye. We repeat the process in the same way, but using the left-hand loop nodes. Sew on beads in the middle.
- The bird's beak is woven from four central threads, weaving them alternately into flat double knots.
- We continue weaving with a checkerboard pattern in five rows.
- To tie the wings, we use four components on each side, braiding them with double-sided knots. After that, we return to the checkerboard pattern again, connecting it with the wings.
- Next, we put the next stick, which will be a perch, throw threads on it at the number 3,4,5,6, as well as from 15 to 18. We get the legs of a bird.
- Further, according to the scheme, we finish the pattern, at the end we cut the threads diagonally.
An exquisite and original panel, made by the hands of a talented craftsman, will warm you and decorate your interior.
Weave panel "owl" part 1
Weave panel "owl" part 2
Weaving an organizer bag
The original wall organizer in the form of a bag will help not only decorate the interior of the hallway, but also collect all the necessary little things in one place, such as keys, a comb or gloves.
 For each type of knot, a certain piece of thread is consumed
The knitting algorithm is as follows:
- We take for work a dense cotton rope 40 meters long, a round stick made of wood or plastic. You can take threads of two colors to separate the base from the pocket.
- We divide the rope by cutting it into 20 equal parts. We divide the yarn of a different color into 12 parts, each 1 meter long.
- We fix 20 components on a stick in the classic way of knot fastening. We begin the weaving process, strictly adhering to the scheme in the figure.
- We knit the first five rows with square knots, braiding the grid. We turn to weaving a pattern in the form of small rhombuses. 12 threads are involved in the work. We connect the rhombuses to each other with a nodal chain.
- The pattern of rhombuses and the grid of square knots are staggered.
- Let's start creating a pocket. Separately, we knit a grid of square knots. The pocket is slightly smaller in size than the base itself.
- We sew two parts of the product with a sewing needle. Weave a strap on top to hang the organizer on the wall.
A similar scheme can be used to create a dainty summer handbag that will perfectly complement a fashionable look.
 This elegant, openwork macrame bag will complement your outfit.
Macrame art is a universal type of needlework. Having mastered the simplest basics of weaving, learning to read patterns and select high-quality materials for work, you can safely experiment.
Fascinating macrame bags
Do-it-yourself openwork planters for indoor flowers, wicker lampshades, macramé napkins and tablecloths, as well as fashion accessories will be a wonderful gift.
Today, the nodular weaving technique, macrame, is gaining popularity again. By the way, this type of needlework has been known since the time of the Incas! And despite such a solid age, at present, needlewomen are happy to weave threads, tying them into knots to get interesting products.

What is macrame.
So, the art of macrame is many, many years old. At first, these were the simplest knots, over time they became more complex and interesting. Later, the sequences of their different types laid the foundation for the whole art of weaving. It should be noted that macrame united many cultures of successive eras. Knot weaving was quite common in Europe in the 19th century. It is known that the ancient East is the birthplace of macrame. Perhaps that is why the term "macrame" in Turkish sounds like "an elegant shawl with a fringe."
Before you start making a product using the macrame technique, you need to provide yourself with materials. The main and main components, of course, are threads. They come in many varieties; you need to choose based on the idea of \u200b\u200bthe future finished work. For example, if you are going to make a thin product, choose threads from silk, nylon or cotton. If this is a piece of clothing, a woolen thread will do (look at the degree of twist, in the case of clothes, you need a tightly twisted thread). Macrame of various accessories (bags, belts, etc.), as well as jewelry, involves the use of thick cotton, synthetic or linen threads. As for wall decorations (interior), they are made from special twisted bundles that have different thicknesses.

In addition to threads, to make a product using the macrame technique, you need to purchase various decorative elements: beads, rings, and more. This will decorate the finished sample.
Required Tools
Equally important tools for work are the following components:
Knitting hook;
Tailor's scissors;
Centimeter tape (or ruler);
Sewing pins (they will fix the work on a printed basis);
Stuffed base (this can be, for example, a pad with filler (polystyrene, foam rubber). The base of the work will, in fact, be attached to it);
Clamps (needed in order to, if necessary, attach the product to the surface of the table).

Varieties of weaving
It is interesting to note that macrame in its classification is very diverse. There are several types of weaving depending on the different thread fastenings and types of knots.
Thread attachment methods
So, there are about four main ways of attaching the working thread to the warp:

By the way, the types of sketches are also very diverse.
Node types
As you know, a knot is nothing more than an interlacing of threads. Interestingly, knots are used today in a variety of areas, for a variety of purposes. We hear about weaving knots, nautical, sewing, tie knots - so generally a classic. But strictly speaking, only two types of weaves are distinguished - these are simple and double knots.
However, let's get back to the macrame technique. Obviously, the nodes here are the main component. Let's talk about them in more detail. In this type of needlework, the following types of knots are distinguished:
Flat (also called square)

It is woven with four strands. At the same time, the working threads are those on the side, and the middle threads are motionless in work. The length of the fixed threads should be five centimeters longer than the total length of the future finished product. Working threads are exactly four times longer than the average ones;
Flat knot made of six strands

To tie it, you first need to perform a classic flat knot (four threads). Then, passing down and leaving the middle threads motionless, with the help of the first and last, you need to form a square knot again;
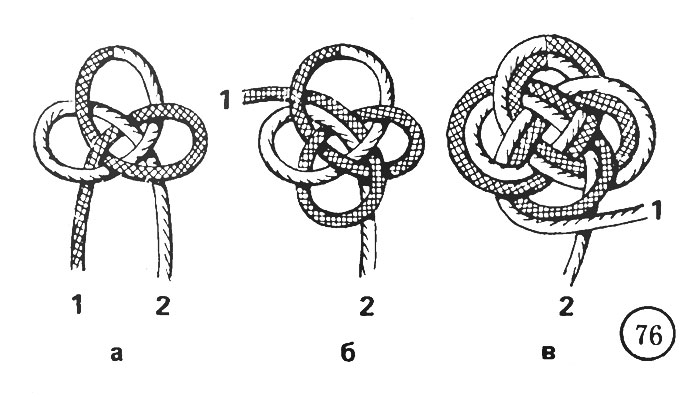
twisted chain

These nodes are classified according to their sides - respectively, left-handed and right-handed. For the latter, it is important to lay the extreme thread over the two located in the middle on the left, and the right one - to run diagonally on the right side. Difficult, but slowly, trying, you can figure it out. The left-hand chain is performed in the same way, only in the other direction. Accordingly, it is necessary to lay the right thread over the middle threads, threading the left thread diagonally to the left;
Connecting node

It is very simple: you only need to form a loop with the right thread over the left. Then pass the first right thread through this loop and connect it to the left thread;
Rep knot

It is a certain number of similar nodes made tightly to each other. Obviously, rep knots are of various types, depending on the weaves that underlie. Terminologically, you can remember that the sequences (or rows) of rep knots of a macrame craftswoman are called brids.
decorative knots
In addition to those indicated, a huge number of other decorative knots are used in the macrame technique: “Josephine”, “knot of happiness”, “Armenian”, “tatting” and so on.

Apart from the varieties of knots, I would like to focus on such an important macrame technique as pigtails. They can very interestingly emphasize or decorate the finished product. Traditionally (and in macrame too) braids are woven from three threads or more.
Edge processing methods
Finishing the manufacture of the product using the technique of nodular weaving of macrame, it is necessary to beautifully and accurately process its edges. This can be done using two options:
- A clean edge means completing the needlework with rep knots, picking up the extra threads with which the work was fixed.
- Use of false decorative fringe. True, in this case, it is still necessary to remove protruding extra threads with rep knots, as in the first case. And only then sew a beautiful fringe onto the finished work. It will be interesting to look.
Video
Master Class. Reception "Trap"
Cord bracelet
Macrame lessons. Basic Course No. 1
Basic course. Lesson 2