How to make a gypsy outfit from improvised materials. Skirt pattern “double sun”
Gypsies are a cheerful and nomadic people who sacredly honor their traditions. Songs and dances are something without which it cannot be imagined. Therefore, it is not surprising if you decide to choose the image of a gypsy.
What does the outfit look like?
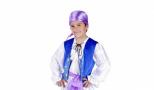
Now you can buy various ready-made costumes, including gypsy ones. But if you want to try yourself as a designer and seamstress, then the following information will be very useful to you. A gypsy costume for a boy consists of the following details:
- trousers;
- shirt;
- headdress;
- shoes;
- additions to the image.
You can use the example of adult costumes to see what one of the variants of the gypsy look looks like.
Trousers
To begin with, I would like to note one thing - this is the opportunity to alter or use things existing in the wardrobe. So, if your child has dark-colored pants, you can use them. If not, then you will have to sew it yourself. In this case, it is better to choose satin or silk, because we need to create a festive and elegant gypsy costume. Take your child’s measurements correctly and start sewing.
When finished, the pants should be wide and loose. Ideally, you should use black fabric, but in the absence of one, dark brown or gray will also work. If desired, you can decorate the bottom of the legs with gold fittings or braid.
There is another option for trousers - these are wide breeches, knee-length. At the bottom of the legs you can create the effect of torn fabric. But when choosing this option, you need special shoes, which we will talk about later.
If you do not want to create a gypsy costume that is too bright and shiny, then choose a fabric without shine and chic, it can be linen or cotton.
Top of the suit
This part of the costume is a shirt with wide sleeves. If you decide to sew a gypsy costume with your own hands, we advise you to adhere to the basic rule - use the same material. If your pants are made of satin, then for your shirt use the same material, just in a different color.
As you can see in the photo, the shirt of this suit is not like what we are used to wearing. Therefore, using existing clothing is not suitable here.
The shirt is sewn without buttons, only a few on top, and even then it is not necessary. You can make a V-shaped neckline, which will look very impressive.
We've sorted out the fabric, now let's move on to choosing a color. As mentioned above, the gypsy costume has no clear rules and boundaries. This applies to the color scheme of shirts, so feel free to choose red, yellow, green and other bright colors.
I would also like to note that the gypsy can be complemented with a vest if desired. We recommend sewing it from the same material as the entire outfit. But it is not necessary to follow the color scheme. That is, the vest may be contrastingly different from the color of the pants and shirt. The result is an interesting and colorful gypsy costume. A photo of this option can be seen below.

Headdress
For greater harmony of the image, a headscarf is almost always used. It can completely cover the entire head or look like a bandage. If you have scraps of fabric left after sewing a suit, you can use them as a bandage.
The color of this accessory does not make a fundamental difference. You can use bright shades that match the overall background of the suit.
But that’s not all; a hat is often used as a unique headdress. Moreover, it is put directly on a bandage or scarf. I would like to note that such a bold decision makes the gypsy costume more interesting.
Now we note that the headdress is not a mandatory part of the image. Therefore, if you do not have the opportunity or desire to use it, then you can completely do without it. In the next photo you can see an example of what a gypsy costume might look like without a headdress.

Shoes
Do you think that no carnival costume can do without shoes? You are mistaken, the gypsy costume is just like that. Gypsies are a poor people who love freedom. That's why they are often barefoot. But we are talking about children's costumes, which means we must remember the safety of children. This option is appropriate if the suit is worn on the beach. Carnivals are often held in children's camps, and a barefoot gypsy costume is suitable for such an occasion.

For another option, choose black shoes or boots. Any available ones will do. Now let's talk about shoes that go under breeches. We have already said that instead of trousers, you can sew breeches that have a torn hem. So, high boots, dark in color, are best suited for them.
Although boots go well with trousers, it is not always convenient to wear them due to the large amount of fabric. In general, as you can see, choosing shoes to match a gypsy costume is not difficult.
Add-ons
One of the main additions to a suit is a belt. In almost every variation of the suit you can see that the trousers and shirt are connected with a belt. You don't need anything special to make it. Long, dense fabric is the belt we need. But again I would like to emphasize that it is better to sew it from the same fabric as the entire suit.
The color of the belt can be combined with a scarf, or, on the contrary, it can be made contrasting against the background of the suit. It should be wide enough and tied to the side so that the ends remain free.

As we have already said, gypsies are a musical people, so you can choose a small instrument as an addition to your costume. It could be a tambourine or a sopilka.
To sew a gypsy-style skirt, it is not at all necessary to have extensive experience in cutting and sewing. Here it will be enough to master the key principles of the sewing process: how to take measurements, create a pattern, cut the fabric and directly sew the product itself. As the main material, we recommend using a light, “flying” material, but at the same time not transparent. The fabric should be bright, which will emphasize its style. In this article we will look in detail at how to sew a gypsy skirt with your own hands, using a pattern and a photo.
Preparatory stage.
The fabric you can choose from is satin, silk or polyester. However, if desired, it is possible to use cotton fabric. It is important to take into account the large volume of the future product. The color scheme of the skirt remains entirely at the mercy of your taste. You can choose monotonous or multi-colored, variegated material. The canvas should be 4 times longer than the length of the completed product.

As we will use a circle skirt for the basics.
In addition you will need:
parchment paper for patterns;
measuring tape;
pencil;
interlining;
satin fabric ribbons.
Step-by-step description of sewing a gypsy skirt
There are 3 main stages in the process of creating such a skirt model.

First stage. You need to take measurements. To do this, measure the circumference of your hips and waist. Select the required length of the product. Once the measurements in centimeters are obtained, you can proceed to constructing the gypsy skirt pattern itself. This stage is not as difficult as it may seem at first. To create a template, parchment paper or tracing paper is best suited. You need to add five centimeters to the obtained hip circumference measurements. The result will be a circle. The drawing itself is usually built from two halves-semicircles. You can also use a ready-made circle skirt pattern.

Second phase. Let's move on to the cutting itself. The fabric itself must be washed before cutting. When you start cutting the material, do not forget about the seam allowances (about one centimeter). To create ruffles along the hem of a skirt, you need to stock up on a strip of fabric that will be 2 times longer than the width of the very bottom of the product. You should make a pattern for the belt, two panels and the frill of the skirt. Remember to allow an allowance of one and a half centimeters along the frill to fold the bottom.

Third stage. Let's move on to the actual sewing of the product. We fold the parts of the panel right sides together. We connect the side seams with a thread of a contrasting color. Then we process it with a machine seam. Then we remove the contrast basting. We process the edges of the seams themselves with an overlocker and iron them. Overlock can be replaced with a zig-zag seam. We process the edge of the frill in a similar way. We bend the bottom part and stitch it. Next, when gathering the frill, we baste it to the hem of the product. I would also like to note that this skirt model will look good on wide hips.
The belt of the product must be cut out in the shape of a rectangle, which should be duplicated using non-woven fabric. Next, we put a panel into the belt and process it using a machine seam. Remember that you need a small gap to thread the elastic through. It is best to use a wide elastic band with great elasticity. Then you should close this gap with a seam. If your product will have a single color, then we advise you to make the belt from a contrasting fabric.

You can decorate the skirt using ribbons made of brightly colored satin fabric. If you wish, you can use an application. In the case when you need a very fluffy gypsy skirt, you can sew it from several layers of fabric material. It is important that the product has a petticoat. But its presence is more important for those who create this model for dance classes.
The finished product should be washed and ironed.
It is better to wear this type of skirt with a tight-fitting blouse. But shoes should have flat soles. The decorations for this look will be traditional gypsy earrings and bracelets.
Gypsy style skirt will add variety to your wardrobe, making it even more saturated, will allow you to look attractive and original.
It would be more correct to say – collect.
If you are preparing a personal performance at a carnival and intend to win the main prize for the best costume, my advice may not be very suitable for you.
But for a New Year’s corporate event or a fun party for another occasion, this is just right, because I played the gypsy just at work on New Year’s Eve.
This was a long time ago, the Internet was still largely unavailable, so everything was invented from the head and from memory. The memories, however, were vague, and they were based on what I saw in childhood: images of gypsies whom I occasionally met on the street, infrequent appearances on TV by the gypsy theater "Romen" and the probably cult film "The Camp Goes to Heaven", which I watched it for the first and last time on a big cinema screen at the age of 10.
The impression was so strong that I never watched this film again.

Gypsy costume
I imagined this and only this:
- Bright colorful skirts with a very wide hem
- Blouse with wide flounce sleeves
- Scarves on the head and/or waist
- There are a lot of decorations on the neck, shiny and jingling when moving - beads, chains with gold coins, medallions, etc.
It is very possible that the gypsies themselves would have corrected my costume, but when I entered the hall where the corporate party was taking place, no one doubted that it was a gypsy who had entered. And this is the most important thing for us. And this despite the fact that no one saw me in my outfit before the performance, except for one girl in the office, and I am not a black-eyed brunette, but a gray-eyed brown-haired woman.
How to make a gypsy costume for a corporate event.
More precisely, how we did it.
First we came up with what we needed - see above.
Then we began to figure out what we had from this ourselves. It turned out that there was almost nothing - just one skirt that didn’t seem to be the most suitable color. There was almost no question about buying something in addition - it was expensive, and there was nowhere else to go, and there was no point in buying it for once.

They began to quietly ask their colleagues, trying not to reveal the secret. As a result, we were given several large fringed scarves, another skirt and a whole mountain of chains and beads))
They brought a large box, wrote “Gypsy Costume” on it, put all the collected goods there, and put a large list on top - who brought what and when it needed to be returned.
Some people wanted to pick up their item immediately after the party (and I myself would have been calmer that way), others, on the contrary, asked to give it back after the holidays, since they had no time for it before.
I’ll say right away that everything was returned on time with gratitude, and this list helped a lot. I strongly advise you to also put everything into thematic boxes and be sure to write them down immediately and then cross them out. Because at first it seems that you will remember everything, but when you collect several boxes with different costumes, props for performances, and plus the excitement fills your head - you can never completely get rid of it until the very end of the event - then you forget everything completely! Your head is either empty, or smart thoughts are rushing through it at breakneck speed in hindsight))) So add it up and write it down right away!
Let's return to the gypsy costume.
The problem turned out to be finding a blouse. A few years later, I accidentally got the blouse I needed - at least go perform again! -, but then there was nothing even close. It seems they brought something, but it was small and very open - I refused. After much thought, I decided to just wear my usual black dress, with both skirts over it and a large scarf over one shoulder, tying it diagonally at the waist. On the neck - almost all the jewelry brought, it seems, there were also some bracelets, on the head - a scarf, tied at the side.

The skirts turned out to be the same length, and so that their beauty and quantity could be seen, I tucked the edge of the overskirt into the belt, thereby showing a piece of the skirt underneath.
In the photo, this very edge was included in the frame - thanks to our amateur photographer who called out to me as I was closing the office. He managed to click the shutter while I was turning around. That’s why the tassels of the scarf in the photo still continue to fly))
All the other few photos from the party, unfortunately, are either fuzzy or very dark.
There is another photo of me in a gypsy costume in the article, where the wardrobe was moved.
It may also be useful for you to create the image of a gypsy.
Of course, the number of my skirts was very far from the number of skirts of the Rada)) Especially for this article, I watched the film “The Camp Goes to Heaven” in fragments and found this shot: the white one is a scarf, everything else is the skirts of one housewife, which are drying on the shore!

But my two, I think, are still better than one))
Read also the gypsies - they will be useful to you at the holiday. And for now I say goodbye
with wishes to successfully make a gypsy costume
and feel good in it!
Your Evelina Shesternenko.
Many women have thought about the things they can use to diversify their wardrobe. You can buy something primitive and boring in a store; it’s much more interesting to make a unique thing with your own hands. Gypsy skirts are now gaining great popularity due to their unique pattern and ease of sewing. Today we will tell you how to sew a gypsy skirt with your own crayfish.
The gypsy skirt uses a very simple cut and draping fabric in bright colors. You can use mixed fabric, lye, satin or polyester. You will need to use a pattern technique called two suns. Ribbons and other various decorations are best suited to decorate a skirt. Making one skirt will take beginners several hours, perhaps due to inexperience you will spend more than six hours, but don’t despair! The main thing is practice and you will succeed.
How to sew a gypsy skirt: the main stages of sewing
The process of sewing a gypsy skirt is usually divided into three stages. Each process will take a different amount of time, the last one will be the longest, and the first one will be the fastest.

The essence of the first stage is to take measurements. First, decide what length of skirt you want to sew, and then measure the volume of your hips and waist.
Have you decided and measured all the sizes? It's time to move on to the second stage - patterns. You can use a ready-made pattern or make it yourself. Before cutting the fabric, be sure to wash it or steam it with an iron, this will prevent the fabric from shrinking during wear. We cut out the panel, belt and frills. When cutting the fabric, do not forget to add one and a half centimeters to each seam. This step will allow you to make a quality hem for the bottom of the skirt.

Our master class will describe and consider this stage in more detail.
- We take two cut panels and lay them on top of each other. Baste and stitch the side seams.
- We will need to overlock the edges of the seams and iron them. We fold the frills of the parts facing each other inward. Sew all side seams.
- The frill along the length of the hem must be gathered and sewn to the bottom edge. Sew the edges of the seams and iron the bottom. Sew all the frills around the bottom and make a hem.
- Add interlining to the waistband and sew all the edges together, fold them in half and iron all the seam allowances inside.
- We put the skirt into the belt, but leave a small piece of the seam uncovered. But we thread the elastic tape completely into the waistband. We finish the seam by completely sewing it up.
- The skirt we made with our own hands must be ironed.
The pattern of a gypsy skirt is not as difficult as it seems. Even a beginner can easily handle it. The main detail here is a pair of circles and a belt. A pair of circles consists of one large one and another smaller one at its center.

To create a pattern, we take a newspaper or tracing paper, canvas, pencil, scissors, chalk, compass and ruler.
- In order to determine the size of the circumference, measure the hips and add five centimeters to the resulting size. Maybe a little less. The outer radius of the hem of the skirt depends on the length you would like to achieve.
- The gypsy skirt pattern is made in two parts. The cut details are in the shape of a semicircle.
- When you measure the dimensions, be sure to leave a small allowance, from half a centimeter to one and a half centimeters.
- The size of the allowances depends solely on what kind of fabric you use. You don’t have to worry too much and just make a pattern of one-fourth of the inner radius.
- Try to use bright and colorful fabrics. Skirts made from fabric with a pattern look very good.
- If you are using a plain fabric, be sure to add some brightly colored braid or ribbon.
- If the skirt is made for dancing, then do not forget about the petticoat. A petticoat is a skirt that has a straight shape and is also the same color as the skirt. Try to make it such a length that it does not hinder your movements and does not interfere with your movement.
- The fabric must be as light as possible. A gypsy skirt made of heavy fabric will be very heavy.
- Make the pattern for the belt detail the same width as the rectangular shape. And the length of this form should be equal to the radius of the main canvas.
- Be sure to remember to add six centimeters to the hem of the edge of the belt and fastener.
- When cutting, do not forget to lay out the fabric in one layer and smooth out all its folds. In this case, the side seam should lie parallel to the cut edge. The belt is drawn on the working fabric along an oblique line.
Video on the topic of the article
Below you can watch some very interesting videos on sewing gypsy skirts.
The enticing gypsy dance does not allow you to take your eyes off you, largely thanks to the bright skirt, which seems to repeat all the movements of the performer. It seems that sewing such a thing is very difficult, but in fact it is not so. It’s just that such a model will require a lot of fabric, especially if it is sewn for an adult girl. This thing looks good on almost any figure. It’s easy to sew with your own hands, even for a beginner. How to sew a gypsy skirt with your own hands? — Patterns can be found on any needlework website. And then you need to choose the material for sewing and purchase threads that match the color, bias tape and interlining. We will deal with all this in this article.
Choosing material
Gypsy skirts are usually made of bright material that does not wrinkle or show through. Suitable:
- atlas;
- staple;
- rayon;
- polyester based fabric.
To sew a gypsy skirt with your own hands, the color of the material is usually taken with a floral pattern.
Important! Fabrics with geometric patterns are not suitable here. You can take a plain material and decorate it with contrasting color ribbons, beads, sequins or embroidery. For the lining, you can use fabric that matches the color, but from a cheaper material.
What is a gypsy skirt?
- Most often, such a thing is a wide, long model, sewn in a “sun” style, with a frill at the bottom.
- The frill can be slightly gathered or represented by several flounces cut on the bias.
- The belt is sewn of medium width, usually without elastic, so that the product does not slip during the dance. For rigidity, it is treated with non-woven fabric and a zipper is sewn in. You can make a belt with ties on the side.
Important! If you still want to sew in an elastic band, then use one that is not very thick and not very narrow.
- In order to give the product pomp, the bottom needs to be treated with fishing line.
Important! What can be added to such a thing?
- If this is part of a themed costume, then it is usually complemented by a tight-fitting short blouse that covers the stomach.
- Instead of a blouse, you can choose a regular T-shirt and complement it with accessories. This costume goes well with a brightly colored shawl, large beads, earrings, and bracelets.
- In cold weather, the suit can be complemented with a long knitted sweater.
How to make patterns?
Before you make patterns and sew a gypsy skirt with your own hands, you need to take measurements - measure the waist, hips and length of the product. Further:
- To create a pattern, you need to calculate the internal radius. To do this, the waist circumference is divided by 6.28. For example, your waist size is 63 cm. Dividing this figure by 6.28 we get 10 cm. This will be the radius for one circle skirt. But the style of such a model requires two such “suns,” so we divide this radius by two more. The result is 5 cm, which we mark on paper.
- From the inner radius we set off the length of the product and draw the second radius. We will get either two semicircles or a quarter of the “sun”. In this case, when cutting, the fabric will need to be folded in four.
- If we take the width as 150 cm, then for one copy we will need from 9 to 13 meters of fabric. From this fabric you will get two “suns” and there will be more left for a frill.
- For the belt, cut out a rectangle from the main fabric and another similar one from non-woven fabric.
- The size of the main fabric should be 4 times the length of the item. And the length of the frill is 2 times the hem of the finished product.
Sewing stages
How to sew a gypsy skirt with your own hands? The following stages can be distinguished when sewing:
Fabric cutting:
- We attach the pattern to the material and outline it with chalk.
Important! Don't forget to leave seam allowances.
- Cut out the main parts.
- Cut out the frill and belt.
Making the main part of the skirt:
- We fold the panels with their right sides facing each other.
- We sew their side seams.
- Sew the edges with an overlocker.
Sewing the frill:
- The lower part of the frill needs to be folded and stitched. Or you can finish it with bias tape.
- The ruffle strips sewn together must be gathered and sewn evenly to the main part of the skirt.
Residual work
The main work is done, all that remains is to sew on the belt and petticoat, if provided in this model. Decorate the product if it needs it, wash and iron it.