How to make a pencil holder. DIY pencil holder: how to quickly and beautifully make a convenient organizer for writing instruments (85 photos)
Organizer, pencil holder, stationery stand - different names for one item. A simple subject, but at the same time important. Thanks to a pencil holder, your desktop is kept tidy and the necessary items are always at hand. Vintage, stylish or bright - it can become an interior decoration!
You can buy a stand at a stationery store or order a custom model. But if you love to create or you have children, then this article is for you! In it we will discuss how to make a pencil holder with your own hands.

Paper pencil holder
Paper is a wonderful budget material for crafts! The art of origami wonderfully develops children's brains - it is a real puzzle. There are quite a few options for pencil holders made of paper - from a simple quadrangular box to complex modular (consisting of several elements) variations.

Reference! Modular origami, unlike classical origami, involves folding figures from several sheets of paper. Each sheet is folded into a separate element (module), then the parts are connected by gluing or inserting one into the other.


Step-by-step process for creating a modular pencil holder of a simple design:
- You will need 6 sheets of thick, shiny, bright, double-sided square-shaped colored paper (can be of different colors), scissors, glue.
- Take one square of colored paper. Fold it in half.
- Unfold the sheet and fold it in half the other way. Unfold the sheet again.
- Place the edges of the sheet to the center line, press the folds. Expand the sheet.
- Place the opposite edges to the second center line and press the folds into place. Expand the sheet. The result was a kind of marking into 16 equal squares.
- Fold all four corners, placing the corner to the nearest intersection point of the folds.
- Lay two strips with curved corners to the center line.
- Turn the rectangular shape over backwards.
- Fold the short sides up, placing them towards the center line. The result is a square with a diamond-shaped figure in the center.
- Insert the left strip into the triangular pockets of the right strip until it stops to form a three-dimensional triangle.
- Press all three folds of the triangle again. The first module is ready!
- Follow the same pattern for the other five elements.
- If desired, you can insert a corresponding sized piece of colored paper of a different color into the diamond-shaped window of each volumetric triangle.
- Glue six modules together. Pencil holder with six compartments is ready!

Cardboard pencil holder
There are quite a few models of cardboard pencil holders - from simple ones to real works of art.

Template option. The easiest option is to find an origami box template of the shape you like on the Internet, download, print and cut it out. Transfer the contours of the template and fold lines to the cardboard, cut along the contour. Fold the template along the fold lines. Apply glue to the shaded parts (the so-called allowances) and glue them to the base.


Vintage masterpiece made from cardboard paper towel tubes
- You will need 3-4 pieces of cardboard tubes, strong glue, scissors, and a lot of decor.
- Make the tubes different in height. Cut cardboard circles of the required diameter for the bottoms, glue the bottoms to the tubes.
- Cover the outside of the tubes with vintage wallpaper or fabric; you can do decoupage. Decorate with roses, lace, ribbons, pearl beads.
- Prepare a round or fancy-shaped solid base from self-adhesive foam board. Remove the backing from the foam board that protects the adhesive side. Place the base with the adhesive side on the satin material, trim off the excess fabric along the contour, and melt it. Glue thin knitted lace along the contour.
- Glue the tubes with their bottoms onto the base in different places.
- Complete the composition with a vintage bird, a miniature in a frame, or a scattering of artificial pearls!


Pencil holder made from a jar
When it comes to do-it-yourself pencil holder models from a jar, there are countless options!

For girls
You will need a pineapple tin, scissors, glue, and decorating materials.

Cover the tin can with pink corrugated paper or fabric. Girdle the top, bottom and center of the jar with beautiful lace or ribbons, gluing them.

Glue tracks of rhinestones or pearl beads on top of the lace and ribbons. In the center, on the front side, glue a mini-composition of cut out lace elements, satin ribbon roses and beads!

For boys
Cover the jar with shirt fabric with a thin stripe or small check print. On the front side, from top to bottom, glue a row of shirt buttons.

Cut a plain rectangle from felt with a length equal to the circumference of a tin can - this is a collar. Glue the collar along the inner edge of the can, bend it outward. You can complement the composition with a mini tie!

The above examples of organizers made from scrap materials are just the beginning of a long list of possible models. Ice cream sticks, stale markers, floppy disks, toilet paper tubes, shampoo bottles, plastic bottles - photos of various pencil holders show that the list of available materials can be continued endlessly. Create, move from simple to complex, and who knows what masterpiece you will be able to create one day!

DIY pencil holder photo


September 1 is just around the corner, the time when all children go to school, and students go to technical schools and higher educational institutions, the time has come to gain knowledge. Students spend most of their time in educational institutions, but they also spend just as much time at home preparing and doing homework.
 In order for the acquired material to be better consolidated in an educational institution, you need a comfortable and beautiful workplace at home. Of course, a desk and a comfortable chair are important, and it is also very important that everything you need is always at hand. A desktop stationery set - a keeper of pens, pencils, erasers, paper clips and other such important little things - should cope with this task.
 In this article, the News Portal “site” has prepared especially for you the best selection of the most original stands for pens and pencils, which you can easily make yourself from scrap materials. You can use this homemade stand for pencils and pens yourself, or you can give it as a gift to your girlfriends or friends, brothers or sisters.
DIY stand for pencils and pens

Necessary materials:

- threads;
- scissors;
- plastic jar;
- wooden popsicle sticks;
- brush and glue.
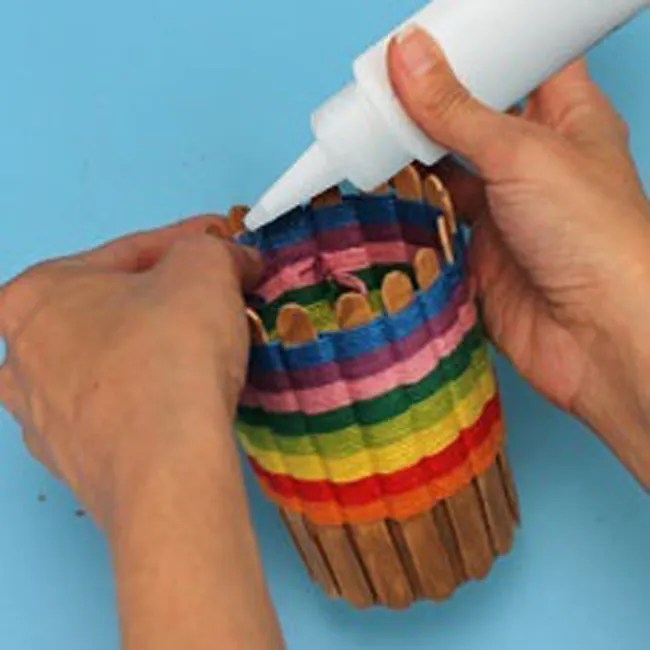
Manufacturing:
We cut off the top of the plastic jar so that the bottom remains and a few more centimeters up. Using glue, glue the wooden sticks to the plastic jar (see photo).
 Now we intertwine wooden sticks with multi-colored threads, filling the voids with threads.
 Use threads of different colors, then the pencil holder will turn out especially bright and unusual.
 You can decorate the finished pencil holder with rhinestones, interesting stripes or buttons.
DIY pencil stand made from a tin can
DIY stand for pencils and pens made from newspaper tubes

Necessary materials:
- newspapers or magazines;
- cardboard toilet paper roll;
- glue;
- cardboard;
- double sided tape;
- threads;
- acrylic paints.
Manufacturing:
Make tubes from newspaper or magazines and coat the ends with glue to prevent them from unraveling.
 Using glue, glue the newspaper tubes vertically onto the cardboard roller. For more security, tie them together using threads.
 Make a shaped bottom for the pencil holder from a sheet of thick cardboard (it can be a flower, a leaf) and glue the bottom with double-sided tape.
 Now you can decorate the pencil holder and the bottom.
 You can decorate a finished stand for pencils and pens using different elements - grass cut out of paper, leaves, flowers, etc.

Stand for pencils and pens from the telephone directory

Necessary materials:
- thick book (telephone directory);
- glue;
- acrylic paints;
- cardboard toilet paper rolls;
- cardboard;
- scissors or stationery knife.
Manufacturing:
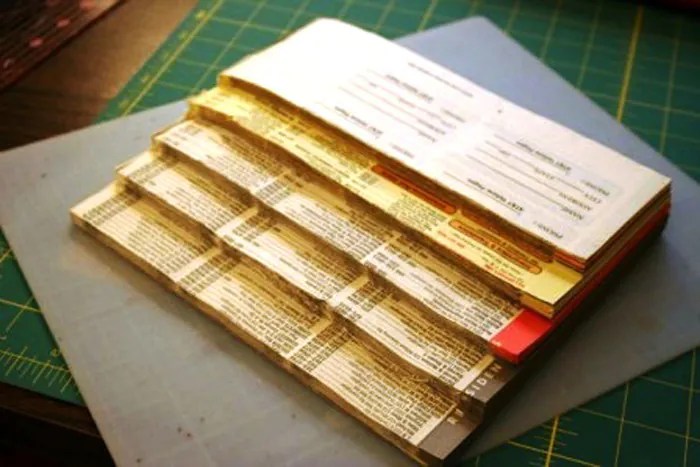
We cut the telephone directory and wrap the pages into cardboard rollers, fixing everything with glue. We cut out a shaped bottom from a sheet of thick cardboard and glue it to the finished structure. Now you can decorate everything with acrylic paints.
 If you cut a telephone directory into pages of different heights (see photo), you can end up with an original and unusual pencil holder, different in height.

DIY gold pencil holder
Stand for pencils and pens from a tin can

Necessary materials:
- tin jar;
- textile,
- glue;
- decorative braid and ribbons.
Manufacturing:
We measure the tin can and sew a cover for it from a scrap of fabric you like. Covers the fabric with beautiful ribbons and braid. We put a cover on the jar.
We tuck the edges of the cover inside and glue them with glue.
Stand for pencils and pens made of mosaic

Necessary materials:
- can;
- a piece of foam;
- primer;
- stationery knife;
- acrylic paints;
- glue
- cement mortar, sealant, or putty.
Manufacturing:
First of all, you need to apply a layer of primer to a previously cleaned tin can of dirt.
 Using a sharp knife, cut out squares from a sheet of foam plastic that need to be decorated with colored acrylic paints.
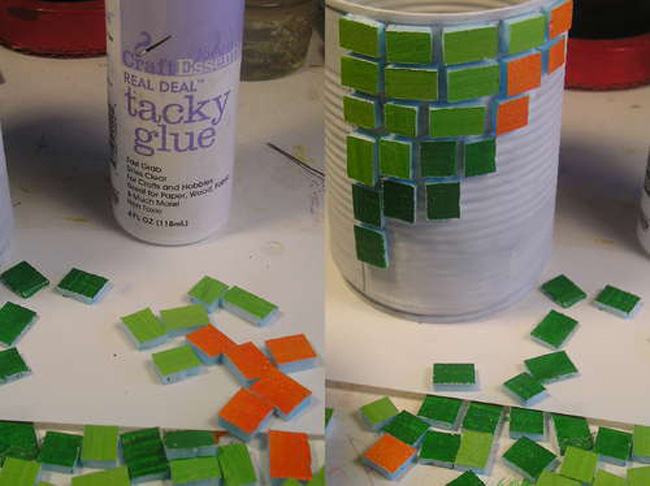 We glue the decorated foam plastic pieces to the tin can with glue, not forgetting to leave gaps between them.
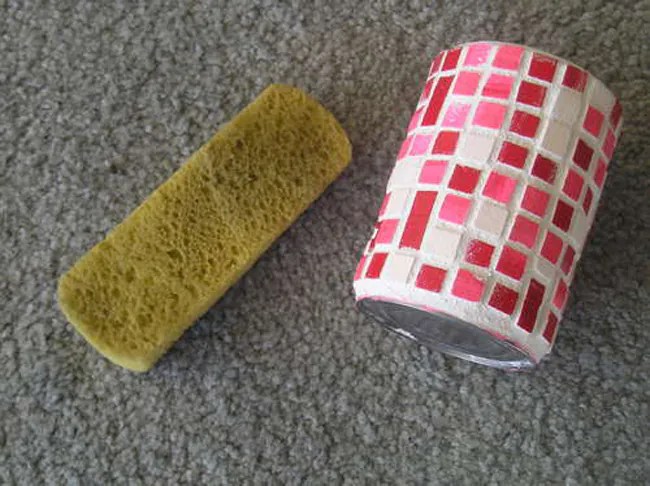 Now fill the cracks with primer using a regular sponge. All excess is wiped off and the pencil holder is ready.

DIY tumbler stand for pencils
Stand for pencils and pens made of thread

Necessary materials:

- can;
- threads;
- glue;
- buttons, braid, ribbons and bows for decoration
Manufacturing:
The tin can must be carefully wrapped with multi-colored threads, periodically coating them with glue so that they do not unwind later.
Now you can start decorating. Decorate the pencil holder with buttons, beads, decorative braid and rhinestones.
A stationery stand is a simple but very important accessory. Thanks to it, your desktop will be in order, and you can easily find the tool you need. Making it yourself is not at all difficult. Here are just a few options.
To maintain order on your home desk, you can make stands for pencils, pens, scissors and other office supplies.

A pencil stand will allow you to always keep writing objects at hand, rather than looking for them in the corners of bottomless desk drawers.
DIY stand for pencils and pens made from newspaper tubes
This technology appeared relatively recently, but has already gained popularity. Required tools and materials:
- newspapers;
- glue;
- scissors;
- cardboard;
- varnish or paint (optional).

There are different ways to work with newspaper tubes.
The first, the most elementary, is as follows: a sheet of newspaper or magazine is wound diagonally onto a knitting needle. The edge is smeared with glue and pressed to secure it. If you make such tubes from sheets of a glossy magazine, then you don’t have to paint them - you’ll get a cheerful variety of colors.

You can involve children in making a pencil holder, who will bring something new and interesting to its design.
Then the resulting “semi-finished product” is glued to a base (cardboard glass, juice box) and, if desired, covered with paint or varnish.
A more interesting option, thanks to which sculptures are created from newspaper tubes, is weaving.

The process is very similar to wicker weaving.
The base of the pencil holder can be made of cardboard, or it can be woven like the bottom of a basket. Of course, it will take time to make an interesting model. Even a beginner can do a simple glass.
The finished stand is coated with PVC glue. And then, if desired, they can be painted.
The technology is very economical.

Allows you to get rid of stashes of old newspapers and create an interesting thing with your own hands.
Paper pencil
Rolls from paper towels or toilet paper are used as a base. Having measured the diameter of the sleeve and its height, we cut colored paper for finishing.

We decorate the sleeves with paper.
Then we glue the parts in random order and attach them to the base. For the base, it is better to take a sheet of thick cardboard.

If desired, the pencil holder is decorated with multi-colored paper flowers.
Stand for pencils and pens from the telephone directory
Required:
- directory;
- sharp scissors;
- glue;
- paints;
- paper towel roll.
The directory needs to be cut, the pages wrapped around the sleeve and the form secured with a paper holder.

We divide the flexible catalog into five identical parts.
Do this for all pages. Then glue it so that the shape is preserved.
Make a bottom (from cardboard or plastic) in the shape of the resulting flower and glue it. If desired, the stand can be painted.

If the directory is cut into fragments of different heights, the result is a very impressive little thing.
DIY gold pencil holder
To create such a masterpiece you will need:
- metal jars or cases of different sizes (plastic containers or pipe scraps are also suitable);
- glue;
- base (board or metal plate).
- "golden" paint.

Although we are not talking about real gold, this model looks very stylish.
The containers are placed on the base in random order, glued, and then the entire structure is covered with “golden” paint.

It will decorate any desktop and accommodate all the necessary tools.
Stand for pencils and pens from a tin can
It turns out that you can build a very original thing from a tin can, a piece of cloth and glue. The technology is simple.

If desired, add various decorative elements.
First, take measurements from the jar. We are interested in circumference and height.
Then we sew a fabric cover. We decorate it with braid.
We place the jar inside the cover, and tuck the edges of the fabric inside and fix it with glue.
And this is what we get as a result.

As they say: simple and tasteful.
DIY tumbler stand for pencils
The tumbler pencil is made from a tin drink can. To do this, use sandpaper to remove the paint from the can. Then melt lead (about 80 g) and pour it into the bottom of the jar from the outside. When the metal hardens, it is carefully removed and glued to the bottom with the convex side out. The jar is then coated with paint and used for pencils.

The lead “stand” will prevent the pencil holder from falling.
Stand for pencils and pens made of thread
DIY pen stand made from a tin can, threads, decorative elements and imagination. An ordinary jar is covered with a layer of glue and wrapped with threads (either the same color or multi-colored).

If you want something unusual, you can use different accessories purchased at a craft store.
The product is then decorated with buttons. This is the most budget option, since there are extra buttons in every home.
Another option. For the work you will need multi-colored threads, it is better if they are not very thin. As well as ice cream sticks and a cardboard or plastic cup.

When the last row is completed, fix the tip of the thread with glue.
We cut the glass so that the height from the bottom is 3–5 cm. Then we glue sticks to it along the entire circumference, and pass multi-colored threads around the sticks.

Thanks to the bright colors of the threads, the pencil holder turns out to be very “cheerful”.
Balsa wood discs
Several wooden disks are glued together and holes are drilled in them. Perhaps the creation of this model will require minimal effort. And it looks very stylish.

If desired, the stand can be made from several pieces of thick plywood.
High-tech style stand
Old floppy disks (5 pieces) are connected to each other using cube-shaped plastic fasteners.

An unusual design solution.
Cardboard tube
Rolls from paper towels and toilet paper are wrapped in paper of different colors or painted, and placed inside the box in any order.

For greater stability, the bottom of the box is coated with glue.
Burlap case
The technology is similar to creating a stand from threads. Only the jar is decorated with a strip of burlap and decorative braid.

Glue a piece of burlap onto a tin can and glue flowers formed from light linen fabric around the perimeter of the neck.
Block stand
It’s easy to make a pen stand from a wooden block: you need to drill holes of the required size and in the required quantity in the workpiece.

We saw off a small part from dry wood with a saw, then use a drill to create many holes in the upper part of the stump, into which we install pencils.
Pencil pencil made from sewer pipes
The remains of pipes of different diameters are cut along the bias to the required size. Do this with a sharp knife so that there are no nicks left. If necessary, the cuts can be carefully processed with fine sandpaper.

Using a jigsaw or hand saw, we cut sewer pipes of different diameters into small pieces.
The parts are glued together and the bottom is glued.
The finished stand can be painted or coated with clear varnish for shine.

We glue each of the segments in a row onto a short thin board.
The most ordinary workplace can be made unique with the help of a DIY stationery stand. It will be not only creative, but also a very convenient thing.
VIDEO: DIY stand for pencils and pens.
50 photos of unusual pencil holders:


Making a pencil holder. Master class with step-by-step photos.
Minaeva Elena Vitalievna, teacher of additional education, MAOU DO "DCC", Severodvinsk.
Description: The master class is intended for additional education teachers, educators, primary school teachers, primary school children, and parents.
Purpose: for organizing and decorating your workplace, as a gift.
Target: making a pencil holder using the parallel beading technique.
Tasks:
teach the basic stages of making and decorating the base of a pencil holder made of cardboard and paper;
teach the basic techniques of parallel threading with beads;
promote attentiveness, observation, and hard work;
develop a sense of color, logical thinking, imagination, fine motor skills.
At all times, people highly valued the outstanding external qualities of beads. Everyone has seen that beads are a very beautiful, durable and resistant material.
Working with beads is extremely popular. Many craftswomen create real miracles from it - magnificent paintings, luxurious jewelry, elegant household items.
In this master class we will try to touch the art of beading using the example of making a pencil holder. Let's feel the limitless possibilities of its use in the design of interior items.
Introduction to materials and tools.
Thick cardboard, white or light beige paper, a sheet of colored cardboard, beads No. 8 of different colors, beading wire, acrylic paint, a bristle brush, a piece of foam rubber, an acrylic outline, a pencil, a ruler, a glue pencil, transparent glue "Contact" or " Moment", scissors, rubber bands.

Safety precautions when working with scissors and glue:
While working, keep the ends of the scissors away from you;
pass the scissors closed with the rings away from you;
do not leave them open, place them on the table with the sharp end facing away from you;
Do not put glue in your mouth; if it gets into your eyes, rinse with plenty of water;
maintain order in the workplace.
Sequence of making a pencil holder.
1. We will make a pencil case from a piece of thick cardboard.
It is necessary to determine the size of the rectangle from which we will make the base of the pencil holder: in this case, the height is 10 cm, the length is 19 cm. The length of the rectangle depends on the diameter of the product (can, bottle, etc.), around which we will lay well-moistened cardboard.
Secure the cardboard with rubber bands. Dry.


If there is no thick cardboard, then you can use any ready-made cardboard tubes as a base.

The diameter of the bottom of the pencil holder is approximately 4 cm larger than the diameter of the base.
We cut it out of the same cardboard.


We glue the joint of the base of the pencil holder and additionally glue it around with a strip of paper.


We cut out rectangles from white paper, slightly larger than the height and length of the rectangle of the base of the pencil holder and the diameter of the bottom. We crumple the paper well and then smooth it out.


We cover the bottom of the pencil holder and its base with crumpled paper. We glue the allowances to the wrong side, first making notches at a distance of 1 cm from each other.


The pencil holder is ready!
2. We make pencils from beads using the parallel threading technique.
Choose bead colors for pencils (green, red, yellow, orange, blue).
We string 3 beads onto the wire: 1 green, 2 white. We close the wire into a ring and, with the opposite end, stretch it through 2 white beads. Tighten the wire in the middle.


We string 3 white beads onto one end of the wire. We pull the second end of the wire through these beads in the opposite direction. We tighten it.


Similarly, we make the next row of 4 white beads.

Subsequent rows are made similarly from colored beads. There are 4 beads in each row.

In the last row, the ends of the wire are connected, twisted tightly, cut (leaving a tail of 5 mm) and bent to the wrong side.


Schematic representation of the sequence of making a pencil from beads using the parallel threading technique.

The number of pencils and their length is determined by the size of the pencil holder.
In this case:
5 multi-colored pencils, which have 9 colored rows of beads (wire length 30 cm);
5 multi-colored pencils, which have 14 colored rows of beads (wire length 40 cm);
5 multi-colored pencils, which have 19 colored rows of beads (wire length 55 cm)

3. Decorate the pencil holder.
Choose acrylic paint of a suitable color.
Using a fairly wide bristle brush, pick up some paint and leave any excess on a piece of paper. Using an almost dry brush, we move vertically along the base and bottom of the pencil holder.


We paint all the edges with acrylic paint using foam rubber.


From colored cardboard of a suitable color, cut out a rectangle 9.5 cm by 20 cm.

We paste this rectangle over the inside of the pencil holder.
Glue the bottom of the pencil holder to the base.


The pencil holder can be decorated with an acrylic outline.

We choose the sequence of arrangement of pencils on the pencil holder.

We string beaded pencils onto the wire in the chosen order (pull the wire into the sixth row from the bottom). We collect beads between pencils to fill the space between them. The number of beads is determined individually.
You have to use a variety of pens and pencils everywhere: at school, at university, in the office, at home. Often, all kinds of felt-tip pens are added to the most popular stationery products and How to organize a workspace for a child and an adult? You can, of course, buy special cups and pockets for such little things in the store, however, homemade things will bring a special note of comfort and style to the interior of a home room or office. People make amazing, and most importantly, unique things with their own hands. Why don't you try it too? Perhaps some of the ideas below will come in handy.
Country chic
A unique item for organizing the storage of stationery can be made from a simple piece of wood. To do this, you don’t even need to have specific skills or have extensive experience working with the material. Just find a piece of wood that suits your shape and size, and drill as many identical holes in it as you need. Sand the edges with sandpaper. That's all - the pencil stand, made with your own hands from scrap materials, is ready.
Second life of garbage
In Europe and the USA, an innovative trend in handicrafts has become widespread - creating crafts from all kinds of garbage and waste. And indeed: if you look closely, many things that are regularly thrown away can be easily adapted to practical needs. A great example is cardboard tubes used for toilet paper and paper towels. These are ready-made parts waiting for their finest hour. This tube of suitable diameter makes an excellent pencil holder. With your own hands you can create not just a useful thing and interior decoration, but also a nice gift for a friend. Just grab a paper towel tube, a small piece of thick cardboard, brightly colored yarn, felt, tape and glue. Measure the diameter of the tube opening and cut out a corresponding circle from cardboard. Glue the bottom of the cup to the base using clear tape and decorate it with a piece of felt. Then begin winding yarn around the cup, alternating different colors as desired. Glue it with regular glue. Upon completion of the work, decorate the item with any rhinestones, beads, or felt appliqués. You have now created a stylish pencil holder with your own hands.

Original children's craft
Even a child can make a simple stand for all kinds of stationery. If one of the parents works in an office, such a craft will be a cute and touching gift from a son or daughter.
The basis of the work will be any unnecessary metal can. If you choose to use a paint or canned food can, make sure the sharp edges are properly dulled. Take some nice wrapping paper or a piece of fabric and carefully wrap it around the metal base. The only thing left to do is decoration - you can decorate the gift in any way. By adding your loved one's initials to the decor, everyone can see that the DIY pencil holder was made as a gift. Similarly, creative people add personality to glass jars used for canned vegetables or fruits.
Flight of fancy

In fact, you can adapt almost any thing to store office supplies. If you regularly use only a couple of pencils and a couple of pens, and you are not interested in how to make a pencil holder with your own hands from scrap materials, take an ordinary clothes brush and try sticking a pencil or felt-tip pen into the bristles. You'll be surprised how firmly the bristles of such a humble household item can hold office supplies. Even small scissors can be stuck into such a “stand”.
Do you want to create a truly unique item? Use your imagination - and it is quite possible that you yourself will be able to give recommendations and share amazing ideas on the topic of making practical things.