How to sew a blouse: patterns and master classes. Sewing blouses for girls Pattern school jacket 9 years
Every fashionista has a cute blouse in her wardrobe. If this item is sewn with your own hands, it acquires exclusivity. A well-chosen blouse can add playfulness and coquetry to a woman’s look. Depending on the style and color, such clothes can be combined not only with a skirt and business trouser suit, but also with shorts. Before you start sewing, you should decide on the model and style.
How to sew a blouse with your own hands?

To create an exclusive item yourself, you will have to be patient and persevering. There are both complex models that require a lot of time, and simple options that, despite their primitiveness, look no worse.
At the initial stage, you will need a pattern, to create which you need to measure the circumference of the waist, chest, and shoulders. For simplicity, it is recommended to divide the results in half. For a summer blouse, it is advisable to choose a loose model, made of lightweight, air-permeable material. For the cold season, you should take care of purchasing thicker fabric. When the grooves are ready, you should begin the sewing process itself.
We sew a chiffon blouse according to the pattern
The recess can be drawn on paper, the sheets of which are glued together. The pattern is then cut out and transferred to the fabric. First, a vertical line is drawn, the length of which is equal to the distance from the shoulder to the bottom of the product. Three horizontal lines are also needed: chest, waist, hip lines. Their length is a quarter of the measured value plus another 5 cm.
Important! For clothes with set-in sleeves, you will need to measure the width of the front part, which will allow you to determine the depth of the armhole.
It is also necessary to draw a neckline, draw a shoulder, tilting it about 5-10 degrees. The side seam requires special attention. It is important to make a smooth connection of three lines, bring it onto the sleeve, bringing it to the armhole, and draw the second seam.
Below are patterns for a long sleeve sweater.


The undercut of a sleeveless chiffon blouse has the form of rectangles, the side seams of which are cut off and rounded at the armholes. This is the most ideal option for a product made from this material, since it has the property of “creeping”. It is enough to make four seams, as well as process the bottom and throat.
Below is a sleeveless chiffon blouse pattern.

On a note! For chiffon products, it is recommended to use a thin needle to avoid beating the fabric. For such a sweater, it is better to choose a loose style. It should not fit tightly to the figure. Chiffon tends to electrify, so it is recommended to use an antistatic agent.
The following actions are performed:
- Using pre-made patterns, the necessary parts are cut out of the material.
- The elements of the blouse are sewn together, the side seams are basted, ground down, and then finished with an overlock stitch.
- The edge of the sleeve, like the bottom of the product, is turned up and ground down.
- The neckline is swept away, ground down, folded in half in the opposite direction, and ironed. The facing is stitched inside.
The blouse is ready.

If this option seems too complicated for you, try the blouse pattern in the photo below.

How to sew a blouse quickly and easily - sew a blouse from an old shirt
It is possible to sew a product from an existing wardrobe item, for example, from a classic cut shirt:
- A top of suitable size is applied to the shirt, the neckline and armhole are cut out. Both parts are pinned together.
- During fitting, parts where undercuts are required are chipped. Using a plate, the neckline is adjusted.
- The cut sleeves of the shirt are tapered to the required size. Then the blouse is turned inside out and the sleeves are fitted. If they fit, they can be sewn on.
- To create a cuff, a rectangle is cut out of fabric, folded in half and sewn on the wrong side. The upper part, which acts as an internal edging, is turned away and ironed.
- To process the bottom edge, it is turned up approximately 1 cm and pinned. Then it is stitched. The jacket can be turned right side out and the seams can be ironed.
You can add decorations and various accessories to the finished product at your discretion.

No matter how much we want to extend the summer, it is inexorably approaching the end, which means that very soon our children will go to school, where new discoveries, impressions, favorite teachers and, of course, classmates await them. The first of September is a real holiday of knowledge, and to make this day even more desirable, we invite you to sew this lovely school blouse with a lace frill for your girl. In it, she will feel like a real young lady, and it is known that all ladies approach any task very responsibly, including studying. So, excellent grades will be guaranteed, to the delight of parents! In this tutorial we offer you one of the simplest blouse patterns for girls, with a minimum of seams - all the luxury of this model is contained in a lace frill, on top of which an elegant brooch is pinned.
IMPORTANT! The frill is sewn separately and fastened with buttons or loops to the stand-up collar.
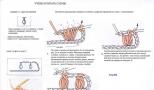
Copy the pattern of the back and shelf onto tracing paper. The length of the product along the back depends on the height of the child and is determined independently. The back is cut out without changes. On the shelf from the middle line, set aside 1.5 cm (3 cm) to the right and left and draw two vertical lines of a one-piece plank. Then set aside another 3 cm to the right and create a one-piece allowance for processing the strip.
Pattern of a frill for a blouse for a girl
Place point A on the paper. From point A, draw a horizontal line to the left with a length of AA1 = 7-8 cm (the value may vary depending on the size of the blouse).
From point A, draw an arc about 15-20 cm long, place point B. From point B, draw down a perpendicular with a length of BB1 = 12-15 cm (the value may vary depending on the size of the blouse). Connect points A1 and B1 with a smooth arc.
Cut a bar for attaching a frill measuring 5 cm x 11 cm from the main fabric and duplicate it with an adhesive pad (Fig. 1). Calculate the length of the strap in this way: 4 cm (going under the right side of the collar) + 3 cm (width of the finished blouse strap) + 4 cm (going under the right side of the collar). Cut the frill from lace fabric with a fold.
Rice. 1. Pattern of the back, front and frill for the blouse
Pattern of sleeves, collar and cuffs for a girl’s blouse
Re-install the sleeve without changes and shorten it by 2.5 cm (1/2 the width of the cuff). Construct the sleeve cuff pattern as shown in Fig. 2.
IMPORTANT! This model does not have a sleeve cut for a fastener, but if you want to make one, increase the increase in the length of the cuff by 2 cm, mark a 10 cm long cut on the sleeve (the cut is located in the center of the left half of the sleeve).
Rice. 2. Modeling the sleeves and collar of a blouse for a girl
Create a pattern for a round stand-up collar according to the instructions at the link: Pattern for a stand-up collar
How to cut a school blouse for a girl
Rice. 3. Pattern of a school blouse for a girl - cutting details
Rice. 4. Details of the blouse cut: sleeve, cuff, collar
How to sew a school blouse for a girl
Sew the sleeves along the seams, gather at the bottom to the length of the cuffs. Stitch the cuffs along the short sides, fold the reinforced side with the sleeves along the allowances and stitch, fold the cuffs in half, fold the allowances and stitch along the edge of the hem.
Sew the sleeves into the armholes, slightly fitting along the edges. Fold and stitch the seam allowance at the bottom of the blouse. Sew out the loops on the right placket and sew buttons on the left.
How to sew a lace frill
Sew a thin strip of scalloped lace along the rounded edge of the piece. Gather the frill lace detail along the top edge (or add small folds). Fold the allowances along the long side of the plank on both sides. Fold the strip in half with the right side inward and stitch along the short sides. Turn it inside out and iron it, place the lace piece inside the placket, align the placket seam allowances with the jabot details, baste the placket along the bottom allowances and hand-sew it with blind stitches. Sew small buttons or baste loops at the ends of the strip. Sew 2 buttons (or flat buttons) onto the stand-up collar according to the marking (mark 1 on the shelf).
You will find even more interesting ideas on the children's clothing website. Subscribe to our free lessons and sew clothes for your children with us!
 In this post I will share a simple and quick way to sew a simple summer blouse with your own hands. In 30 minutes, in an hour, or in 2 hours - it depends on your speed and experience in sewing, and also the fabric from which you will sew.
I’m also a “millimetre” guy 🙂, I sew for a long time, so the entire sewing of this blouse, from preparing the fabric to the finished result, took me about 2 hours. Well, the fabric is not very simple - it’s a staple, it slides and warps.
In general, the blouse is really extremely simple! No patterns, darts, etc.! 2 lines – and you’re done :)

I bought 60 cm of staples for her, with a width of 150 cm. And all the fabric went into the blouse, no scraps! Very convenient :)
I saw the principle of such a blouse a long time ago in one of the second-hand items. I then admired the simplicity and effectiveness of this thing. Then I came across similar blouses on the Internet.

Dotted lines show machine stitches
And then “unexpectedly” 🙂 summer came, I wanted a beautiful new thing. But I didn’t want to bother with sewing it for a long time, but just like that, once it was done.
So, how to quickly sew a summer blouse without a pattern
Light flowing blouse fabrics are suitable for such a blouse. As I already said, this is a staple for me. For summer, the staple is very convenient, it is hygienic and very pleasant to the body.
Since the blouse itself is very simple, it is better to choose a fabric with a beautiful color. There is a rule: the simpler the model, the more beautiful the fabric should be. And vice versa: the more interesting and complex the model (more seams, details, etc.) - the easier it is to take the fabric. The main beauty of this blouse is the fabric.
How much fabric is needed: one blouse length. I repeat, this is what I have: 60 cm with a fabric width of 150 cm.
Cut out blouses
Fold the fabric in half and cut it into 2 rectangles. I got the size of the rectangles: length 60 cm, width 75 cm.
 If you want the “sleeves” to be longer (as in the photo), you need to take 2 lengths of the blouse. And then the width of the rectangles will be larger - up to 150 cm, and thus “long sleeves” will be obtained.
1 rectangle will be the back, the other will be the shelf. And on the shelf you need to deepen the neck (to make your neck comfortable).
To do this, fold the shelf in half, the fold will be the line of the middle of the shelf. From the top edge we put 3...4 cm down along the fold, put a mark - this is the depth of the neck.

Along the top edge, set aside the width of the neckline. The neck width is determined as desired. Mine is 14.5 cm. You can make it wider or narrower. But it is important to remember that the neck is made wide, like a “boat neck”, or deepened. And the head must pass through it, otherwise you will have to make a fastener.
When we have determined the width and depth, we draw a smooth line for the neck of the shelf.
Now the shelf and back are cut out.
How to sew a summer blouse
Everything is simple here. First you just need to process all the sections of the shelf and back.
I processed the sections with a frequent zigzag: stitch width 2...3 mm, stitch length (frequency) 0.7...1 mm. For each fabric, you need to determine the stitch width and length individually, using a trial method.

You can zigzag all sections of the back and front. But I decided to sew the bottom of the blouse (the lower edges of the back and front) with a narrow (Moscow) hem seam.

How to make a narrow seam: fold 5-7 mm to the wrong side, stitch 1...2 mm from the edge. Very carefully use scissors to cut off the excess fabric as close to the stitch as possible (it is important not to damage the stitching). Then fold it again and place the 2nd line between the inner fold and the 1st line. This way, the cut of the fabric remains inside, and the hem itself turns out narrow and neat.

I used the same seam to sew the neck of the shelf.

But, I repeat, it can also be processed simply with a frequent zigzag, like the rest of the cuts. It all depends on your fabric. And if the neckline of the shelf is quite rounded and deepened, a narrow seam can tighten the fabric.
When all the sections have been processed, all that remains is to sew the front and back together.
First along the top edge - the shoulder seams. You can sew them completely - from the neck to the edge of the “sleeves”. Or you can leave holes, and the shoulders will turn out semi-open. I left such holes, and along the upper edge I only placed bartacks (I laid triple stitches 1.5-2 cm long): along the edge of the neckline, and at the ends of the shoulder seam. And she left her shoulders open.

The dotted line shows machine tack stitches.
Depending on the “length of the sleeves” you can place such fastenings in different areas. For example, along the edge of the neckline, in the middle of the shoulder seam and at the ends. Or leave the ends open. And the blouse will look a little different.
And all that remains is to lay those same 2 lines.

Dotted lines show lines
Turn the blouse right side out. Align the back and shelf, matching the side and bottom edges. Directly along the front side we mark and lay 2 vertical lines on the sides - these are the side seams.
How to determine at what distance to lay the side seams.
You need to measure your half-chest girth: measure yourself with a measuring tape at chest level (A tape measure runs horizontally around the body, through the most protruding points of the mammary glands). Divide the resulting value in half and add 2-4 cm - this is an increase in the freedom of fit.
For example: we measured ourselves, we got 96 cm. Divide in half = 48 cm. Added 3 cm = 51 cm. Now we divide these 51 cm in half again, = 25.5 cm.
Find the line of the middle of the blouse (center). We set aside 25.5 cm from the middle in both directions. And at this distance we draw vertical lines parallel to the line of the middle. The side seams will run along them.
How to determine the length of the side seams
The side seams go from the very bottom of the blouse, but, of course, do not reach the top edge. Otherwise, where to put your hands :)
The distance from the top edge to the side seams is the length of the armhole. To determine it, you can measure the approximate distance from the shoulder seam to the bottom edge of the armhole using your clothing. Or ask someone to measure your armhole length, as in the photo (photo of a child, but an adult is measured exactly the same)):

You need to add 2-3 cm to the resulting measurement (an increase for the freedom of the armhole).
For example: on my blouse this distance = 23 cm. You can use this value as a starting point.
In any case, I highly recommend basting the side seams first. Try on a blouse. And see if the width of the blouse and the depth of the armhole suit you. If necessary, make changes: make the blouse wider or narrower, increase or decrease the depth of the armhole.
And only when you are completely satisfied with everything, sew down the side seams using a machine. And don't forget to make side seams at the ends.
That's all. New summer blouse is ready :)

And here are a couple more variations of a similar blouse:

I wish you success!
Sincerely yours, Olesya Shirokova
It is not always possible to find in a store exactly the item that you think will fit perfectly into your wardrobe and emphasize your individual taste. And sometimes even a simple thing costs much more than its “real” cost, which completely discourages purchasing it. Then cutting and sewing skills come to the rescue, which will allow you to easily and quickly sew a beautiful blouse or skirt. Let's learn how to sew a blouse, having a minimum of relevant skills and experience behind you.
Photos of types of blouses
Depending on the design features, blouses are divided into 4 types:
With set-in sleeves;

"Raglan".

With one-piece sleeve.

Without sleeves.

At the same time, the named classification is not the only one, because there are many options for sewing them: neck cuts, collars, cut-off yokes, decor and much more. The blouse can be romantic, office, casual or any other style, have an A-shaped, fitted silhouette, be asymmetrical or have a variety of trims. Therefore, it is worth determining for yourself what exactly you would like to see in the end - a summer blouse for every day in the style a la "Carmen" or an option for the office - a strict American one.
Blouse patterns by types of sleeves
Items with set-in sleeves are especially appreciated among women who prefer convenience and simplicity. Pattern of such a blouse:

Raglan sleeves are characterized by seams running from the armpits to the neck. American armhole is the second popular name for this cut of women's blouses, tops and dresses. American pattern:

A blouse with a one-piece sleeve looks very laconic, gives a feeling of lightness and can visually expand the shoulder line, so this option is well suited for women with wide hips and narrow shoulders. Pattern for such an item of clothing with a chest dart and a one-piece sleeve:

A sleeveless blouse is best suited for summer: such a chiffon item in a woman’s wardrobe will be indispensable in the summer heat.

All patterns provided can be downloaded for free and printed on a suitable sheet of tracing paper to make it easier to transfer directly onto the fabric.
Step-by-step description: how to sew a short-sleeved blouse
We offer the simplest option for sewing a blouse with a short one-piece sleeve in a T-shot silhouette. It is with this model that you can start sewing things for yourself. By choosing the right material, you can get a product for any season.

Another simple master class on sewing a blouse with short sleeves and a dropped shoulder can be seen in the following video.
Master class: how to sew a blouse with your own hands
Is it possible to sew a simple cut blouse without using patterns? You can, and now we’ll look at how to sew a new thing in just 1-2 hours. To do this, it is better to purchase a flowing blouse fabric (chiffon, staple or another of your choice) measuring 60x150 cm. It is better to choose a more interesting color, since the style of the product itself is very simple. The sewing principle is as follows:

The result is such an interesting thing for the warm season:

Many novice dressmakers have noticed that even with strict adherence to all the parameters of the pattern and step-by-step master classes, the product is not always the right size. To avoid such mistakes, you should know some tricks:
- learning to sew is worth using simple fabrics: wool, poplin, linen;
- You need to sew the product only after trying it on: this step makes it possible to adjust the parameters of the parts and adjust them to your figure;
- take any pattern as an idea, and always draw the diagrams yourself, calculating the parameters of the parts based on the characteristics of your figure;
- Before cutting, treat any fabric with a hot iron under steam - the material will shrink a little;
- We must not forget about the margin for freedom of movement - there are allowances for this;
- Before sewing any parts, their seams must be ironed again with steam - without this manipulation, the item will look sloppy after sewing.
Hello, dear needlewomen! There are many different clothes on sale, but many fashionistas prefer to sew blouses and dresses themselves. It would be useful for every woman to know how to sew a blouse with her own hands without a pattern.
How to create a stylish look
To create a fashionable, unique look, you need to learn how to sew different types of clothes with your own hands. Today we will learn how to quickly sew beautiful blouses of simple styles. By summer, you can sew a light blouse from chintz, silk, cambric, chiffon or linen.
For an evening option, it is better to choose chiffon. Chiffon makes airy, light, beautiful wardrobe items. Chiffon is a delicate, sophisticated fabric that requires special treatment. But if you are patient, you will be rewarded with a successfully sewn item.

Option for ladies with different builds.
Helpful tips for cutting chiffon:
- It is better to cut in one layer, since chiffon folded in two layers is difficult to keep from moving.
- First, draw the pattern on paper along with seam allowances, place it on the canvas, press it along the edges with weights.
- Trace with chalk, then carefully cut out. Material cut without distortions is a guarantee of a beautiful product.
- When cutting chiffon, work on a large table.
- The machine must be set to work with thin material, and the needle must be very sharp and thin.
- First, sew a stitch on a piece of material to get a perfect seam.
- To prevent the seams from bunching, make the stitch length no more than 2 mm.
- Choose the simplest pattern. Only experienced seamstresses can sew complex products.
It is easier to sew a product with a lining than without it. If you sew without a lining, then the edges can be trimmed with binding made of the same material.
Blouse with batwing sleeve
The bat is back in fashion! To add a fashionable item to your wardrobe, buy 2 pieces of material, 1.5 meters wide. Measure your hips and waist, sleeve length from neckline to hem, arm circumference below the elbow.

Step-by-step work:

- Fold the material in half “face” inward, then in half again.
- Draw the pattern onto the fabric itself. From the fold downwards we measure 2.5 cm and to the side - 9 cm, this will be the neck.
- From the neckline, measure the length of the sleeve and shoulder horizontally. Then from this bevel line we measure down 2.5 cm. We draw a line from the edge of the sleeve to the neck.
- Divide the circumference of the waist and hips into 4 parts and mark them along the corresponding lines.
- We connect the bottom of the future product and the edge of the sleeve with a curved line. Cut along the contour.
- We cut the front part of the neck a little lower compared to the back.
We sew the details. To process the neckline on the bias, cut out 2 strips of fabric, each 2.5-3 cm wide. They should follow the contour of the neckline. Sew to the neck. We bend the bottom of the blouse and sleeves in a zigzag. The sleeves can be finished with cuffs or a fluffy frill.
Using the following pattern, measure all dimensions on the fabric at once. For beginners, it is better to do it on paper.

One of the simplest patterns.

Option for unusual sleeves.

Quick pattern
The sleeveless pattern will help update the wardrobe of both a slender girl and a lady with curvy figures. It does not require precise fitting to the figure. You only need two pieces to get a new piece into your wardrobe, and, you can sew it in one evening.
For loose models, choose flowing fabrics so that the products do not restrict movement and hide figure imperfections. A simple model can be decorated with embroidery or appliqué. Thin ladies can add a thin strap.

Youth version

Blouse for ladies with full arms
Not all ladies can wear sleeveless clothes. To cover full arms, sew a model with a one-piece sleeve. They are suitable for any occasion. Modern young ladies prefer to wear it with a floral pattern, as well as in a plain version. Step-by-step sewing of comfortable products with one-piece sleeves.

First you need to choose the fabric. The simpler the better. You should not choose bulk material with intricate patterns of sequins or embroidery.

Taking measurements:
- chest circumference is measured at the highest points of the chest and shoulder blades;
- We measure the length of the product from the 7th cervical vertebra to the lower edge;
- Sleeve length – from the point where the forearm and shoulder meet.
For sewing, you will need a basic pattern, which every seamstress has. When cutting, do not forget to allow for freedom of movement at the bottom of the parts, starting from the sleeve - approximately 10 cm for thin fabrics.
Seam allowances:
- along the neck – 1 cm;
- at seams - 1.5 cm;
- at the bottom of the product – 4 cm.
The correct shoulder fit can be determined by a blouse that fits you well.

Detail for a perfect fit
This silhouette may have a problem - the fabric will be very stretched under the arm, and the seam allowances in the curved areas will begin to wrinkle unsightly. When sewing a blouse for overweight ladies, the risk of tearing will increase several times. To soften the tension, sew a gusset in the form of a neat diamond from the same fabric.
When sewing, the tops of the sharp corners should be directed towards the bottom of the blouse and sleeves, and the upper part of the blunt ones should be connected to the corners of the front and back.

The first fitting is done without a gusset. Make sure that the seams of the sleeves and shoulders do not move out of place.
- Next you should stitch the side, shoulder, upper and lower sections of the sleeves. Smooth seams and sweep.
- Sew the gusset into the hem only after stitching and smoothing the seams. Fold the edge of the gusset with the undercut of the front and back facing inward.
- Sew the diamond in from the side of the blouse so that the seam tolerances in the corners are the smallest.
- Place the gusset seam on both sides and smooth it with an iron.


Fashionable blouse for all ages
The wrap blouse has won the love of many women. Comfortable and beautiful, it is easy to sew and looks beautiful. The wraparound model has a front section consisting of two halves. One half overlaps the other. The scent pleasantly narrows the waist, giving the silhouette an hourglass look. To a simple pattern at the waist line, you can sew two belts, 5 cm wide, then tie them, as shown in the picture.


A flyaway from a square.

Dear fashionistas, by summer you will have time to sew several stylish original things to change your wardrobe every day. And every new thing always lifts your spirits!